First Update:key adding function for BMW F/G chassis models and free on X431 IMMO Scanners
Just upgrade your software with a single tap to enjoy the function!

Second Update: New software updates for SUBARU, PERODUA and VINFAST.


First Update:key adding function for BMW F/G chassis models and free on X431 IMMO Scanners
Just upgrade your software with a single tap to enjoy the function!
Second Update: New software updates for SUBARU, PERODUA and VINFAST.
If you need to replace a BMW MSD81.2 engine ECU (DME) with a used one, you can do so using the Launch X431 IMMO Plus/IMMO Elite. This guide walks you through reading the ISN (Individual Serial Number) from the original ECU, modifying the flash data, and writing the ISN to the replacement ECU to ensure compatibility with the vehicle.
The same procedure applies to MSD80, MSD85, MSV80, and similar models.
Step-by-Step Procedure


Done! The replacement ECU is now successfully cloned and functional in the vehicle.
In this guide, we’ll walk you through the process of repairing the BMW FRM3 module (footwell module) using the Launch X431 IMMO Plus. This tool now supports one-click repair for FRM modules, including the FRM3R module (9S12XEQ384 3M25J) used in BMW E87, E92, and E93 models.
Ensure all your tools are connected properly:
Once the connections are set up, power on the system:
The FRM3 module often loses EEPROM data due to low or insufficient battery voltage. Follow these steps:
Now it’s time to repair the corrupted EEPROM data:
Once the repair is completed:


With the repair process complete, your BMW FRM3 module is now restored and operational. Using the Launch X431 IMMO Plus and X-Prog3 programmer, you’ve successfully repaired the module with minimal effort.
Function description: 2019 VW Magotan MQB key matching
Supported products: Launch X-431 IMMO Plus/PAD
Tested models: 2019 VW Magotan MQB, VIN: LFV3A23C6J32***
Procedure:
1.Take IMMO Pro as an example. Enter the VW immobilizer and choose [Anti-Theft Key Matching], as shown in Figure 1.

2.Choose [Key Learning], as shown in Figure 2.

3.Connect the X-431 PROGIII and the connector, and choose OK, as shown in Figure 3.

4.Choose [MQB Anti-theft System], as shown in Figure 4.

5.Choose [Platform Mode], as shown in Figure 5.

6.Choose [Dismantle and read anti-theft data], as shown in Figure 6.

7.Choose [View Wiring diagram], as shown in Figure 7.

8.Choose [D70F3529], as shown in Figure 8.

The chip model D70F3529 is on the back of the instrument, as shown in Figure 8-1.

9.Choose [Pin-up wiring diagram], as shown in Figure 9.

10.Use USB to connect the diagnostic connector and tablet device, connect according to the wiring diagram, and select OK, as shown in Figure 11.


11.After the wiring is successful, choose [Read Chip ID], as shown in Figure 12.

12. The chip ID is successfully read and the wiring is normal. Select OK, as shown in Figure 13.

13.Choose [Back Up Complete Data], as shown in Figure 14.

14. Reading the data…Please wait, as shown in Figure 15.

15. It will read FLASH and EEPROM data in turn, please wait, as shown in Figure 16.

16. After the data is read successfully, enter the name of the saved file and select OK, as shown in Figure 17 (the Chinese name is not supported for the time being).

17. Select the save path and select OK, as shown in Figure 18.

18. Confirm the save path and select OK, as shown in Figure 19.

19. Select [Flash&Eeprom Data Decryption], as shown in Figure 20.

20. Select the instrument data read before and select OK, as shown in Figure 21.

21. The parsing is successful. Record the CS code of the car and select Confirm, as shown in Figure 22.

22.Choose [Generate Dealer Key], as shown in Figure 23.

23. Put the original car key into the programmer and select OK, as shown in Figure 24.


24. The original car key is successfully read. Put in the blank key that needs to be matched and select OK, as shown in Figure 16.

25.Choose [VW], as shown in Figure 26.

26. The dealer key is successfully generated. Select OK, as shown in Figure 27.

27. After restoring the instrument, install it on the car, connect the device to the car, and choose [Learn Key], as shown in Figure 28.

28. Enter the number of keys to be learned and select OK, as shown in Figure 29.

29.The current key is a smart key. Select Yes, as shown in Figure 30.

30. Keep the key in the sensing area on the right side of the steering column and select OK, as shown in Figure 31.
31. The instrument displays 0-2 and enters the learning mode, as shown in Figure 32.

32. The first key is successfully learned, and the instrument displays 1-2, as shown in Figure 33.

33. After the first key is successfully learned, directly replace it with the second key and paste the second key on the sensing area, as shown in Figure 34.

34. The second key is successfully learned, and the instrument displays 2-2, as shown in Figure 35.

35. After the data is saved, the function is completed, as shown in Figure 36.

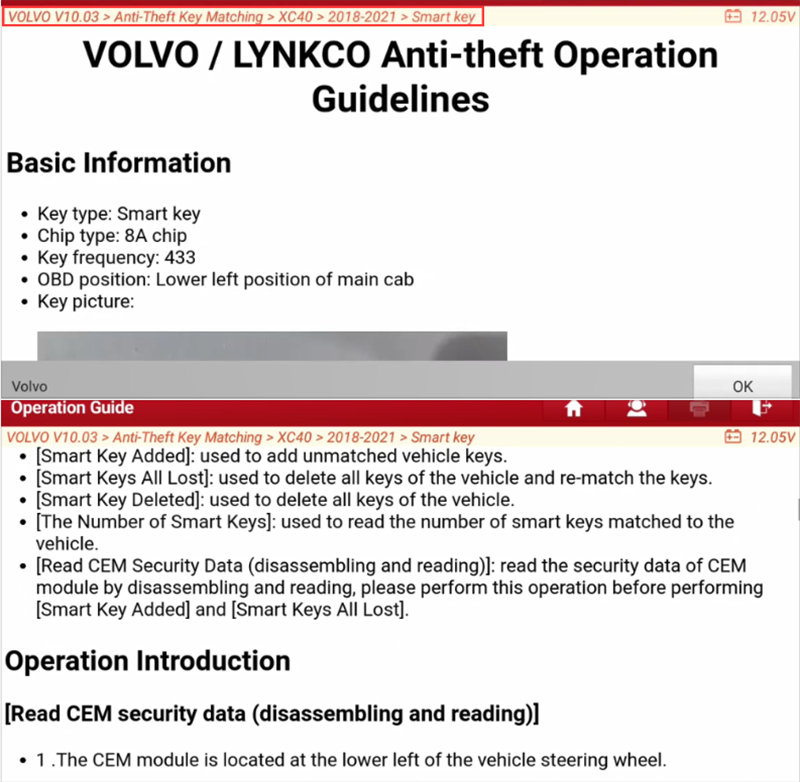
To add smart keys to Volvo XC40 2018-2021 using Launch X431 IMMO Elite/IMMO Plus, you can follow the simple steps outlined in the “IMMO Prog” function. The entire process takes approximately 3 minutes.
First, select the Volvo option in the menu, and then choose the newest version V10.03. From there, navigate to the Anti-Theft Key Matching section and select XC40 as the specific model for key matching. Make sure you choose the correct year range, which is 2018-2021.
Before proceeding, it is recommended to check the Volvo/Lynkco anti-theft operation guide provided by Launch X431 IMMO Elite/IMMO Plus. You will find an operation introduction and a wiring diagram that you can refer to throughout the process.
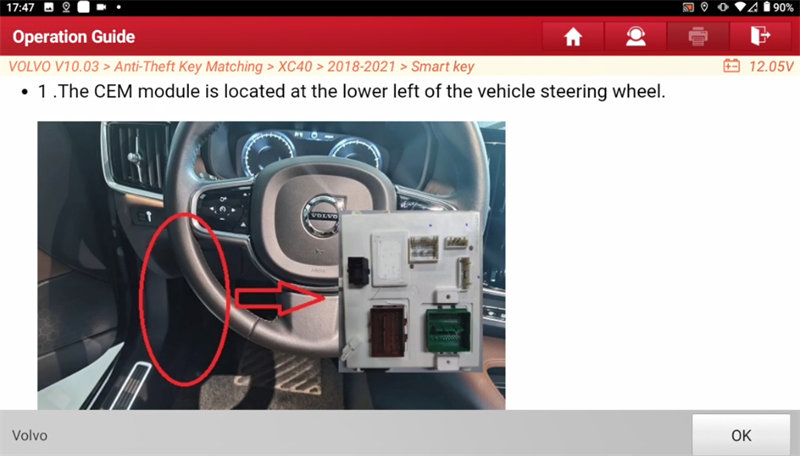
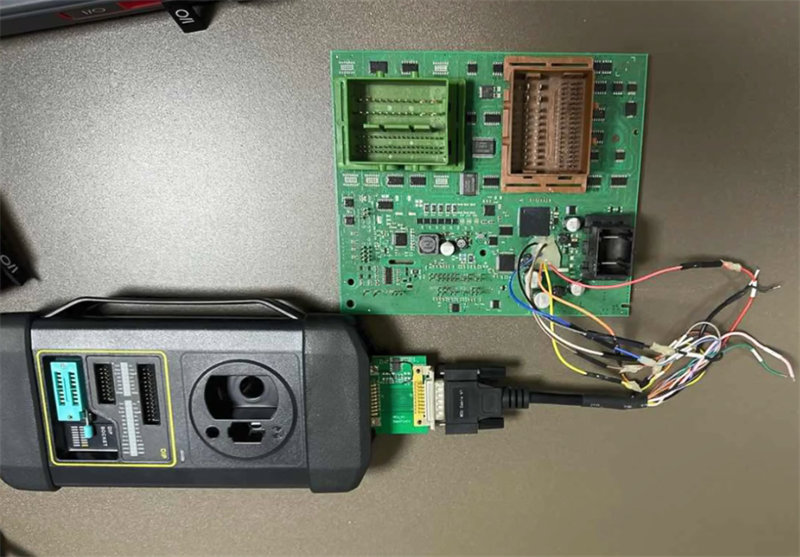
To add a key, you will need to remove the CEM (Central Electronic Module) module from the vehicle. Follow the provided instructions carefully to ensure a proper and safe operation.
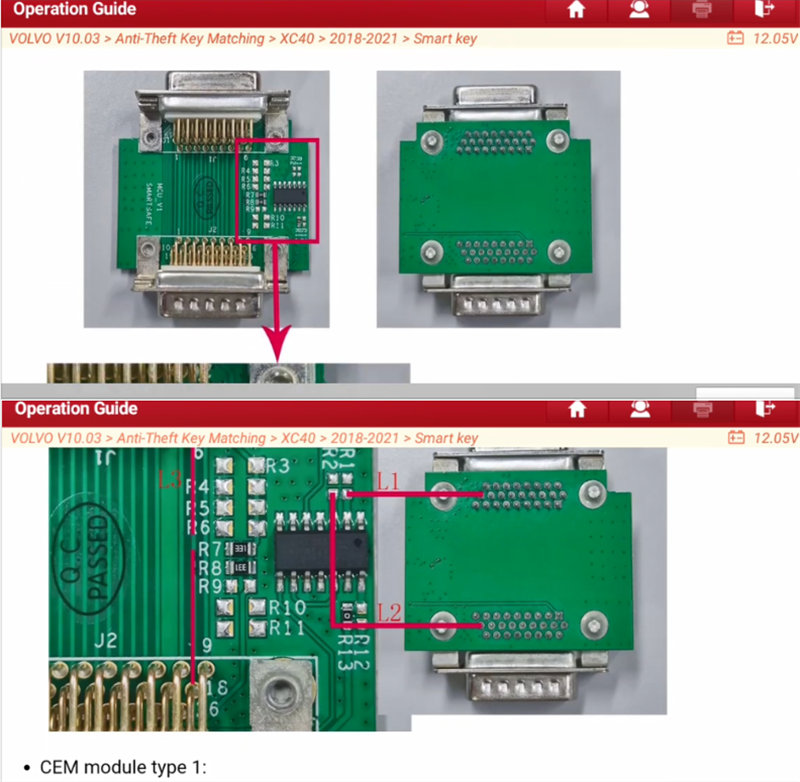
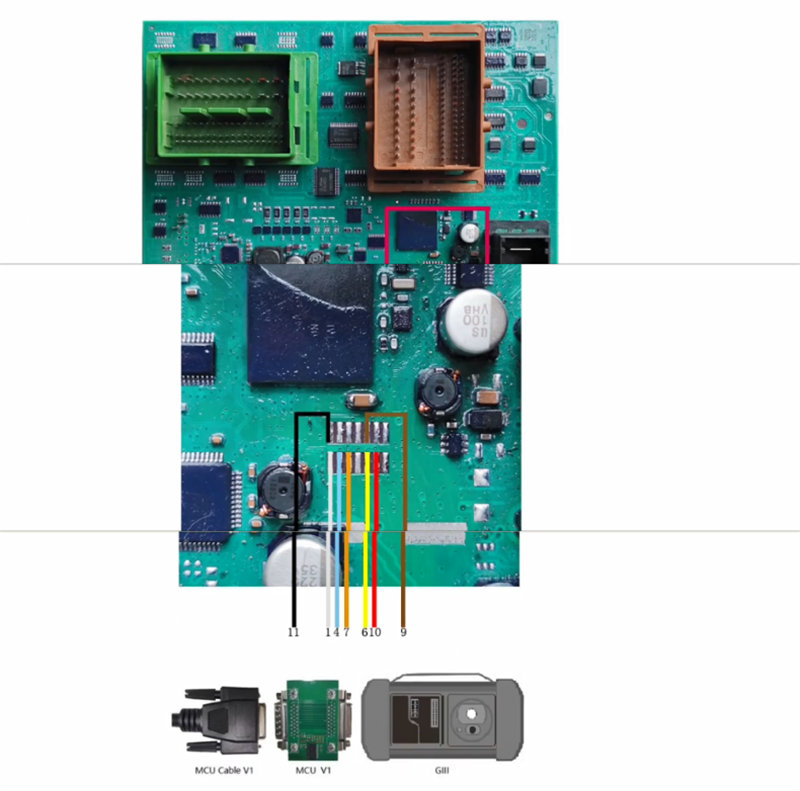
After removing the CEM module, you need to connect the Launch X–Prog3 key programmer to the module using the MCU V1 and MCU cable V1, following the provided wiring diagram.
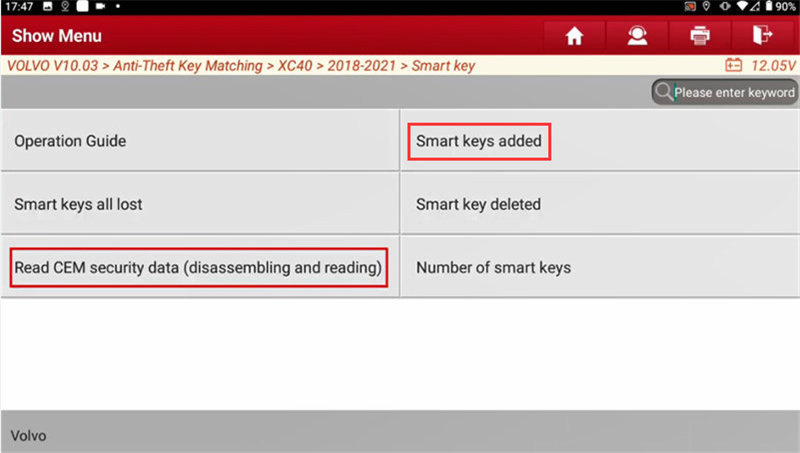
Once the connection is established, you can start reading the CEM security data and adding the smart key. Select the “Read CEM security data (disassembling and reading)” option and pay attention to the prompts on the screen.
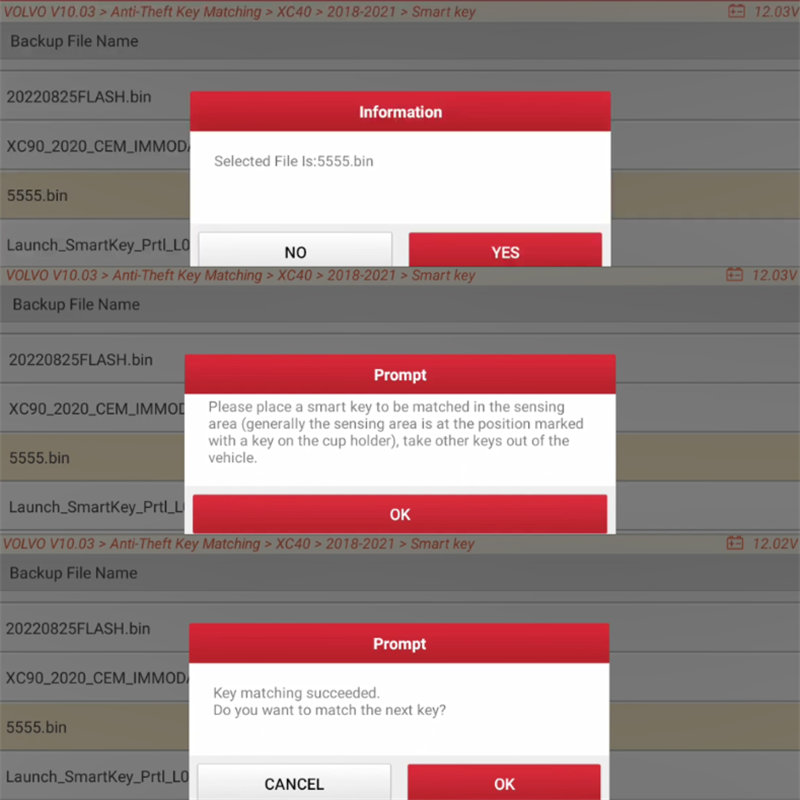
Make sure to save the vehicle immobilizer data after reading it successfully. This step is crucial for the key matching process.

Next, select the “Smart keys added” option and follow the prompts on the screen. Turn the START knob to the right once and release it, and load the CEM security data that was just read.
To complete the key matching process, place the smart key to be matched in the designated sensing area, usually marked with a key symbol on the cup holder. Ensure that there are no other keys inside the vehicle during this step.
If everything is done correctly, you will receive a confirmation message stating that the key matching was successful.
In addition to Volvo XC40, Launch X431 IMMO Plus/IMMO Elite is also capable of successfully matching anti-theft keys for Volvo S40 2004-2012.
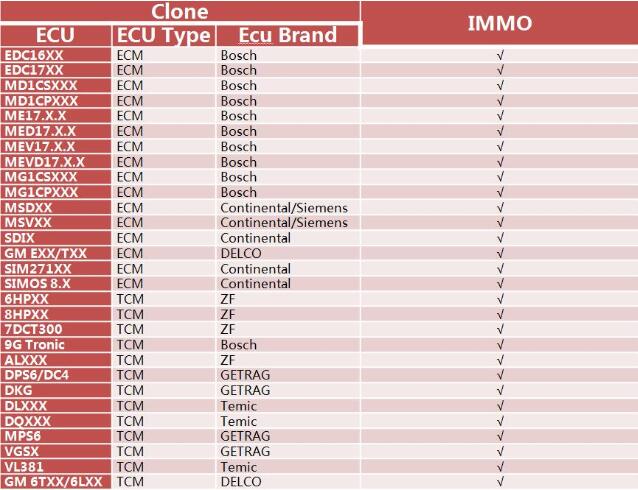
Launch X431 Xprog3 with GIII is used to program Benz/BMW/VAG/Porsche keys and clone or replace ECU/TCU modules.What’s the difference among Launch X431 IMMO Plus,IMMO Elite,X431V+ and X431 PAD VII with Xprog3 ?
In sum:
IMMO Plus has the same key programming and ECU/TCU clone functions as IMMO Elite.The difference between these two is that IMMO Elite has basic diagnostics but IMMO Plus has full diagnostics
IMMO tablets support newer vehicle immo programming,i.e Volvo pre-2022,Toyota pre-2022,X431 V+ and PAD VII do not.
PAD VII supports online programming, others do not.
To clone or replace ECU or gearbox TCU with X-prog3,your tablet should have the ability to connect via USB.Lanuch X431 V+ only connects via Bluetooth, so X431V+ with GIII can not clone ECU/TCU.
Launch X431 V+ Bluetooth Connection Launch X431 IMMO Plus USB Connection
Xprog3 Support ECU/TCU Clone Type