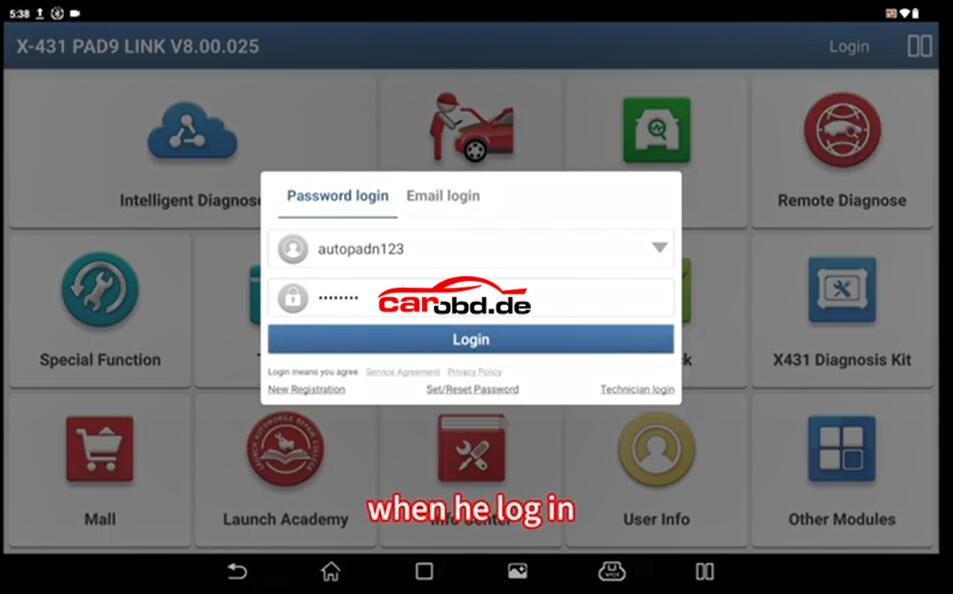
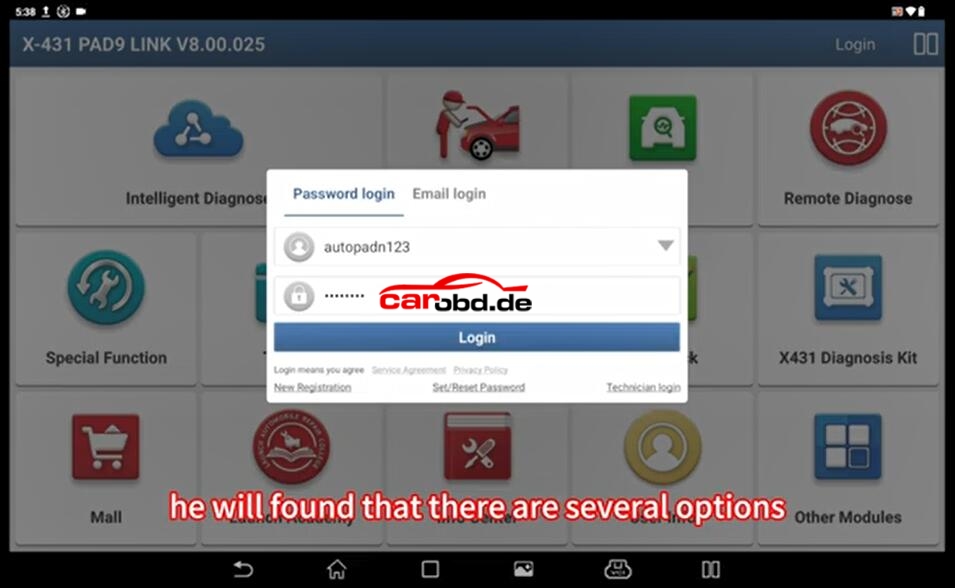
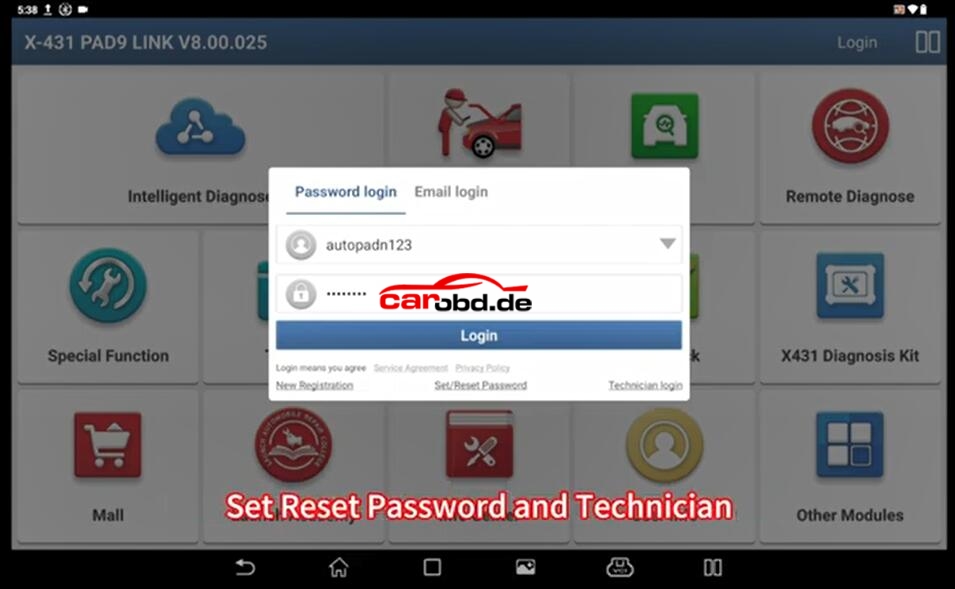
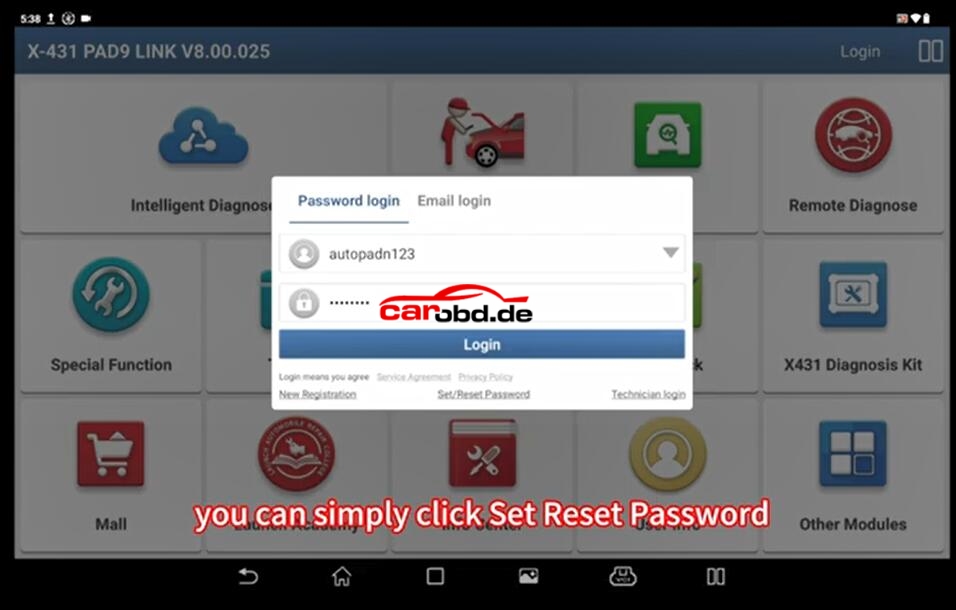
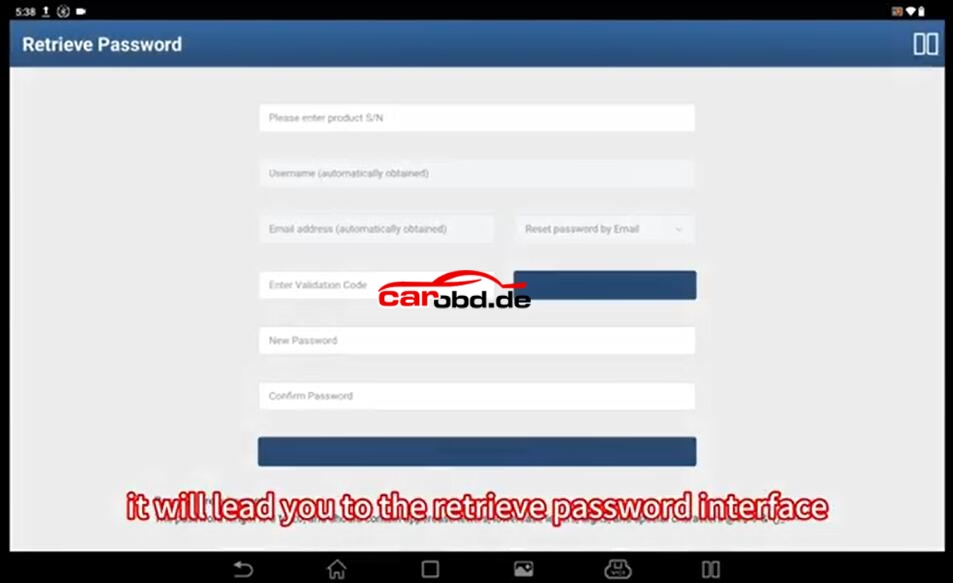
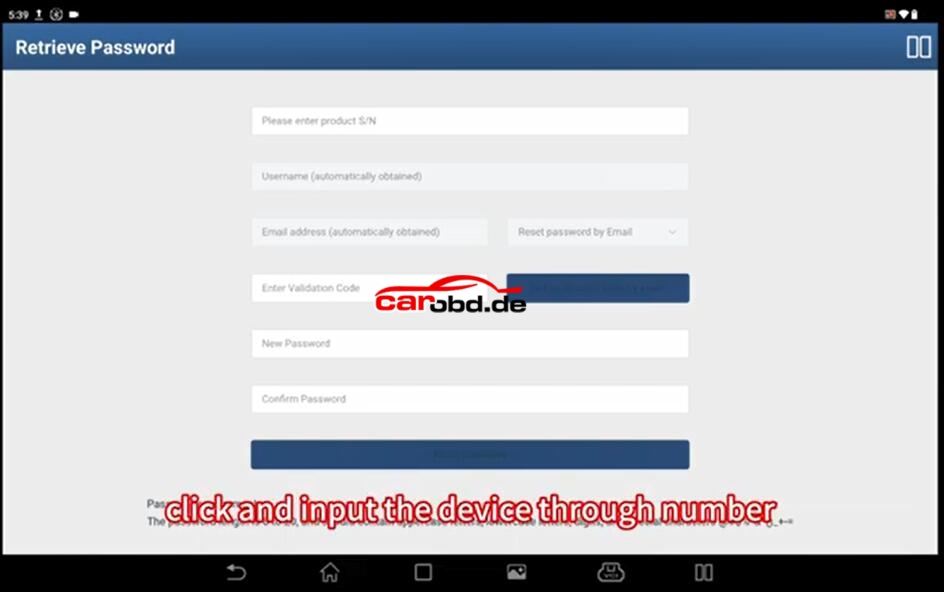
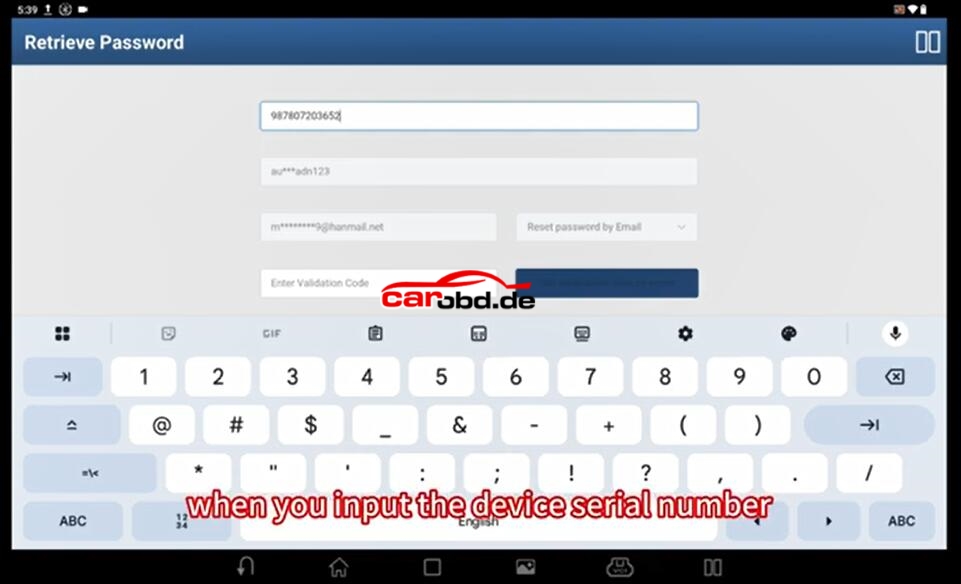
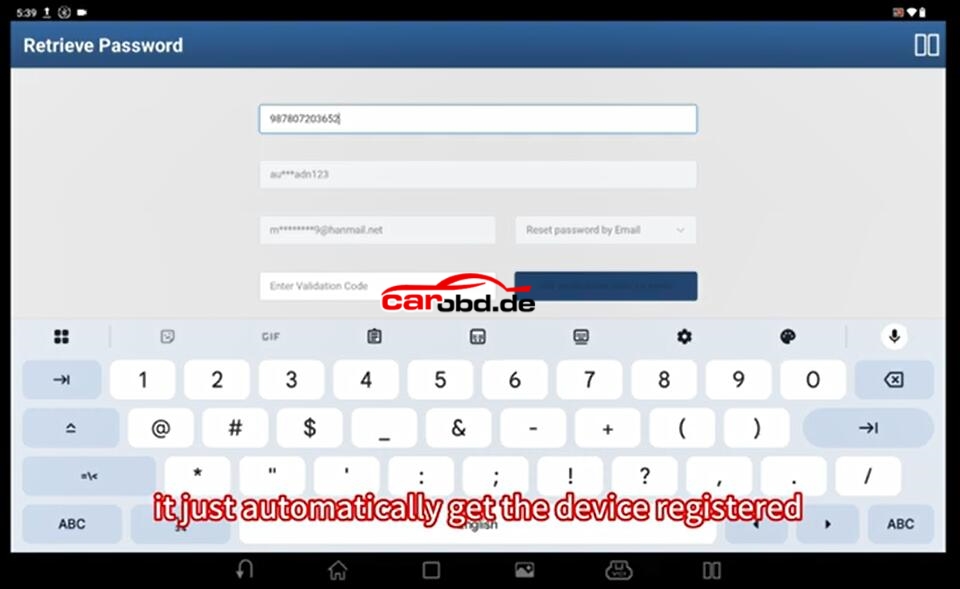
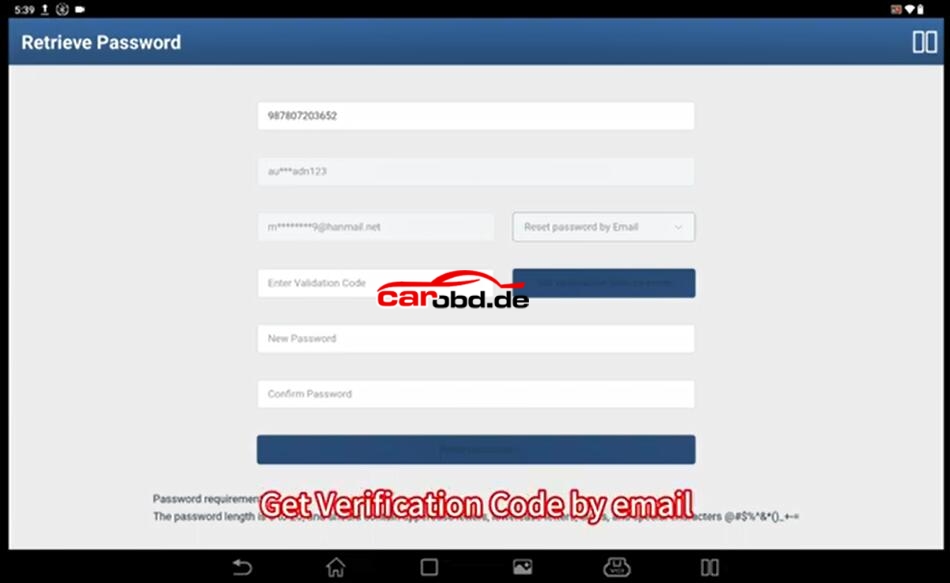
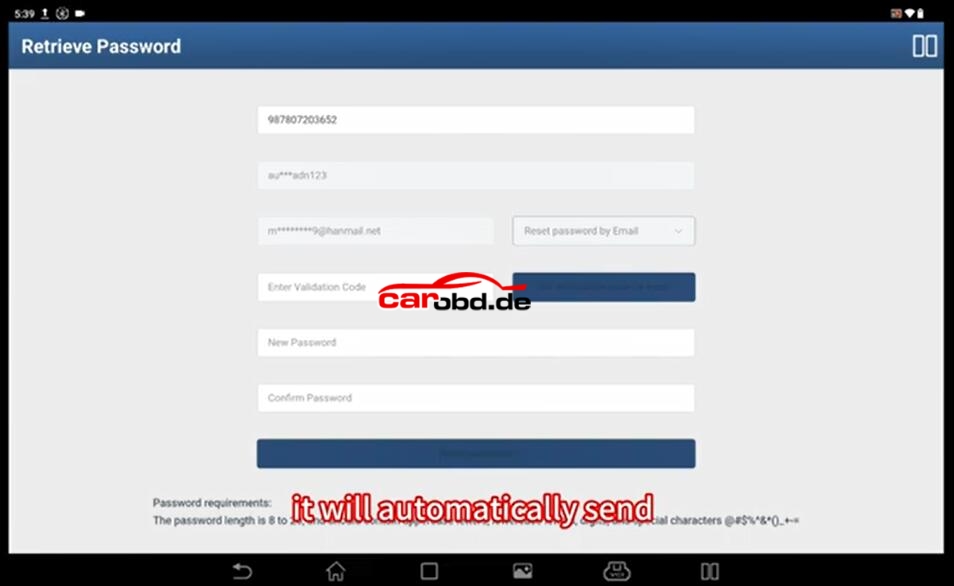
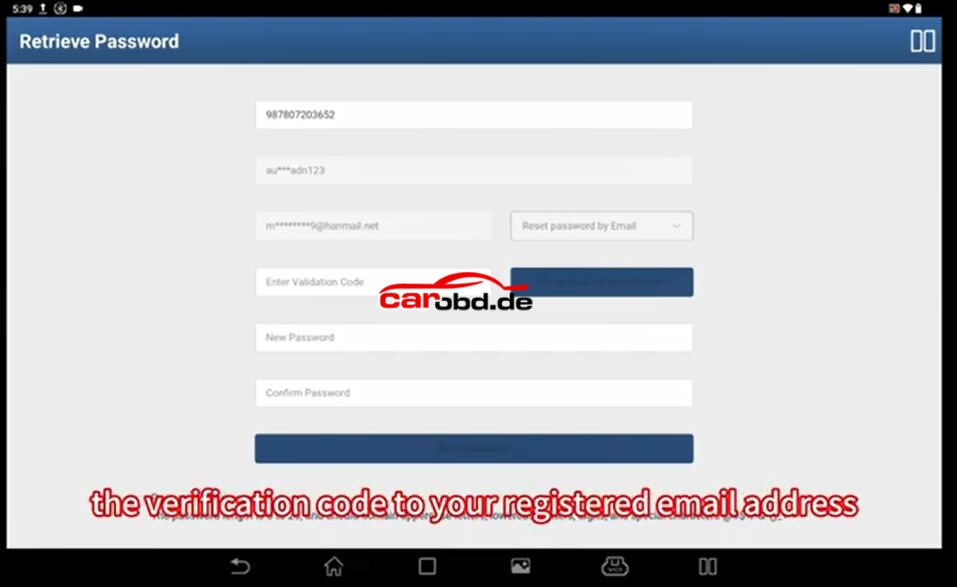
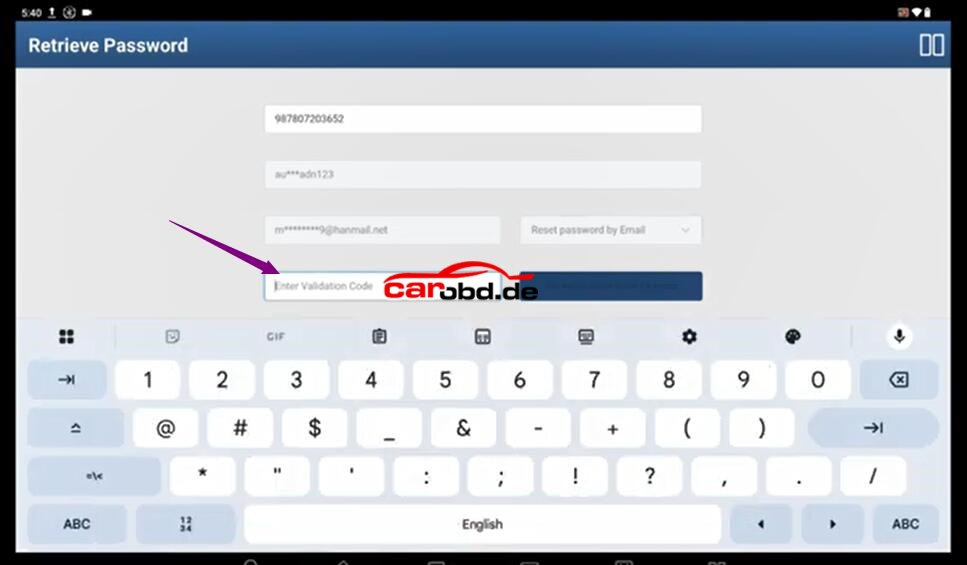
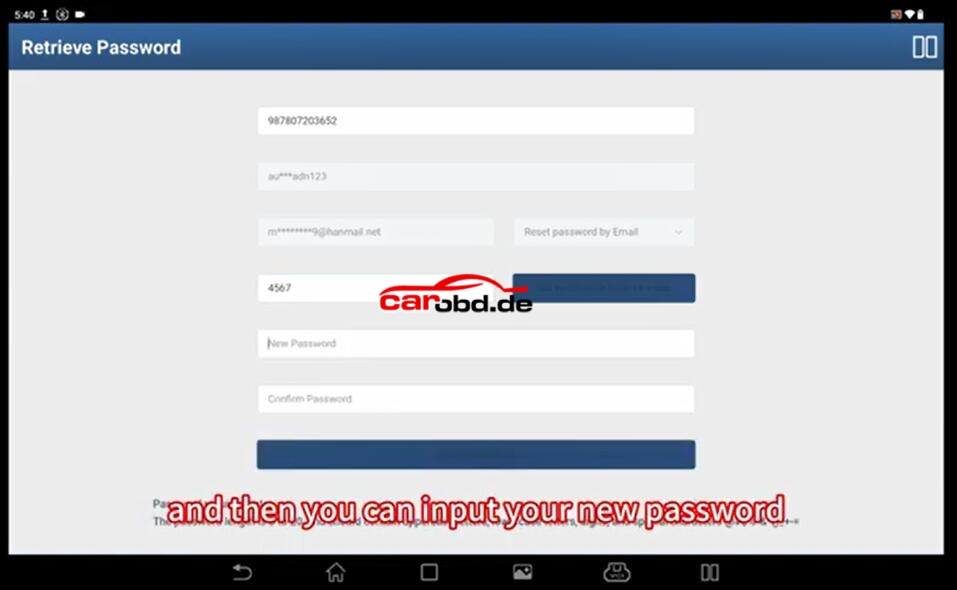
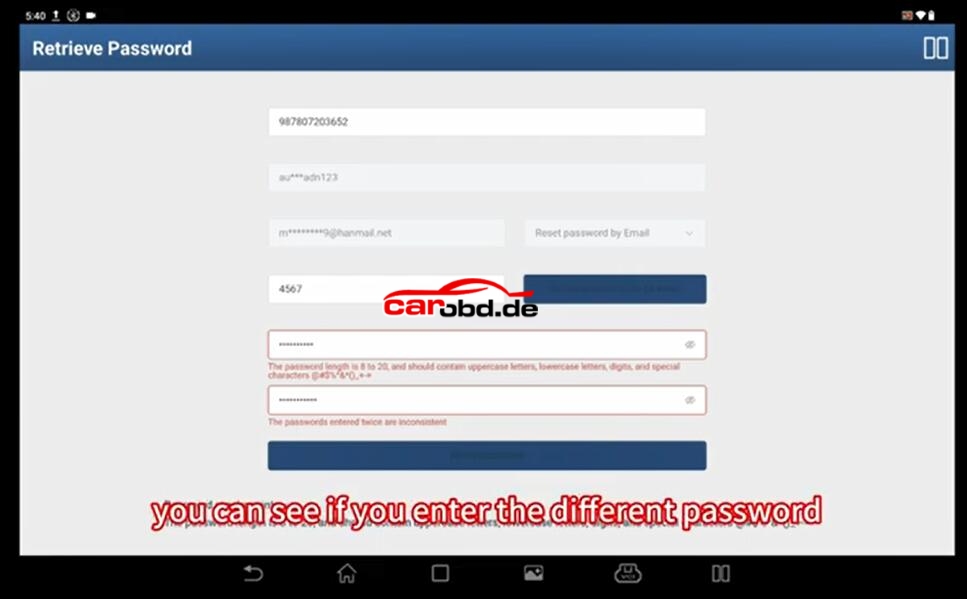
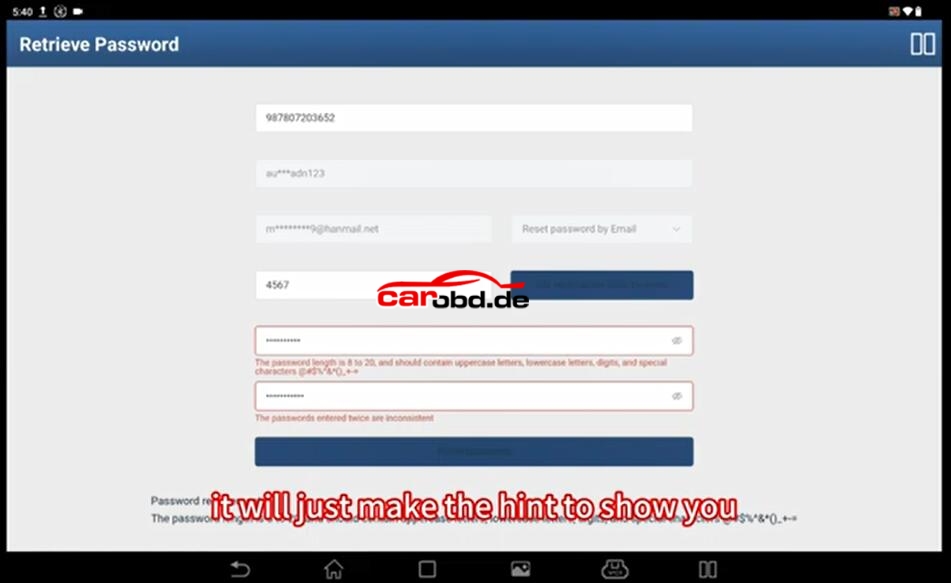
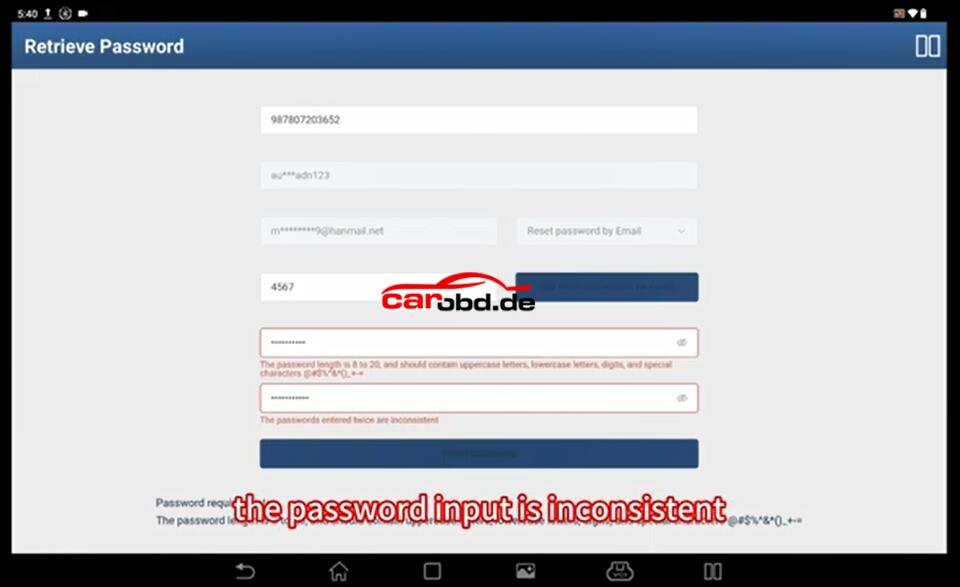
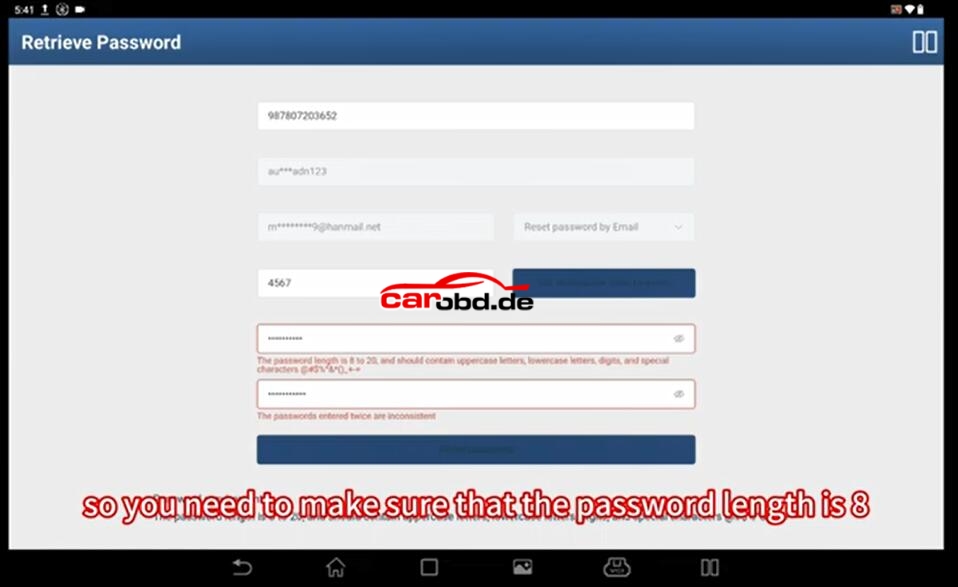
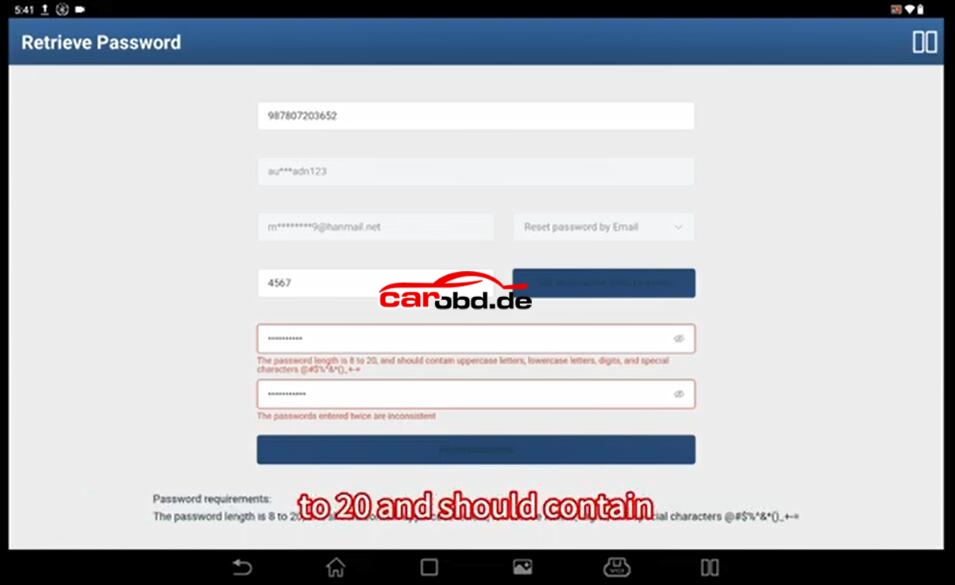
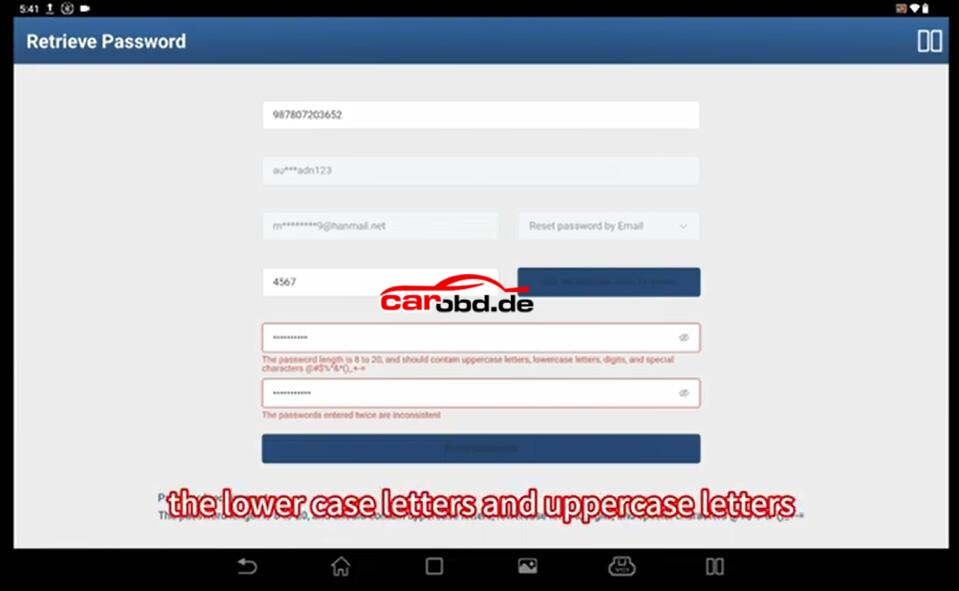
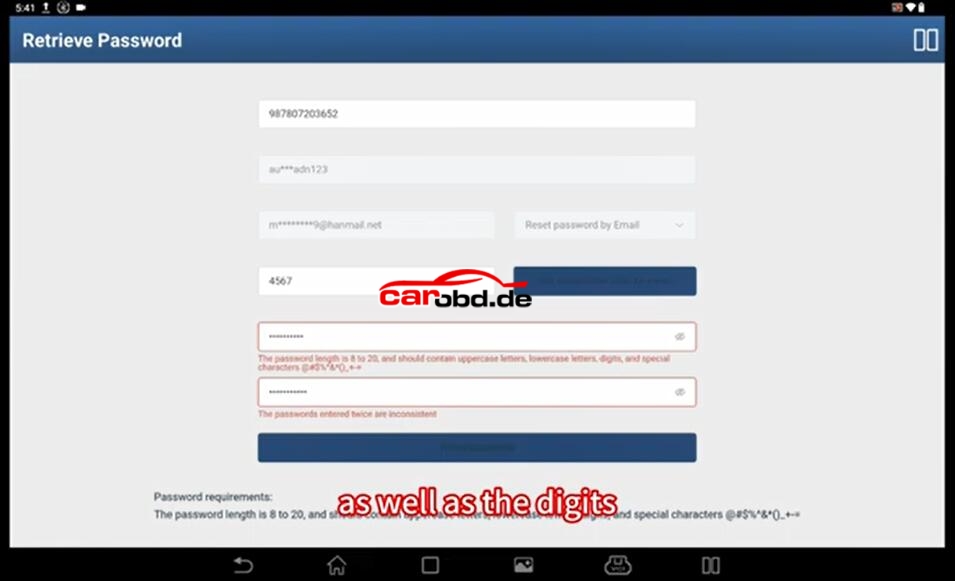
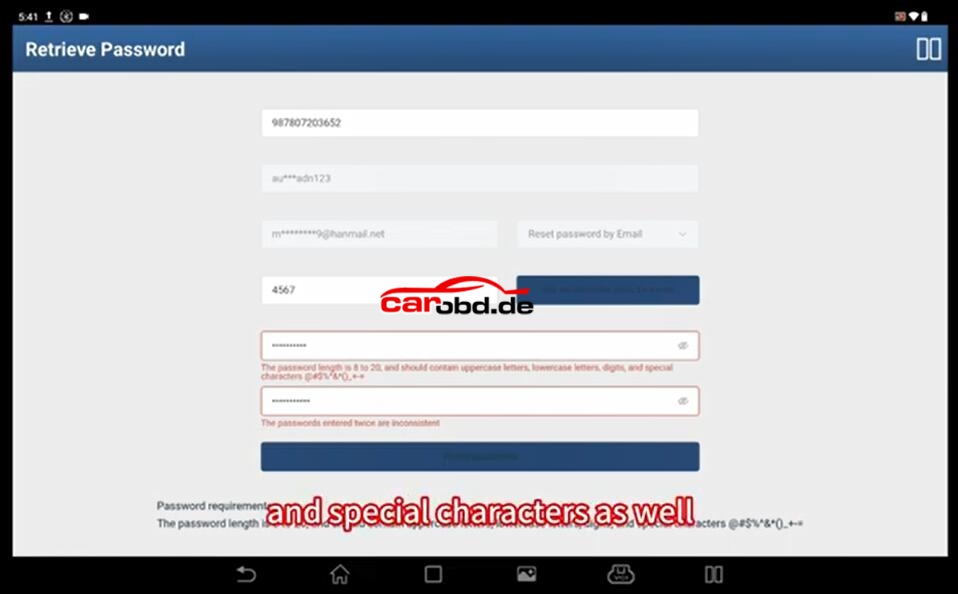
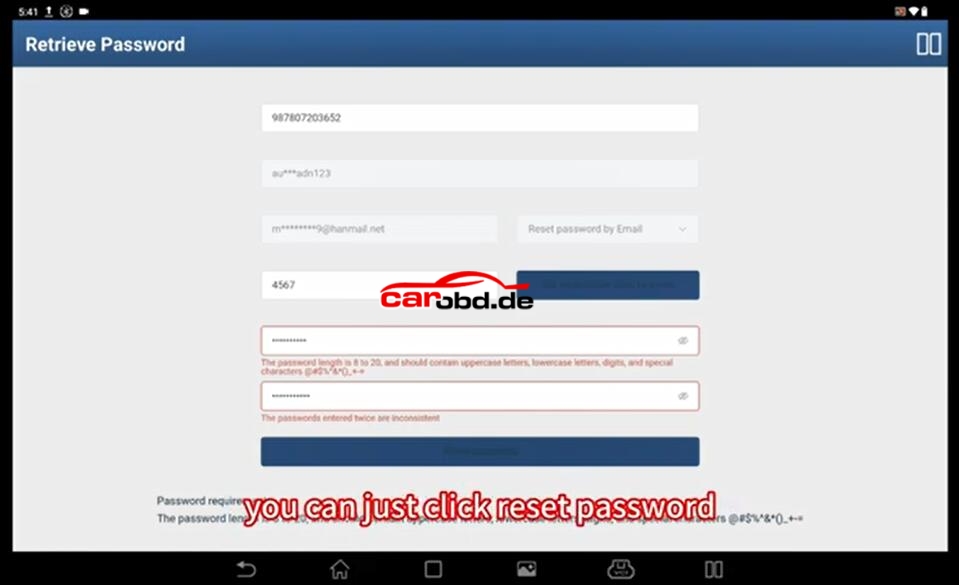
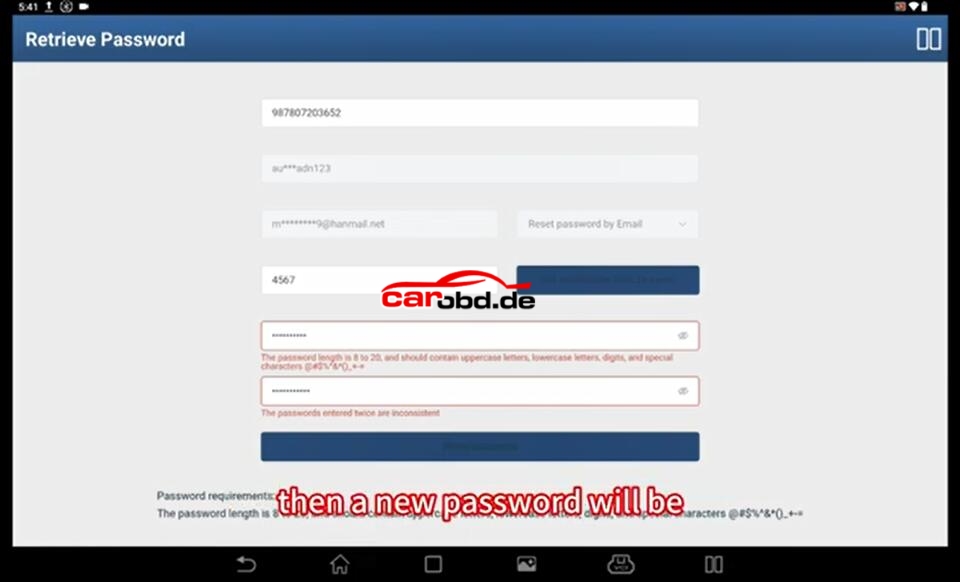
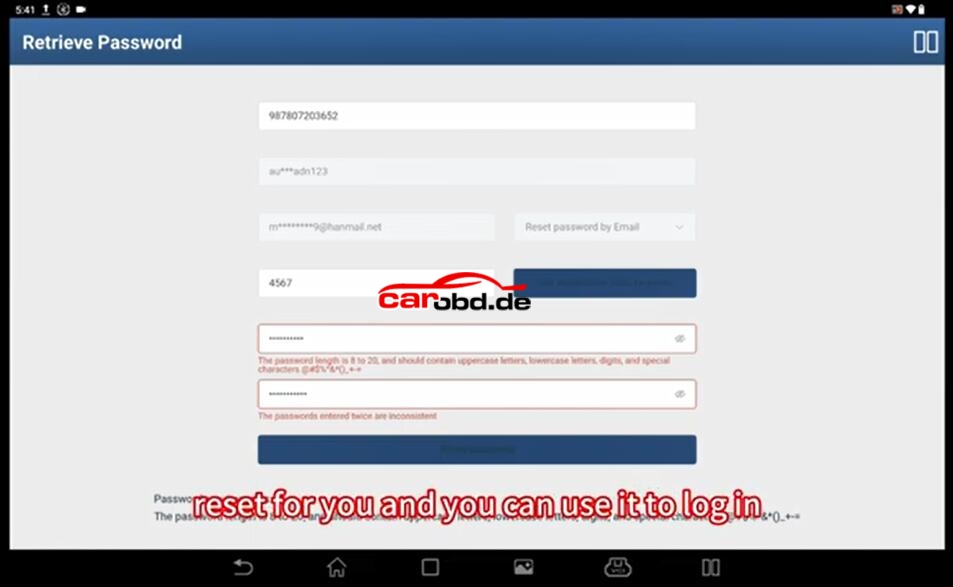
Launch x431 devices is a kind of professional diagnostic and key programming scanner, when customer get the machine, need to register with own personal information.
After finishing registration, some of customer usually forgot the registration password or other information.
So it is important to know how to reset the password if forgetting it.
The Diesel Particulate Filter (D-P-F) is an essential component of modern diesel vehicles, including the 2012 VW Passat TDI. Over time, the D-P-F can become clogged with soot and other particles, leading to decreased engine performance and increased emissions. To restore optimal functionality, a process called D-P-F regeneration is required. In this article, we will guide you through the steps of performing D-P-F regeneration using the Launch X431 Pro5 diagnostic tool.
Launch X431 Pro5 with the “Intelligent diagnose” function can do D-P-F Regen. on a 2012 VW Passat TDI perfectly. This article will show How to Do D-P-F Regen on 2012 VW Passat TDI with Launch X431 Pro5.
Check the details below.
Step 1: Enable vehicle communication Connect SmartBox 3.0 and vehicle’s DLC via the OBDII extension cable Connect X-431 Pro5 diagnostic tool and SmartBox 3.0 via Bluetooth
Step 2: Identify vehicle info Enter X431 Pro5 main menu Tap Intelligent Diagnose
It will connect VCI…read VIN…decode VIN.
Automatically detect the vehicle info successfully. It’s 2012 VOLKSWAGEN Passat.
Click “Diagnostic”
Step 3: Regen D-P-F Select Special Function>> D-P-F Regeneration X-431 Prog 5 will identify vehicle characteristics… Select the engine type and tap “Start” Tap “01-Particle Filter Service Regeneration (Repair Group 26)”
1.Note on function test: It will perform the following steps: Evaluation of event memory entries that prevent regeneration service regeneration of diesel particulate filter
Test Requirement:
Fuel Tank level: At Least 1/4 Full
Vehicles with automatic transmission: Selection Lever in position P
Vehicles with Manual Transmission: Selection lever in a neutral position
Activate Parking Brake!
Hood Closed!
Switch on electrical consumers
Click “Continue/Complete”
Confirm if the Neutral gear engaged (manual transmission) and the selector lever in position P (Automatic transmission) Click “Yes” Confirm if the parking brake applied Click “Yes” Confirm if hood is closed Click “Yes” Confirm if the electrical consumer is switched on Click “Yes”
2.Read the safety instructions Click “Continue/Complete”
3.Check event memory Click “Continue/Complete” There are no entries in the engine control module- J623 that require a regeneration of the particulate filter. End the test?
Click “No”
4.Evaluation during idling Allow the engine to run at idle… Release accelerator pedal Test successfully Click “Continue/Complete”
5.Heat up exhaust system Click “Continue/Complete”
6.Note It is not necessary to permanently press the pedals during the following basic setting. Remain at the vehicle during the entire duration of the basic setting for safety reasons. Click “Continue/Complete”
7.Initiate Regeneration Depress Brake Pedal Depress Accelerator Pedal Fully Regeneration is running The regeneration can be canceled by pressing the Continue button Done!
Conclusion: Performing D-P-F regeneration on a 2012 VW Passat TDI using the Launch X431 Pro5 diagnostic tool is a straightforward process that can help restore optimal performance to your vehicle. By following the steps outlined in this guide, you can efficiently and effectively clear the D-P-F of accumulated soot, ensuring a smoother and more environmentally-friendly driving experience. More informaiton about VW, please visit VW Trouble Repair.
Hey everyone, hoping someone here can help! I recently bought a Launch CRP919XBT and I’m trying to do injector coding on my 2006 Nissan Pathfinder 2.5dci but I keep getting this error! I’ve double-checked everything — ignition is on, cables are all properly connected — but the message still pops up and won’t let me proceed. Other functions on the tool seem to work fine. Just wondering… 👉 Has anyone successfully done injector coding on this model using the CRP919XBT? 👉 Is it supported at all? Do I need a firmware update or use a different menu/procedure? Would appreciate any tips or confirmation before I go in circles again! 😅 Thanks in advance!
Solution:
1.When you choose Nissan it will ask for Market. Choose the Market the vehicle was originally sold in (not where you think it was made) then when selecting a Model you’ll have Navara (Spa), Navara (Thai), Pick Up, and some others. You’ll just have to keep trying models till you find the one that’s works.
2.More than likely incorrect model selected. These can be a PITA because you have Spanish Built and Thai Built both with different systems. I have done D40 Navara before with Pro3 (same software) but it took a bit of playing around to get the right software version.
If you need to replace a BMW MSD81.2 engine ECU (DME) with a used one, you can do so using the Launch X431 IMMO Plus/IMMO Elite. This guide walks you through reading the ISN (Individual Serial Number) from the original ECU, modifying the flash data, and writing the ISN to the replacement ECU to ensure compatibility with the vehicle.
The same procedure applies to MSD80, MSD85, MSV80, and similar models.
Step-by-Step Procedure
Access the ECU Replacement Function Navigate to: BMW Function → Main Function → Engine Module Replacement → Bench Mode → MSD81_TC1796. Check the wiring diagram.
Connect the Original ECU Use the X-Prog3 programmer and follow the provided wiring diagram. Establish a connection with the ECU. Wait for the security login process to complete.
Read & Backup Flash Data Read the chip ID. Back up the flash data from the original ECU. Save the flash data.
Retrieve the ISN Code Select “FLASH Data Decryption” to extract the 32-digit ISN code from the original ECU. Record the ISN code. Disconnect the original ECU.
Prepare the Replacement ECU Connect the replacement ECU to the Launch X431 IMMO Plus/X-Prog3, following the same wiring diagram. Establish a secure connection and log in. Back up the flash data from the replacement ECU. Extract the ISN from the replacement ECU’s flash data.
Modify the ISN Code Select “Change ISN”. Input the 32-digit ISN from the original ECU. Successfully modify the ISN and save the updated flash data. Verify that the modified ISN matches the original ECU’s ISN.
Write the Updated Flash Data to the Replacement ECU Select “Restore Flash Data”. Choose the latest modified flash data and write it back to the replacement ECU. Confirm that the flash write process is successful.
Install & Test the Replacement ECU Disconnect the ECU. Install the replacement ECU back into the vehicle. Test to ensure proper operation.
Done! The replacement ECU is now successfully cloned and functional in the vehicle.
In this guide, we’ll walk you through the process of repairing the BMW FRM3 module (footwell module) using the Launch X431 IMMO Plus. This tool now supports one-click repair for FRM modules, including the FRM3R module (9S12XEQ384 3M25J) used in BMW E87, E92, and E93 models.
Connect the cable to the X-Prog3 programmer, and then to the Launch X431 IMMO Plus.
Step 2: Read the Chip ID
Once the connections are set up, power on the system:
Select “Read Chip ID” on the Launch X431 IMMO Plus.
The ID should read successfully, confirming the connection is correct.
Step 3: Check the EEPROM Data
The FRM3 module often loses EEPROM data due to low or insufficient battery voltage. Follow these steps:
Navigate to the “Backup EEPROM Data” option.
You’ll notice the partition shows as zero, indicating the EEPROM is empty and corrupted.
Step 4: Repair the EEPROM
Now it’s time to repair the corrupted EEPROM data:
Click on the “Repair” function in the Launch X431 IMMO Plus.
The tool will read the flash data and create a new EEPROM file automatically.
Step 5: Confirm the Repair
Once the repair is completed:
Check the EEPROM data again. You should now see valid data populated in the EEPROM section.
The FRM3 module is now repaired and should function correctly.
Conclusion
With the repair process complete, your BMW FRM3 module is now restored and operational. Using the Launch X431 IMMO Plus and X-Prog3 programmer, you’ve successfully repaired the module with minimal effort.
Q: The Launch X431 Pro Elite is said to be compatible with the X-Prog3 programmer. Do I need a DBScar VII to run X-Prog3 on the Launch X431 Pro Elite? How do I connect the Pro Elite to X-Prog3?
A: Yes, the Launch X431 Pro Elite is compatible with the X-Prog3 programmer and the IMMO software for key programming functions.
However, the Pro Elite/ProS Elite tablet does not use the DBScar VII Bluetooth adapter for X-Prog3, as it lacks the DBScar module. Instead, the connection is done directly through a USB interface.
How to Connect the Launch X431 Pro Elite/ProS Elite to X-Prog3: 1.USB to OBD Converter: The X-Prog3 package includes a USB to OBD converter. Connect one end of the converter to the tablet and the other end to the vehicle’s OBD port.
2.Direct USB Connection: The Launch Pro Elite/ProS Elite also supports the Launch X431 Key Programmer Remote Maker. To use this, connect the key programmer to the tablet via its USB Type-C port.
By following these steps, you can successfully connect the X-Prog3 to your Launch X431 Pro Elite for key programming and other functions.
Launch X431 TSGUN WAND is a Bluetooth TPMS service tool which supports tire pressure sensor activation, reading, diagnosis, relearn and programming. It should work together with X431 scanner such as X431 V, X431 V+, X431 Pro, X431 Pro3, X431 Pro5, X431 Pro Mini, X431 PAD III, X431 PAD V,X431 PAD VII
What is in X431 TSGUN package?
X431 TSGUN Wand;
Charging Cable(for charging the X431 TSGUN);
Password Envelope, a piece of paper with serial number(SN) and activation code, which is required when binding the X431 TSGUN to diagnostic tool;
User Manual.
Function of the buttons display
How to bind X431 TSGUN with a diagnostic tool?
Turn on X431 diagnostic tool & TSGUN, press
TPMS >> Swipeleft, Next >> Bind >> Enter serial number(SN), password, Bind
(Note: please tear off the envelope seal to get SN & password.)
Press “Return” when the screen displays SN.
It will download the TPMS software automatically.
Follow the prompts to operate, just wait for Bluetooth pairing…
The X431 TSGUN will connect to the scanner automatically.
It will take some while for updating firmware…
Press “OK” when completed.
Bluetooth connection is successful.
Now you can start to do TPMS service.
for more informations, please visit following link
Q: The Launch X431 Pro Elite is said to be compatible with the X-Prog3 programmer. Do I need a DBScar VII to run X-Prog3 on the Launch X431 Pro Elite? How do I connect the Pro Elite to X-Prog3?
A: Yes, the Launch X431 Pro Elite is compatible with the X-Prog3 programmer and the IMMO software for key programming functions.
However, the Pro Elite/ProS Elite tablet does not use the DBScar VII Bluetooth adapter for X-Prog3, as it lacks the DBScar module. Instead, the connection is done directly through a USB interface.
1.USB to OBD Converter:
The X-Prog3 package includes a USB to OBD converter.
Connect one end of the converter to the tablet and the other end to the vehicle’s OBD port.
2.Direct USB Connection:
The Launch Pro Elite/ProS Elite also supports the Launch X431 Key Programmer Remote Maker. To use this, connect the key programmer to the tablet via its USB Type-C port.
By following these steps, you can successfully connect the X-Prog3 to your Launch X431 Pro Elite for key programming and other functions.
Device: Launch X431 Pro5
Connection: Micro USB to tablet
Details: For older X431 Pro5 models using the Smartlink VCI, connect via a USB cable (Type A to Type B).
Note: An additional DoIP cable is required for this method. Method 2: Connection for Launch X431 Pro3 LINK
Device: Launch X431 Pro3 LINK
Connection: Standard Link connection
Details: Uses the default connection setup provided with the device. Ensure all necessary cables are present.
Method 3: Connection for Launch PAD VIII V2 LINK
Device: Launch PAD VIII V2
Connection: Standard Link connection
Details: For models like the PAD VIII V2, no extra DoIP cable is required. The device supports built-in communication protocols.
Method 4: Connection for Launch X431 Pro3, ACE, and Pro3 APEX
Device: Launch X431 Pro3, ACE, Pro3 APEX
Connection: DBScar VII+ adapter cable
Details: This method applies to newer tablets equipped with the DBScar VII adapter. Method 5: Connection for Launch X431 PAD III/PAD VIII V2
Device: Launch X431 PAD III, PAD VIII V2 Connection: Y-splitter cable to RJ45 Details: This method integrates the DoIP protocol using the PCS 4 system. No additional DoIP cable is required. General Information:
DoIP (Diagnostics over Internet Protocol) uses Ethernet as the communication medium, offering high-speed vehicle diagnostics.
Supported by manufacturers like BMW, Jaguar, and Volvo.