Archive | May 2016

How to update Super Icom?

How to update Super Icom?

Step 1: Double click the Super Icom on the desktop

Step 2: Input the Serial number and password

Step 3: Choose the version you want to upgrade

Step 4: Wait for the download process finish

Step 5: Install the update files

software-for-bmw-icom-icom-a2-support-update-online-ss147-blog-1

Notice:

The Super Icom is special tool for authorized Super Icom user,and this tool is for upgrade only.We do not pay any responsibility if you update other software.

The Super Icom updater nust run inside Super Icom system,please do not run in your own local system.

Upgrade ID: Your serial number

Upgrade password: Last 8 digital number inside your Password envelope.

The Best Tool for Remote Control World Update Online–KD900 Remote Maker

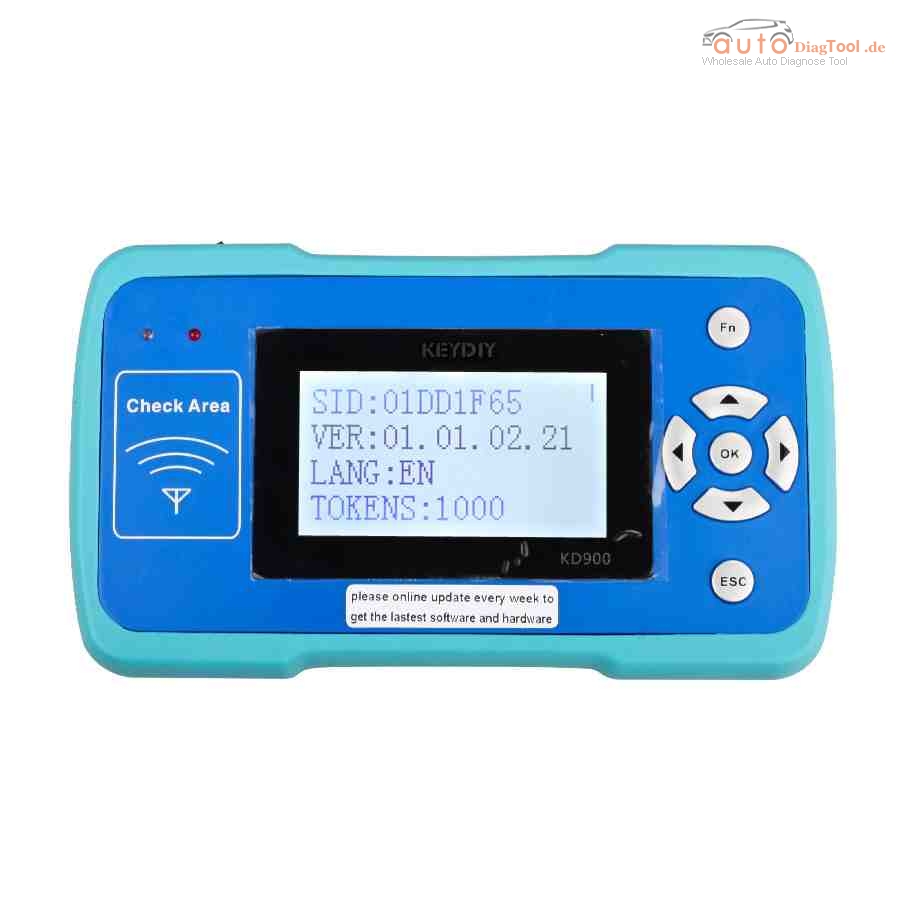
KD900 is a powerful car/civil remote generation tool which developed by KEYDIY tech. KD900 Remote Maker is the best remote control tool for locksmith around the world. Here carobd.de provides the free KD900 user manual.
kd900-remote-key-maker-blog-1

Free Download KD900 Key Maker User Manual

https://mega.nz/#!6xoFFLKJ!k9A6wltWFW1D7eHk0WK8SkkNftGQhSdYiXZRY6qcwUE

KD900 Top Features:

  1. Hand-held, stand alone without PC
  2. One button update online
  3. Cover over 100 car remotes, keeps adding more
  4. Detect key frequency
  5. With tokens (1000 tokens in default)

KD900-key-Maker-software-blog-2

KD900-key-Maker-blog-3KD900-key-Maker-blog-4

KD900 Remote Key Programmer Functions:

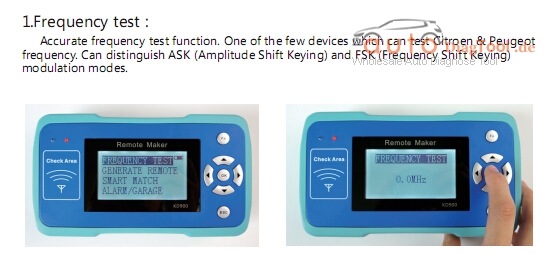
1.Frequency Test: 312Mhz-868MHz
Accurate frequency test function. One of the few devices which can test Citroen & Peugeot frequency. Can distinguish ASK (Amplitude Shift Keying) and FSK (Frequency Shift Keying) modulation modes.

KD900-key-Maker-3-blog-5

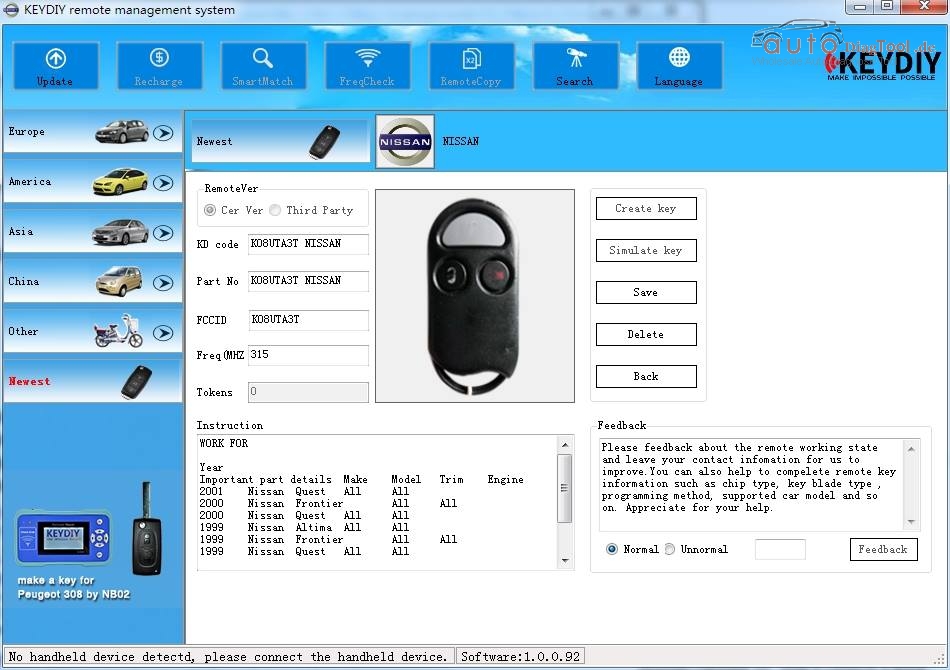
2.Simulate/Generate hundred of new Remote Control
(Remote/RKE): More than about 200 types of transmitters can be generated, for example Toyota, BMW, VW, Audi, Nissan, Hyundai, Kia, Subaru, Mazda, Ford, Honda and many other brands.

SIMULATE REMOTE– SIMULATE REMOTE is a function to make remote, in order to check whether the remote is works well or not, it won’t cost any tokens , but the remote can only use 50 times. During these times you can try to program the remote to the car to check whether you choose the suitable remote.

SIMULATE DEVICE– SIMULATE DEVICE is a function to make the device work as a remote, check whether the remote is works well or not, it won’t cost any tokens , you can try to program the device to car same as program remote to test.

3.Unknown Remote control Identification
VERIFY REMOTE – to check the remote information,if you have original remote ,please put it on CHEAK AREA, and press any button to see whether you choose the correct remote.

MAKE REMOTE — to make a remote directly, will cost tokens, and then program the remote to the car same way as a original remote, you can use all the time.

4.Customized software for Client

Customer Question :

Q: Where I buy Tokens after used up?

A: After 1000 tokens are used up, you can buy from us, price is 270USD.

Q: Would this be able to copy an Audi remote, 4D0837231 F?

A: Yes, it can. For other detail vehicle models, please check the user manual.

Q: Is it upgradable? How can I update KD900?

A: Update is easy though one button click. You can update KD900 on official website www.keydiy.com. Detail instruction, please check the user manual.

Q: How many tokens does it use to create a remote?

A: Generally create a remote will cost 5 tokens, but a few kinds remotes will cost 20 or 50 tokens.

Q: What are the differences between “SIMULATE REMOTE” to “MAKE REMOTE”

A: SIMULATE REMOTE is a function create remote to check whether the remote is work well or not, it won’t cost any tokens , but the remote can only use 50 times.

MAKE REMOTE is generate a new remote, will cost tokens and can use all the time!

Note: Program the remote to car after simulating it, if work well, generate it, then it will work well, don’t need to program again.

Q: Does KD900 only work with KEYDIY remote? It’s necessary to use the blades KEYDIY provide?

A: KD900 only work with our remotes, our remotes work for hundreds of car remotes.

You’d better use our blade, so it’s can perfect match on the connection, our blades are special designed for our remotes, if you use original blades, the joint may not work perfectly.

Customer feedback for Scania VCI-3 Scanner

V2.24 Scania VCI3 VCI3 Scanner Wifi is a brand new tool designed by Scania to provide full maintenance for all Scania trucks, buses and other heavy vehicles or heavy duty engines made by Scania.

vci-3-vci3-scanner-wifi-diagnostic-tool-for-scania-1


One of my customer said the VCI3 is very good to use,here is the function he has tested which all is ok:

wifi-scania-vci-3-1

wifi-scania-vci-3-2

wifi-scania-vci-3-3

If you have the test same funtion,we will really appreciate if you share with us.


How to add the tokens for kess v2 ?

How to add the tokens for kess v2 ?

So many customers asked me how to add the tokens for their kess v2 ,here is the step who want add tokens for kess.

Step1:Disable both local area connection and wireless network connection.

1
Step2:Make sure the driver of kess V2 installing well.

2
Step3:Unzip the file “tool.zip”to desk,and change the name of tok file with other name.(e.g.Token47)

3
Step4:Prepare one 2G TF card,format the card.

12
Step5:Unzip the file”kessv2-TF.zip” to the new 2G TF card.

5
Step6:Replace the old TF card with the new one.

6
Step7:Rename the tok file with other name.(e.g.Token48),and put it on the “Tokens” folder.

7
Step8:Unzip the file”KSuite­_tokens”to “C disk”,change the name of “K10033818.CFG”.(e.g.135K10033818.CFG),then put it on the “KSuite file”-“Update file”.

8
Step9:Open the “K10033818″on the desk,click the file of “KSuite”,then click “OK”.

9
Step10:Start update.

10
Step11:Check the information,and done.

11

If you still has problems,you can connect me by:

Mail-Box:sales@CarOBD.de

Skype:AutoDiagShop.de DE89ads82pw

What’s App:+86 18672989889

How to Operate Digimaster 3 ?

How to Operate Digimaster 3 ?

Here only needs 8 step to make it:

Step 1. Digimaster 3 Function Menu

digimaster-3-digimaster-iii-original-odometer-1 (1)
Step 2. Digimaster 3 Function

digimaster-3-blog-1
Step 3. Digimaster 3 Basic Info

digimaster-3-blog-2
Step 4. Digimaster 3 Select Car Series

digimaster-3-blog-3
Step 5. Digimaster 3 Adjust Odometer

digimaster-3-blog-4
Step 6. Digimaster 3 Adjust Odometer

digimaster-3-blog-5
Step 7. Digimaster 3 Adjust GTS

digimaster-3-blog-6
Step 8. Digimaster 3 Success Adjust GTS

digimaster-3-blog-7

About GM Tech2 Frequently Asked Question

GM Tech2 Vetronix Tech2 Diagnostic Scanner
gm-tech2-gm-scanner-main-interface
About Function
Q1: Does GM tech2 Support Coding?
A1: Yes, it does, but you need to buy an additional TIS2000, TIS2000 support cars programming until 2007 year.
Q2: Can TECH2 support key coding and electronic control unit programming for all OPEL and Isuzu?
A2: GM tech2 can’t support key programming; as for electronic control unit programming, you need to additionally buy a GM TECH2 and a TIS2000, but TIS2000 only support GM and Opel, not support Isuzu.
Q3: GM TECH2 support airbag reset? If not, please recommend me another one tool, my car is Chevrolet Tahoe 2007 year.
A3: Yes, GM TECH2 support airbag reset for Chevrolet Tahoe 2007 year.
Q4: Does GM TECH2 support reading Car VIN number? How to read?
A4: Yes, it does. After selecting the car model, enter function menu, and you will find the VIN number reading option.
Q5: I’m interested in the GM Tech2 Diagnostic Tool and I would like to know which diagnostic functions that tool has for a Hummer H3. I have problems with the windshield wipers, the tire pressure control system and the cruise control. Is that tool able to read the trouble codes and to read some parameters regarding those controllers?
A5:  GM TECH2 contains Hummer H2 H3 software (from 2007 to 2010 year), so Tech2 is able to diagnose Hummer H3 2007-2010 year.  As for reading parameters regarding those controllers, it is theoretically compatible, advice you have a try.
Q6: Can GM Tech2 send commands to the various modules and is it able to do diagnostics on a climate control programmer? To what year is the scanner effective? I own a 1997 Cadillac DeVille and a 2001 Chevrolet Venture.
A6: Yes, you can use GM TECH2 to diagnose climate control programmer, when it has communication GM Tech2 can send commands to the modules.
About Compatible Vehicle Models and Years
Q1: GM TECH2 contains Saturn software?
A1: yes, Saturn software is included in the GM software English and support from 1991 to 2010 year.
Q2: Is GM TECH2 available on my Cadillac year 1996?
A2: Yes, GM TECH2 works with Cadillac.
Q3: Does GM Tech 2 work with Australian Holden 1998?
A3: GM tech2 is only compatible with North American Holden, and our software for Holden only work with Holden from 1999-2012.
Q4: Can GM Tech2 work diagnose 2005 GMC – Sierra 1500 truck?
A4: Want to use our GM tech2 to diagnose truck, you need to buy an additional truck adapter, because our GM tech is compatible with truck, but only packed with the car adapter.
About After-Sales Questions and Answers 
Q1: I bought one GM TECH2 and the TIS2000 software can’t be installed and no identification, what’s the problem?
A1: If the TIS2000 you are trying to install is contained in the GM TECH2 software, then it is useless to install TIS2000 software. To program electronic control unit, I advice you buy an extra TIS2000 to work with GM tech2.
Q2: After receiving GM TECH2, I got some errors.
A2: If it is Blue screen, just replace the Blue Screen Chip. If it is not the problem of Blue screen, please send us the self-test report to check where the problem is; have no idea on how to operate self test? Refer the self-test manual at GM TECH2 “technical support / service”.
Q3: GM TECH2 one button doesn’t work how to fix?
A3: If you have new version GM tech2, there are two ways to solve:
1) we send you a new button to replace;
2) please send back to repair. If you have old version GM tech2 installed with the newest software, the button maybe won’t work.
Q4: When I use GM TECH2 for the second times, the tool starts to smoke, and my car voltage become 14V from 12V, what’s the matter?
A4: Please follow the correct operation steps: before diagnosing, turn on the ignition and then connect the GM TECH2 with the car, when the car starts you’d better test the voltage, because during this process a part of cars’ voltage will reach up to 24V or more, especially the car which has a poor contact of electrical ground.

How To Register Autel Maxisys MS906 Diagnostic Scanner?

How to Register Autel Maxisys Ms906? You can follow below step to operate.

Original AUTEL MaxiSYS MS906 Auto Diagnostic Scanner is the updated Version of Autel MaxiDAS DS708 on Android Operating system

autel-maxisys-ms906-1

In order to get access to the Support platform and obtain update and other services from Autel, you are required to register the Autel MaxiSys MS906 Diagnostic System the first time you use it.

To register the Autel MS906 diagnostic scanner:

1. Visit the website: http://pro.autel.com.

2. On the Sign In page, input your account ID and other information to log in, if you already have an account.

3. If you are a new member to Autel and do not have an account yet, click the Create Autel ID button on the left side.

4. Enter the required information in the input fields, read through Autel’s Terms and Conditions and tick on Agree, and then click Create Autel ID at the bottom to continue.

5. The online system will automatically send a confirmation email to the registered email address. Validate your account by clicking the link provided through the mail. A product registration screen opens.

6. Find out the device’s serial number and password from the About section of the Settings application on the display tablet.

7. Select the product model of your device, enter the product serial number and password on the Product Registration screen, and click Submit to complete the registration procedure.

The Difference of all Xprog on autodiagtool.de

The difference of all xprog on carobd.de:

xprog-m-x-prog-m-box-ecu-programmer-with-t420-laptop-usb-dongle-sm48-1

Item Code SM48 SM48-B SM44-C SM11-D SM11-F SM11
Item Name XPROG-M V5.5.5 with USB Dongle +T410 Laptop +500GB HDD XPROG-M V5.5.5 with USB Dongle XPROG-M V5.50 without USB Dongle Xprog-m V5.3 with USB Dongle XPROG-M V5.3 Main Unit XPROG-M V5.0without USB Dongle
Version V5.5.5 V5.5.5 V5.5 V5.3 V5.3 V5.0
Language English
OS 32Bit/64Bit WinXP/Win7 System 32Bit WinXP EN System
with Dongle YES No YES No No
with Laptop YES (software installed) No No No No No
Update No No Yes (Check SO294-C) Yes (Check SO294-C) Yes (Check SO294-C) Yes (Check SO294-C)
Function Read/Write ECU/MCU Chip,Eeprom programming
Special Function Decypte New BMW CAS4;Add New Authorization: AUTH-0025 Authorized Decypte New BMW CAS4;Add New Authorization: AUTH-0025 Authorized supports more than 450 units (serial EEPROM’s, Microcontrollers (MCU), Electronics Control Units (ECU), DashBoards, Immobilizers, Calculators and others) support microchips freescale MAC, INFINEON, RENESAS supports microchips freescale MAC, INFINEON, RENESAS NO
Support List depends on ECU Chip Types
Xprog Serials products difference
1. Different Version
2. Except SM44-C,SM11-D,SM11 without dongle, replaced by Chips, Others contain dongle
3. No hardware version, different software version with different hardware version, except V5.0, v5.3 others is the same
4. V5.0 Xprog is much more stable than V5.3
5. you can buy SO294-C ATMEGA64 Repair Chip to  upgrade xprog before V5.5Attention: Only Winxp 32bit System Supported. No Antivirus Progarm, No Internet Connection Before installing Software

How to use Magic Wand 4C 4D Transponder Chip Generator

The Lookout of Magic Wand 4C 4D Transponder Chip Generator

magic-wand-blog-1

NOTE:

“Read” button:
This button is used to read chip. After you put the chip into the slot, press “Read” button and get the reading result. If it fails to read, the red indicator will keep flashing. While after reading successfully it will display chip ID and the green indicator will keep flashing. At this time it is ready to copy, take out the chip and replace with the special chip for Magic WAND, press “Write” button and finish copying, then it will display chip ID and meanwhile the green indicator will keep flashing, if it fails to copy the red indicator will keep flashing.

“Write” button 

This button is used to generate and copy chips.

Generate Chip:  Put the chip into the slot , press the chip ID you want to generate, press “Write” button to get the results, the green indicator will keep flashing and display chip ID. In contrast, if the red indicator flashes it means reading is finished, maybe you put an incorrect chip or the chip is incompatible with the device.

Copy: you need to read out the chip ID before to copy, after it read out successfully you will get the chip ID, just press “Write” to finish copying. While if the red indicator flashes it means the chip is incompatible with the device.

2.How to use Magic Wand transponder:

Put the original 4D70 blank chip into the chip slot,

Press the No. buttons 8 and 3,

Press “Write” button,

The green indicator will flash and means copy success fully,

Put the chip back into the key shell,

Take it to the car to add key work together with key programmer,

NOTE:

when you add the key, you have to put the Magic Wand close to the ignition coil and the key go through the hole of Magic Wand, then follow the key programmer prompt to complete.

magic-wand-4c-cd-transponder-chip-blog-2

3.CHIP lists supported:

Special chips that can be generated using Magic Wand:
D68:Daihatsu.

82G: Subaru G (Big capacity).

61: Mitsubishi.

62: Subaru.

65: Suzuki.

67: Toyota/Lexus.

68: Toyota/Lexus.

B9: chip Toyota Crown.

69: Yamaha Motorcycle.

6A: Kawasaki Kawasaki.

6B: Suzuki Motorcycle
Chip ID that can be copied by Magic Wand:
4C: Toyota.

66: Suzuki.

67: Toyota Lexus.

68: Toyota Lexus.

B9: Toyota Crown.

69 chip: Yamaha Motorcycle.

6A: Kawasaki Kawasaki.

6B: Suzuki Motorcycle.

D68: Daihatsu
The smart card chip ID that can be copied: Toyota 71 chip
The chip ID that can be copied online: most 4D (40bit), the 64 chip is not supported temporarily.

Special chip ID that can be generated using Magic Wand transponder:

4C: Toyota.

61: Mitsubishi.

62: Subaru.

63: Ford/Mazda.

65: Suzuki.

66: Suzuki.

67: Toyota/Lexus.

68: Toyota/Lexus.

B9: Toyota Crown.

69: Yamaha Motorcycle.

6A: Kawasaki Kawasaki.

6B: Suzuki Motorcycle.

D68: Daihatsu

4D copy chip with big capacity (special chip for Magic Wand)

Chip ID which can be generated and copied:

4C Toyota.

66: Suzuki.

67: Toyota/ Lexus.

68: Toyota/ Lexus.

B9: Toyota Crown.

69: Yamaha motorcycle.

6A: Kawasaki motorcycle.

6B: Suzuki Motorcycle.

4D68: Daihatsu

The smart card chip ID: Toyota 71 chip

The chip ID that can be copied online: cover all 4D (40bit)

Chip will be covered:

83 Ford/Mazda online and 72G Toyota G.

The special chip ID can be generated:

72G Toyota G. 82G Subaru G. 64 Chrysler/Jeep. D68:  Daihatsu. 4C: Toyota. 61: Mitsubishi. 62 Subaru. 65: Suzuki. 66: Suzuki. 67 Toyota Lexus. 68: Toyota Lexus. B9: Toyota Crown. 69: Yamaha motorcycle. 6A: Kawasaki motorcycle.  6B: Suzuki motorcycle.

4.Function:

Function 1: Change original 4D transponder into special transponder (61.62.65.66.67.68…..)
Function 2: Copy transponder (61.62.63.65.66.67.68)

4D Magic Wand is an advanced device for locksmith.
It can work independently, also work with hand-held phone & computer.
Update constantly , operate with special material.
It can solve lots of problem for locksmiths.
Both beginner and experienced locksmith need Magic Wand


2014D VOLVO VIDA DICE Diagnostic Tool all Details

Considering some regular users are finding low cost working VIDA DICE 2014D VOLVO Diagnostic Tool, carobd.de engineer developed and tested working fine, see details as follows.

Item No. SP170-1, Super Volvo Dice Pro+ 2014D, €69+ shipping cost, €22 lower than Item No.SP170 which sales for €88.

super-volvo-dice-pro-diagnostic-tool-blog-1

item No. SP21-C, 2014D VIDA DICE Diagnostic Tool, €133 +free shipping by express without tax.

volvo-vida-dice-main-interface-blog-2

PC board: reading following PC board, you will visually judge the quality of low cost the VIDA DICE 2014D.

PC board Display:

volvo-vida-dice-main-board-blog-3

volvo-vida-dice-main-board-blog-4

How to install and use 2014D VOLVO VIDA DICE Diagnostic Tool?

Requirement on computer:

step 1:It must be windows 7
step 2:It need to be Internet Explorer 8
step 3:Computer memory need over 2GRAM
step 4:C:// must have 40GB space
step 5:Software must install on C://
step 6:It must be NTFS format