Archives

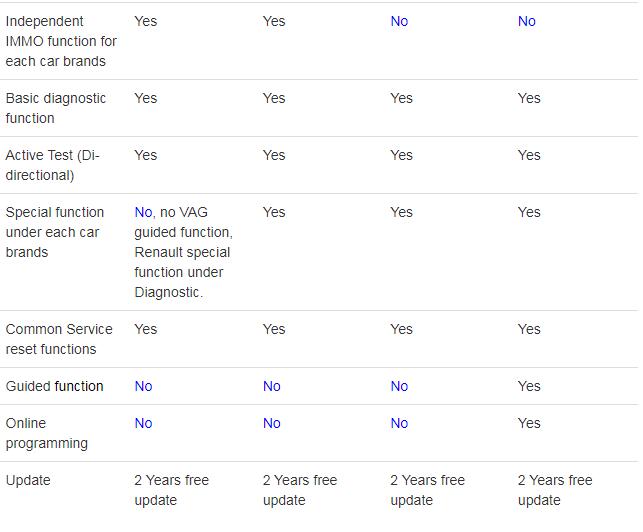
X431 Pro3 ACE vs X431 Pro3 V5.0 vs X431 PRO3S+ V5.0 vs X431 PRO3 APEX vx X431 PRO TT vs X431 PRO DYNO

X431 Pro3 ACE vs X431 Pro3 V5.0 vs X431 PRO3S+ V5.0 vs X431 PRO3 APEX vx X431 PRO TT vs X431 PRO DYNO

We received a request from one of our customers. SO here we make a comparison among these new Launch X431 tablets with DBscar VII adapter. 

In Sum:
Pro TT and Pro Dyno are 8 inch tablets, Pro3 ACE, Apex,Pro3 V5 and Pros3+ V5 are 10 inch tablets.
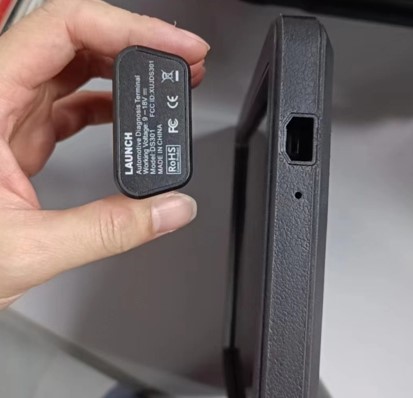
All of these come with DBScar VII Bluetooth connector .Support CAN FD and DOIP protocol(DOIP requires a DOIP cable)
They all cannot do online programming (no smartlink VCI)
Pro TT and Pro Dyno 8 inch tablet are not compatible with heavry duty modules
Pro TT and Pro Dyno do not support Topology Mapping and others .
The new Pro3 V5.0(aka V+ V5.0) now shares the same functions as Pro3s+ V5.0. Only appearance difference.

Autel IM508S – PCM Parameter Reset and Programming All Lost Keys for 2018 Ford F150

Autel IM508S – PCM Parameter Reset and Programming All Lost Keys for 2018 Ford F150

Today, we’ll show you how to use the Autel MaxiIM IM508S to perform a PCM parameter reset and program keys on a 2018 Ford F150 after all keys have been lost. You will need two new smart keys for this process.

Step-by-Step Procedure:

1.Connect the IM508S
Plug the IM508S tablet into the vehicle’s OBD port.

2.Access the IMMO System On the tablet:
IMMO >> Accept >> Ford >> Manual Selection
Ford >> USA >> F-150 >> 2018-2020 >> Smart Key
Select Yes when prompted for Smart Key
Navigate to ECU >> Parameter Reset [Fuel] >> Parameter – Reset

3.Turn on the Ignition

4.Autel IM508S Warning

You will receive a warning:
“Perform this procedure only if you have replaced the PCM or PATS on this vehicle.”
Press YES to continue.

5.Parameter Reset Process

The system will read data, please wait.
The instrument panel might go black during this function—this is normal.
After security access is granted (this takes 3-10 minutes), you’ll see a Learning Successful message.

6.Program New Keys

Navigate to:
Control Unit >> Keyless System “CAN” >> Learning Keys >> All Smart Keys Lost

Important Notes:

A network connection is required, so ensure the device is connected via WiFi.
Again, it’s normal for the instrument panel to turn black during this function.
This process will delete all previously learned smart keys.

7.Continue with Key Programming

Press OK to proceed.
If asked whether the alarm is active, select No.

8.System Configuration

The system will configure, taking approximately 10 minutes.
Select Yes if you want to delete all keys (you will need to program two keys afterward).
Select No if you just want to add keys without deleting the existing ones.

9.Delete and Program New Keys

If you choose to delete all keys:
The system will confirm Current number of keys: 0 after deletion.
Insert the first smart key into the designated slot (in the armrest compartment, cupholder, or glovebox).
The system will begin learning the key.

After the first key is learned:

The system will show Current number of keys: 1.
Remove the first key and insert the second smart key into the slot.
The system will learn the second key.
After learning is complete, the display will show Current number of keys: 2.

10.Finish Key Programming

Press NO to finish the process after learning both keys.

11.Test the Keys
Both keys should now work correctly.

Autel-IM508S-PCM-Parameter-Reset-and-Programming-All-Lost-Keys-for-2018-Ford-F150-1

Autel-IM508S-PCM-Parameter-Reset-and-Programming-All-Lost-Keys-for-2018-Ford-F150-2

Autel-IM508S-PCM-Parameter-Reset-and-Programming-All-Lost-Keys-for-2018-Ford-F150-3

Autel-IM508S-PCM-Parameter-Reset-and-Programming-All-Lost-Keys-for-2018-Ford-F150-4

Autel-IM508S-PCM-Parameter-Reset-and-Programming-All-Lost-Keys-for-2018-Ford-F150-5

Autel-IM508S-PCM-Parameter-Reset-and-Programming-All-Lost-Keys-for-2018-Ford-F150-6

Autel-IM508S-PCM-Parameter-Reset-and-Programming-All-Lost-Keys-for-2018-Ford-F150-7

Autel-IM508S-PCM-Parameter-Reset-and-Programming-All-Lost-Keys-for-2018-Ford-F150-8

Autel-IM508S-PCM-Parameter-Reset-and-Programming-All-Lost-Keys-for-2018-Ford-F150-9

Completed!

This guide helps you successfully reset the PCM parameters and program new smart keys on a 2018 Ford F150 using the Autel IM508S.

How to send diagnosis data to Autel Serve? 
1, Enter “Diagnosis” Menu
1
2. Select vehicle you want to diagnosis
Autel Update Data Steps
3. Select detailed vehicle models
Autel Update Data Steps
4. Click the button on the top right shows as following picture.
Autel Update Data Steps
Select” Model of year absent”

Autel Update Data Steps
Click” OK “
Autel Update Data Steps
You will enter “Data Logging” screen and then write the reasons for sending errors.
Autel Update Data Steps
Click button to save data

Autel Update Data Steps
Back to “Data Manager” menu
Autel Update Data Steps

Autel Update Data Steps

Autel Update Data Steps

Autel Update Data Steps


What is Launch X431 Key Programmer and how to use it?

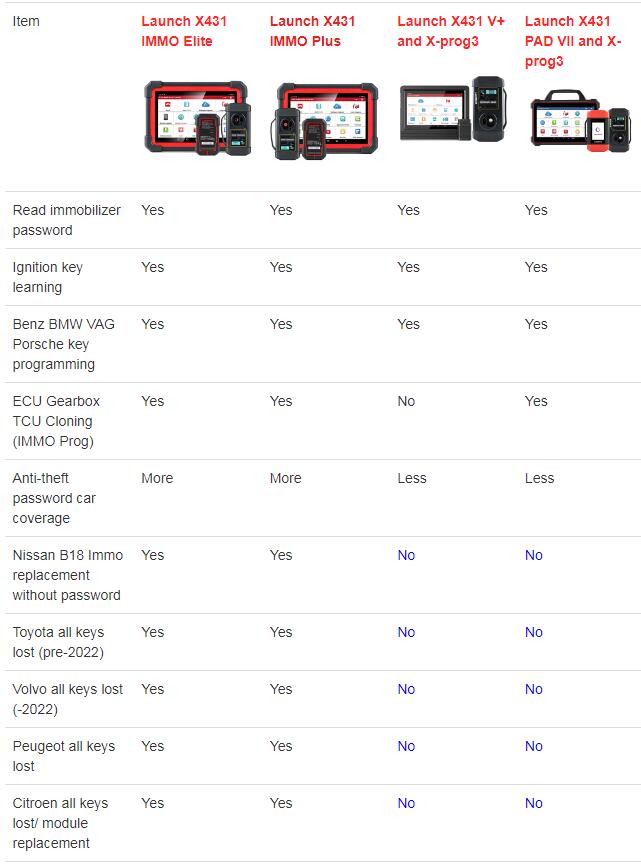
Launch x431 key programmer specializes in reading and writing key information, generating various key chips, etc. Currently, it can only be used with X431 IMMO Elite, X431 IMMO Plus, X431 PAD V (PAD 5), and X431 PAD VII (PAD 7).
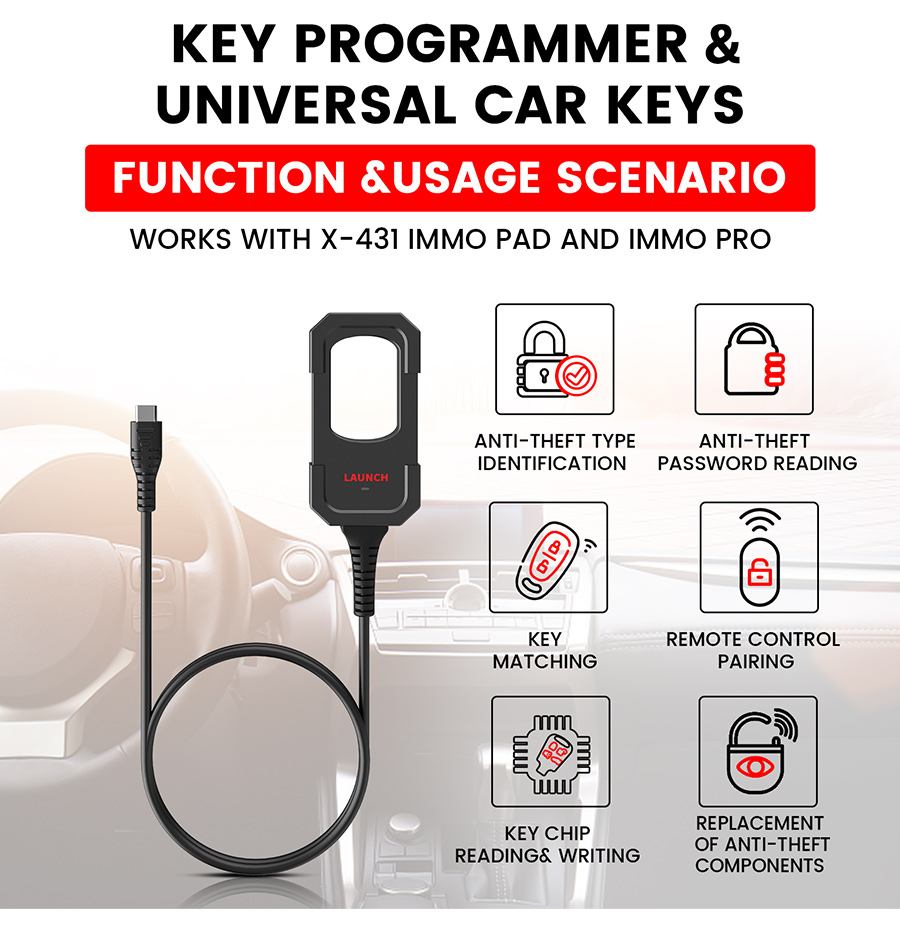
launch x431 key programmer

How to use the x431 key programmer?

Method of using super chips
1. Enter the menu [Set type of super chip] to generate.
x431 key programmer
2. Select the corresponding key chip type and insert the super chip into the anti-theft induction coil.
x431 key programmer
x431 key programmer
3. Once successfully generated, it can be used.
x431 key programmer
Key programmer + key * 4 set includes: key programmer, USB to Type C, LS Nissan (smart card, 4 buttons) -01, LN Peugeot DS (folding 3 buttons) -01, LE Volkswagen super remote (folding 3 buttons) -01, LE Ford super remote (folding 4 buttons) -01
Key programmer: Identify car key chips and generate various types of chip models from super remotes, read the remote control frequency of car keys, and generate remote control devices for different car models from various types of super remotes.
USB to TYPEC connector: device to key programmer
LS Nissan (smart card, 4 buttons) -01, LN Peugeot DS (folding 3 buttons) -01, LE Volkswagen super remote (folding 3 buttons) -01, LE Ford super remote (folding 4 buttons) -01 super remote: One click start smart key models and use LS series Nissan super remotes to generate corresponding keys. For car models with electronic chip keys or the 11/12/13/7936/7937/7947/7946 chips, use the LN series DS super remote. For models without electronic chip keys or models 46, 48, 4D/70, 83, 8A/H, G, 4E, 11/12/13/C, 42, 33, 47, 8C, and 8C, use the LE series Volkswagen and Ford super remotes.
Method of using the LE Volkswagen and LE Ford super remotes: 
1. Enter the [Vehicle Remote] menu and select the corresponding available super remote to generate.
x431 key programmer
2. Select the corresponding key and place the super remote key in the key programmer to generate.
x431 key programmer
x431 key programmer
x431 key programmer
3. After the remote control is successfully generated, enter the [Set type of super chip] menu to generate the corresponding key chip.
Method of using LS Nissan super remote: 
1. Enter the [Vehicle Remote] menu and select the corresponding smart key model to generate.
x431 key programmer
2. Place the smart remote key in the key programmer to generate.
x431 key programmer
x431 key programmer
Method of using LN Peugeot DS super remote
1. Enter the [Vehicle Remote] menu and select the corresponding electronic key model to generate.
x431 key programmer
2. Place the electronic remote key in the key programmer to generate.
x431 key programmer
x431 key programmer
3. For car models without electronic keys, enter [Set type of wireless remote] to generate the corresponding key.
x431 key programmer
 for more informations,please visit https://www.carobd.de/wholesale/launch-x431-key-programmer.html

Solution for “Launch X431 Tablet Install Unknown Apps” Error !!
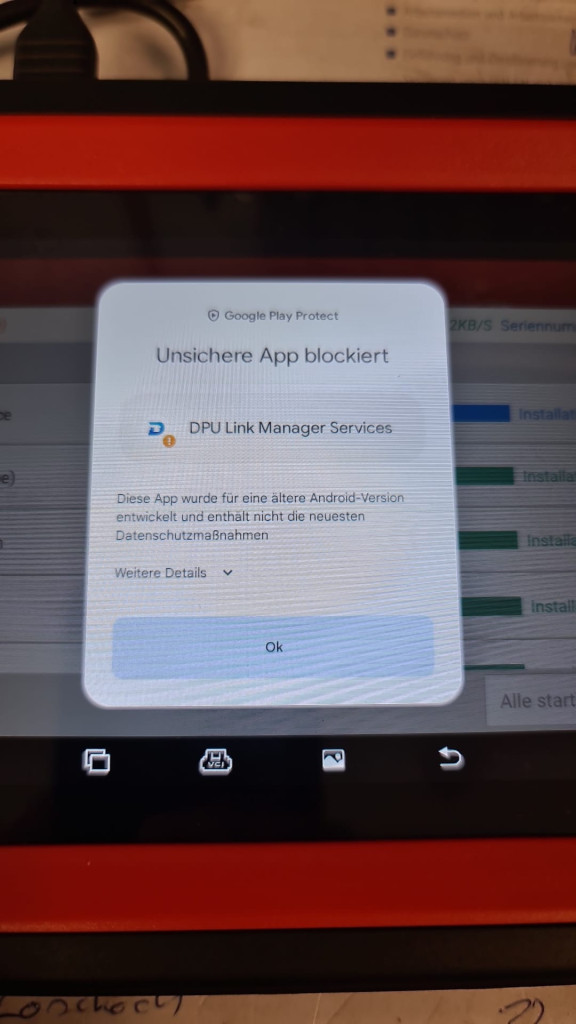
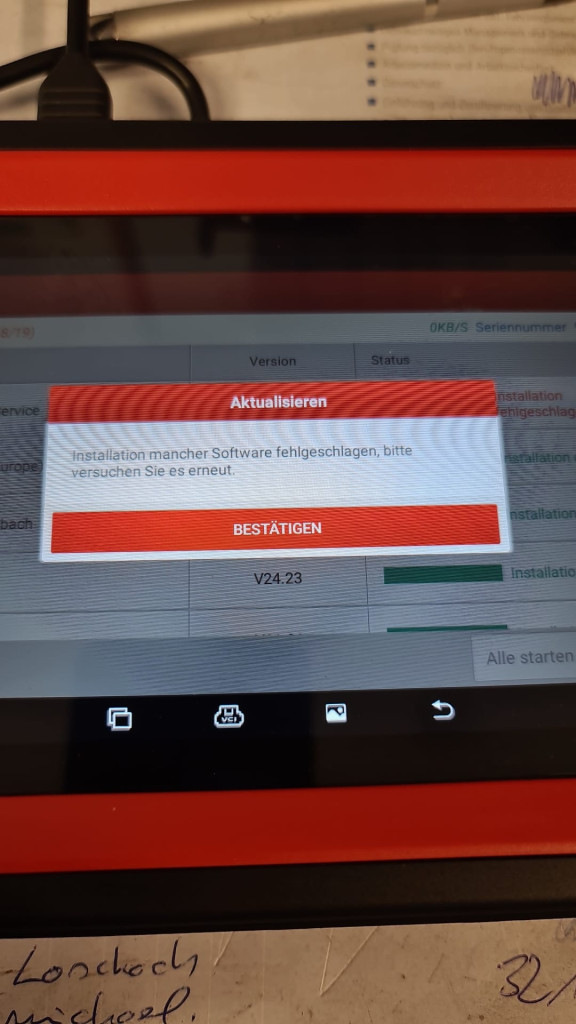
One of my customer got a Launch X431 Tablet machine, after finishing registration, he got an “Install Unknown Apps” error.

unknown install apps

WhatsApp Image 2024-01-16 at 17.23.57

When encounter this issue, how do we solve it ?

Here we share solution for this error
It may happen to the device when update the software, the app is blocked as unsafe app.
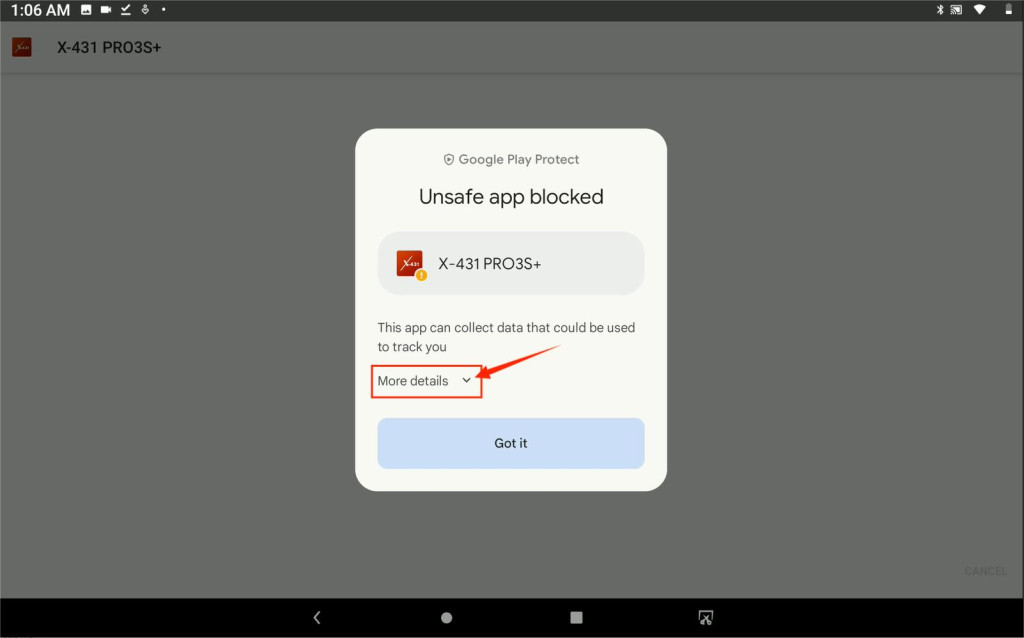
1.Tap More details

launch x431 unknown install app 1

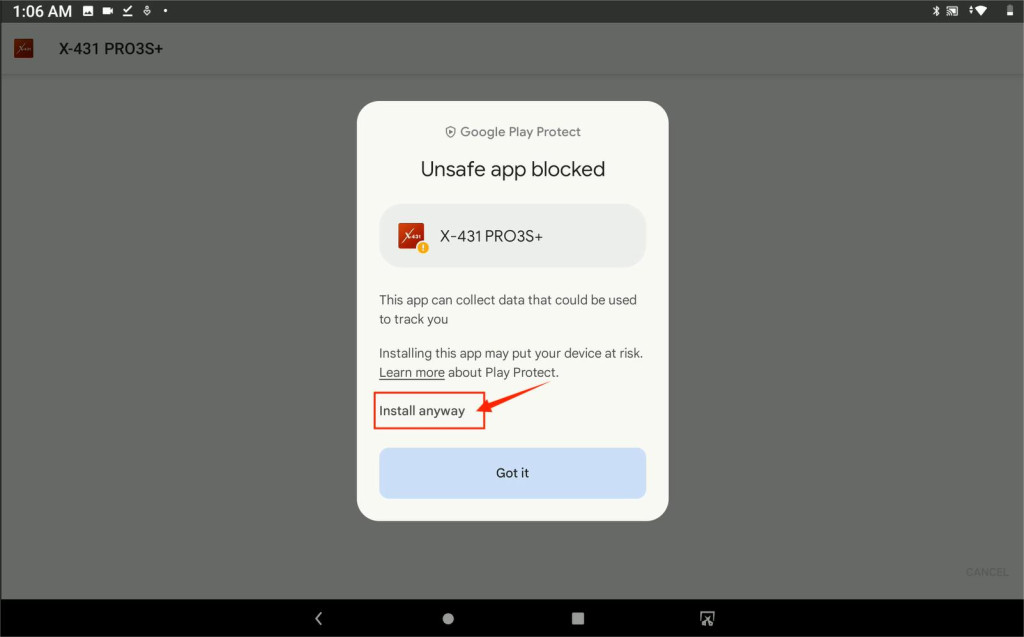
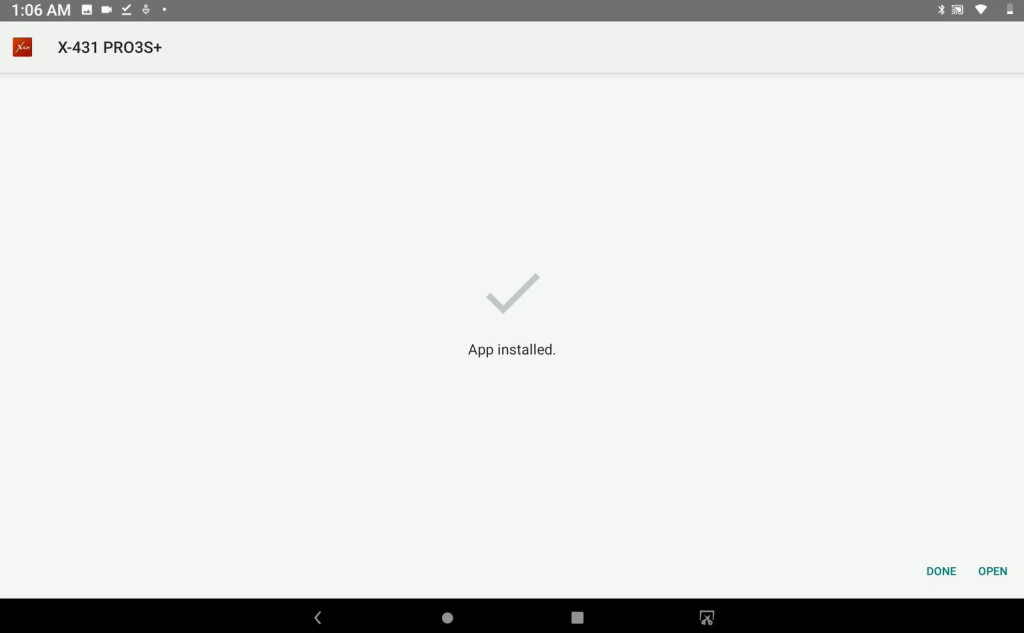
2.Tap Install anyway and the app will be installed.

launch x431 unknown install app 2

launch x431 unknown install app 2-1

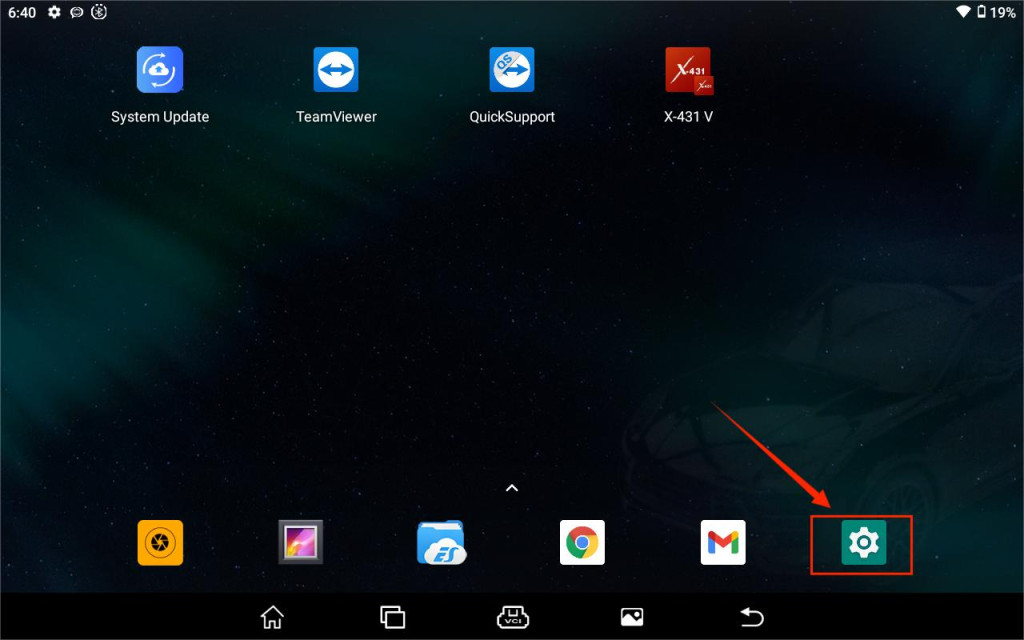
Or you can tap Setting

launch x431 unknown install app 2-2

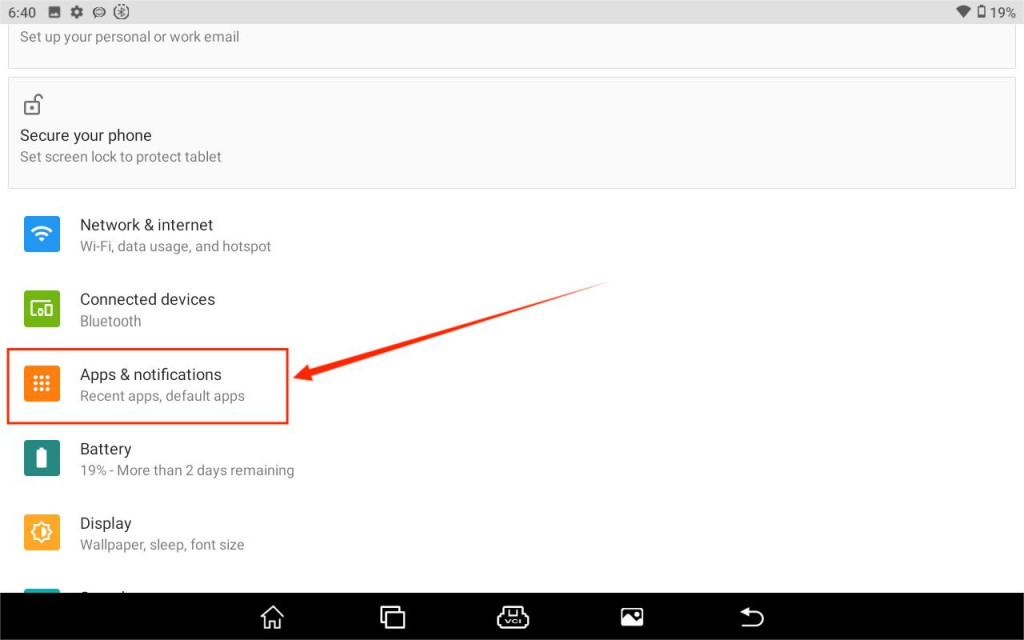
Select Apps & notifications

launch x431 unknown install app 2-3

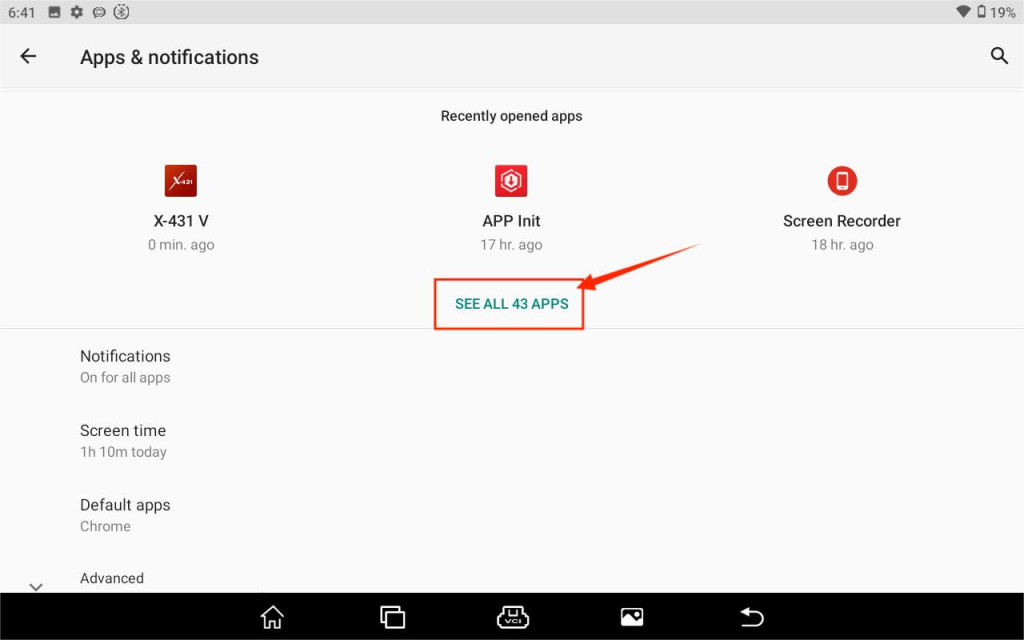
Select SEE ALL APPS

launch x431 unknown install app 2-4

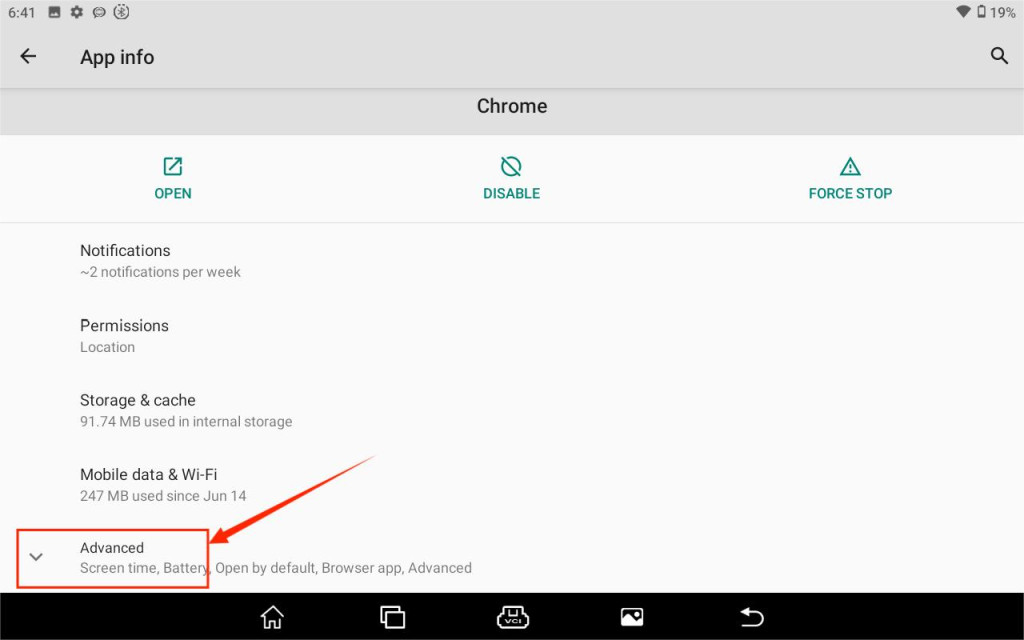
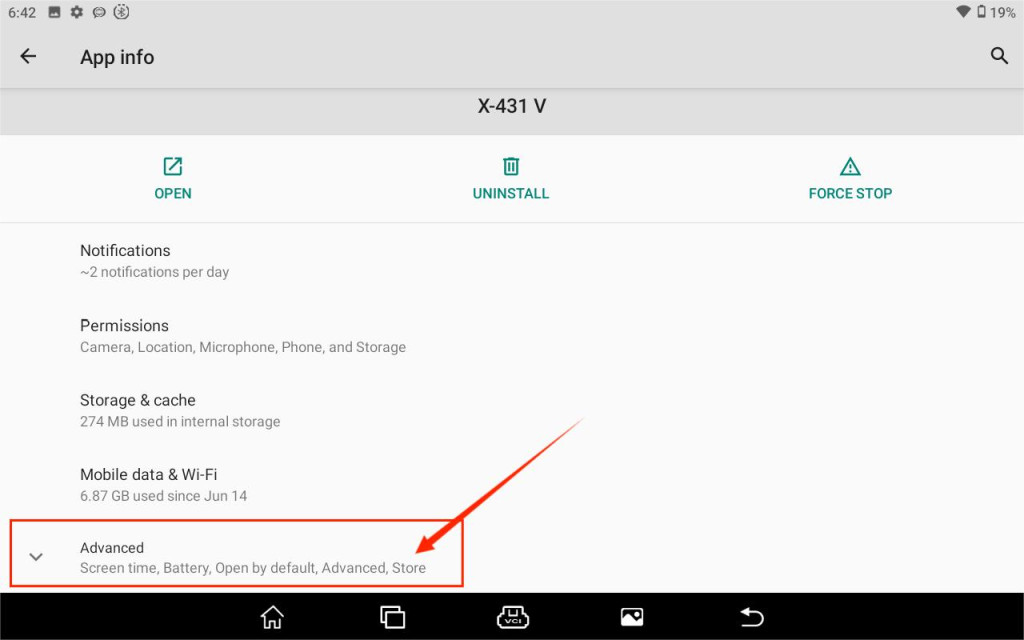
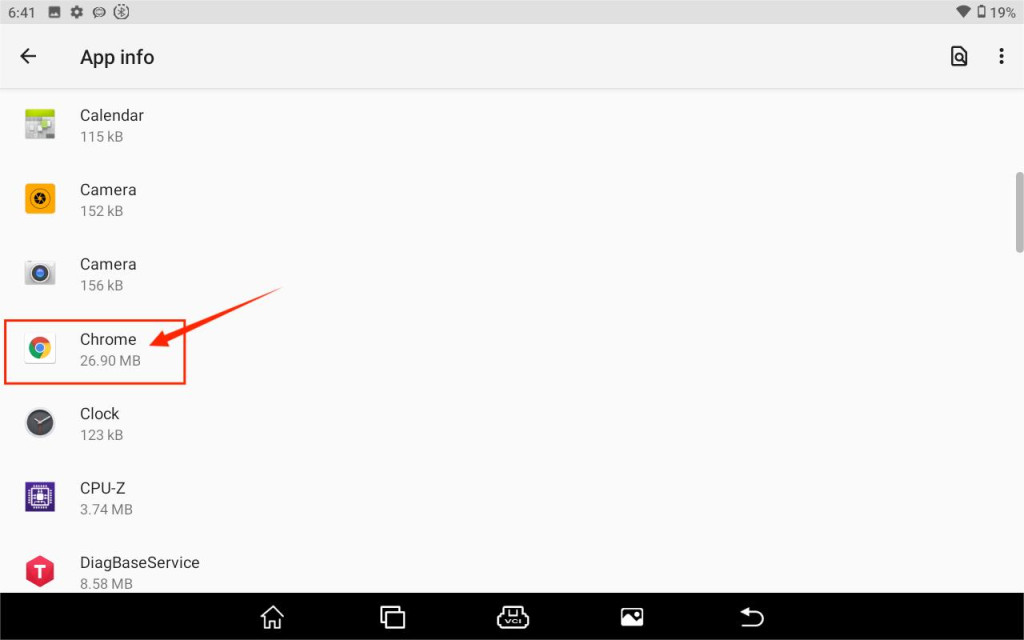
Select Chrome

launch x431 unknown install app 2-5

Advanced

launch x431 unknown install app 2-6

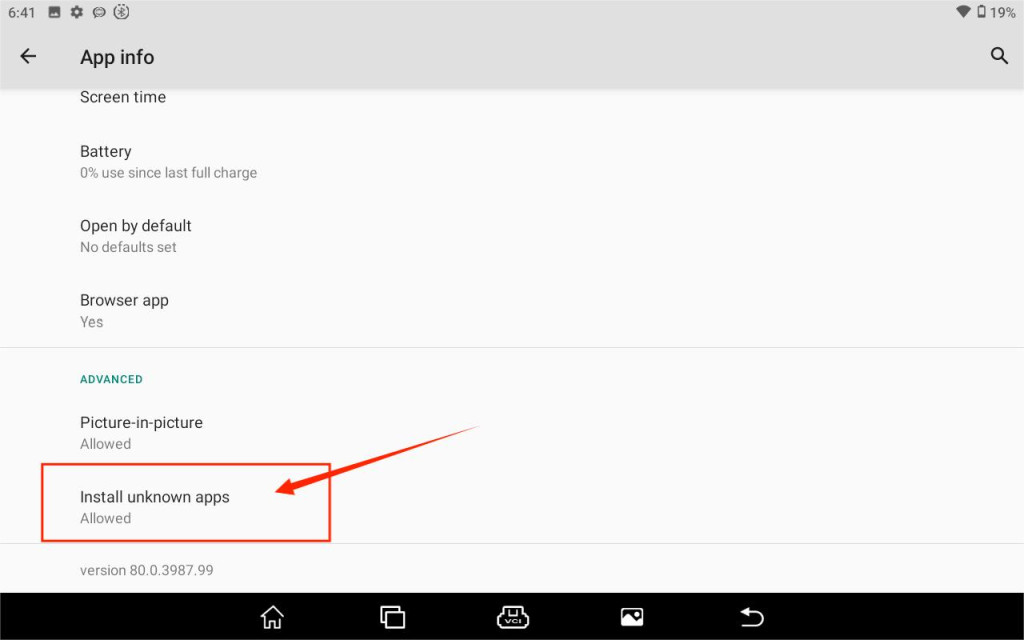
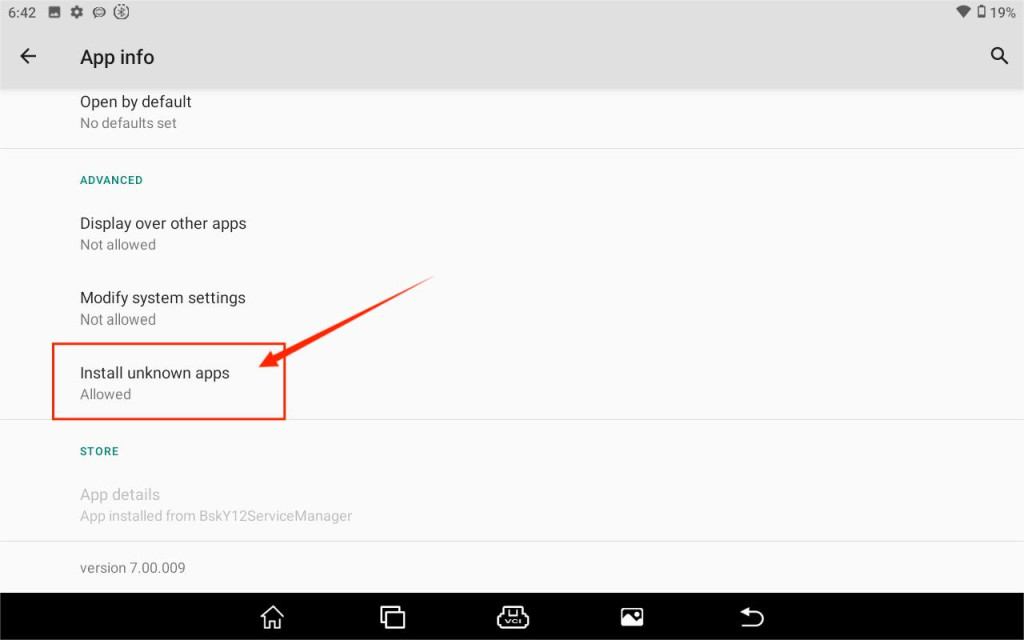
Install unknown apps

launch x431 unknown install app 2-7

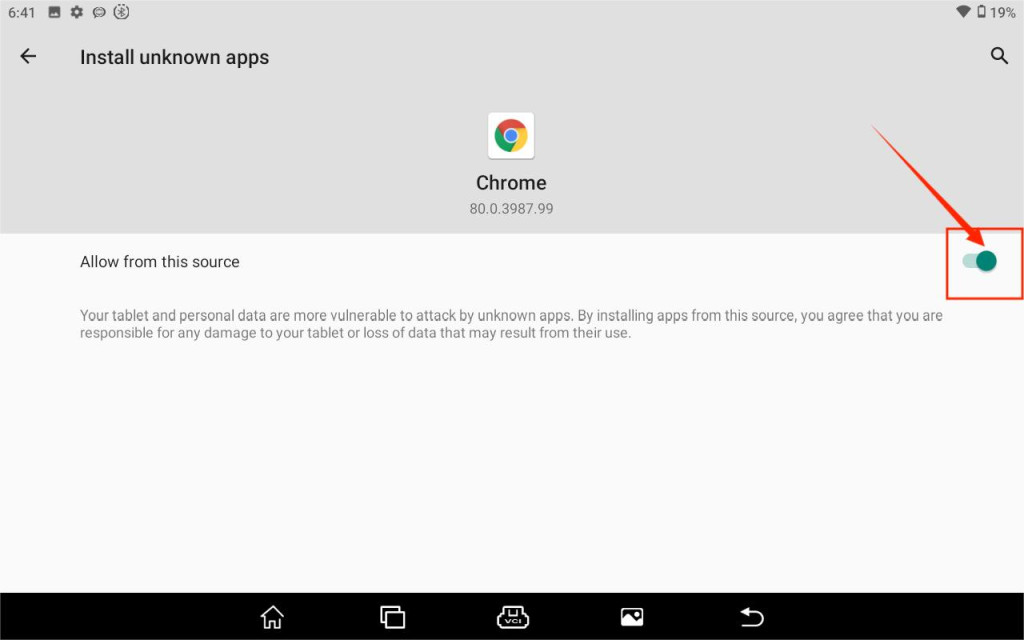
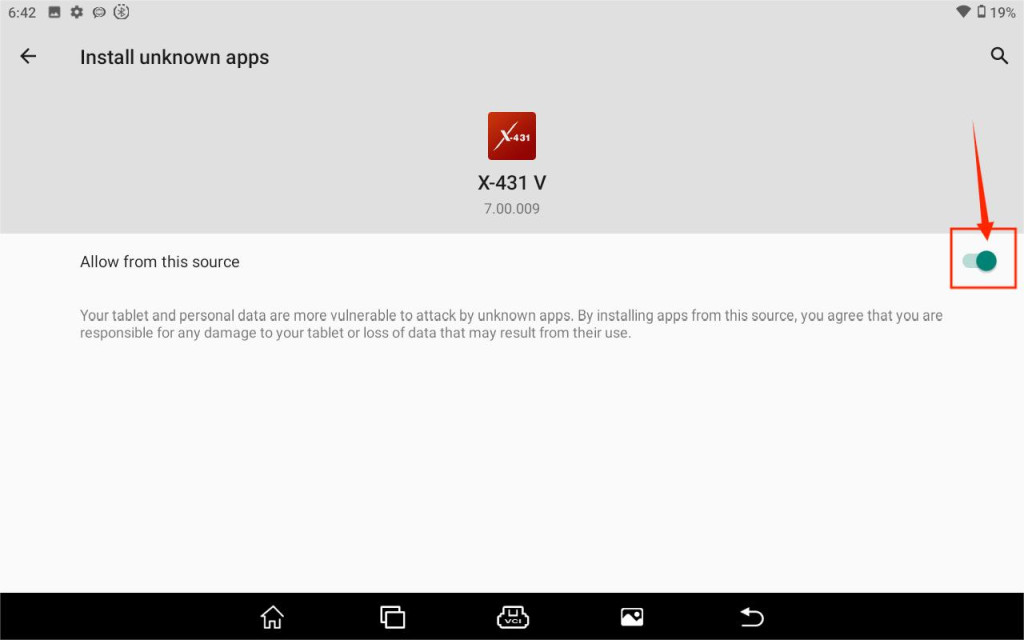
Tap the button to allow from this source

launch x431 unknown install app 2-8

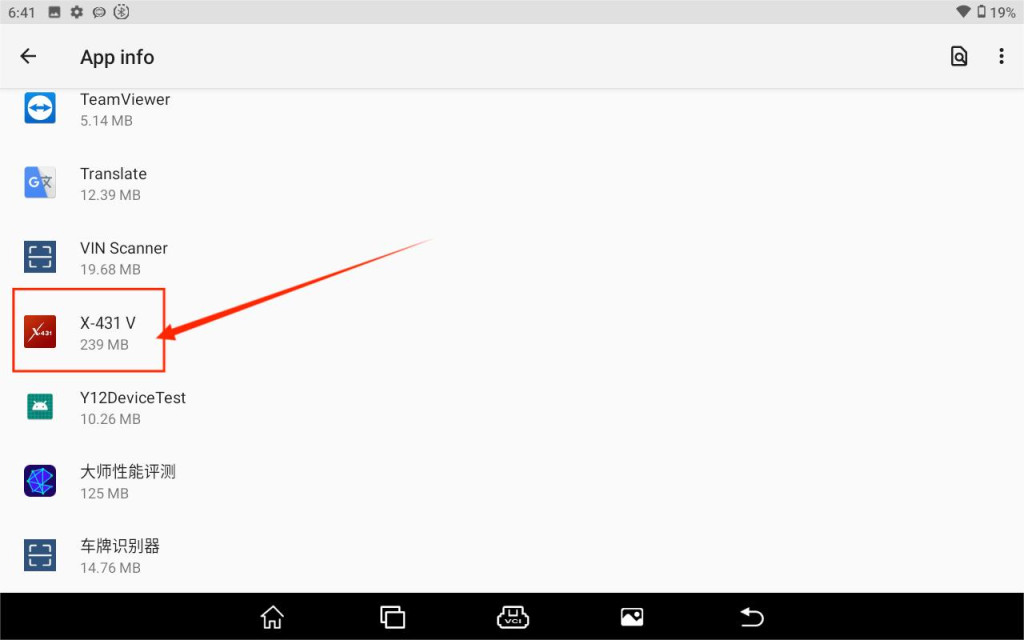
And select X–431 app.

launch x431 unknown install app 2-9

launch x431 unknown install app 2-10

launch x431 unknown install app 2-11

launch x431 unknown install app 2-12

Operation Guide for Formatting IM508 Stuck on Startup Page !!

Operation Guide for Formatting Autel IM508 Stuck on Startup Page

One of our customer who own an Autel MaxiIM IM508 machine, when he use IM508 to do key programming for his vehicle, he got a problem. The machine stuck on the startup page and can not continue anymore.

im508 stuck on start page

But how to solve this problem when using machine ?

Here we share steps which provided by Autel factory engineer

I. Set up Computer Circumstances
1. Install RK driver
Open the folder “RK_DriverAssitant”, run Driverintall.exe, following the on-screen prompts to install the driver.

2. Install Google-USB driver
Some computers may need to install this driver.

Open the folder “Google-USB_driver”; If your computer OS is 32-bit, run DPInst32.exe and if your computer OS is 64-bit, run DPInst64.exe.

If you have already installed this driver before, please go directly to next step.

II. Reflash the Device
!!Attention:This procedure will format your device and will delete the data on your device.

3. Run Reflasing Tool
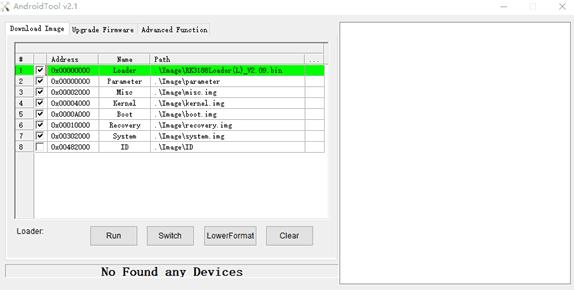
Open the folder “AndroidTool_Release_v2.1”, run AndroidTool.exe, the reflashing window will be displayed as shown in the figure below.

im508 format machine

4. Turn Your Device into Reflashing Mode
Connect your device to computer with USB cable and wait until the computer recognizes the device.

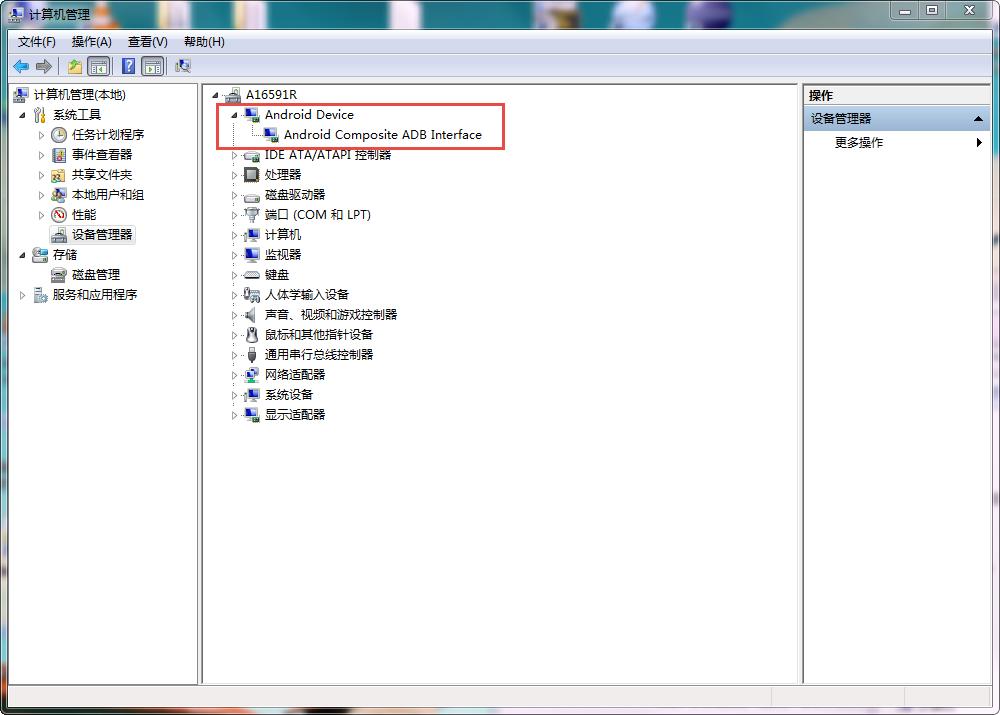
You can check the connection status via Device Manager on your computer.
As it is shown in the red mark on the figure below, the device was already recognized by the computer.

im508 format machine 1

5. Ready to Reflash.
Double click on the script named “reboot to loader.bat”;

im508 format machine 2

If it is run successfully, there will be a prompt message “Found One LOADER Device” displayed on the reboot window (as shown in the figure below).
After you saw this message, click “Run” button to start and wait till rooting process completed.

im508 format machine 3

How to configure the online programming function for Launch X431 PAD VII/X431 Pro5

How to configure the online programming function for Launch X431 PAD VII/X431 Pro5

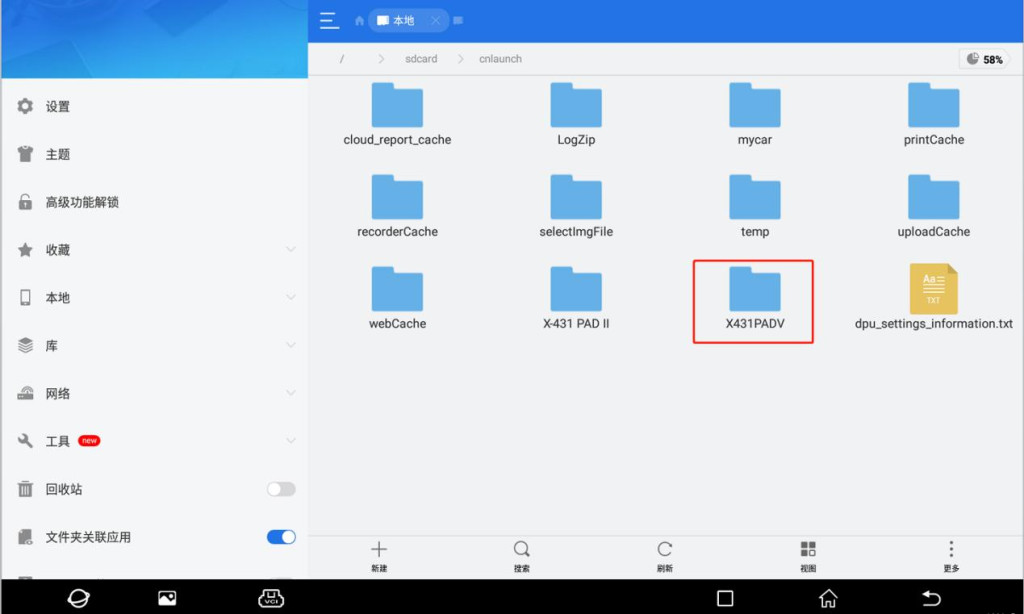
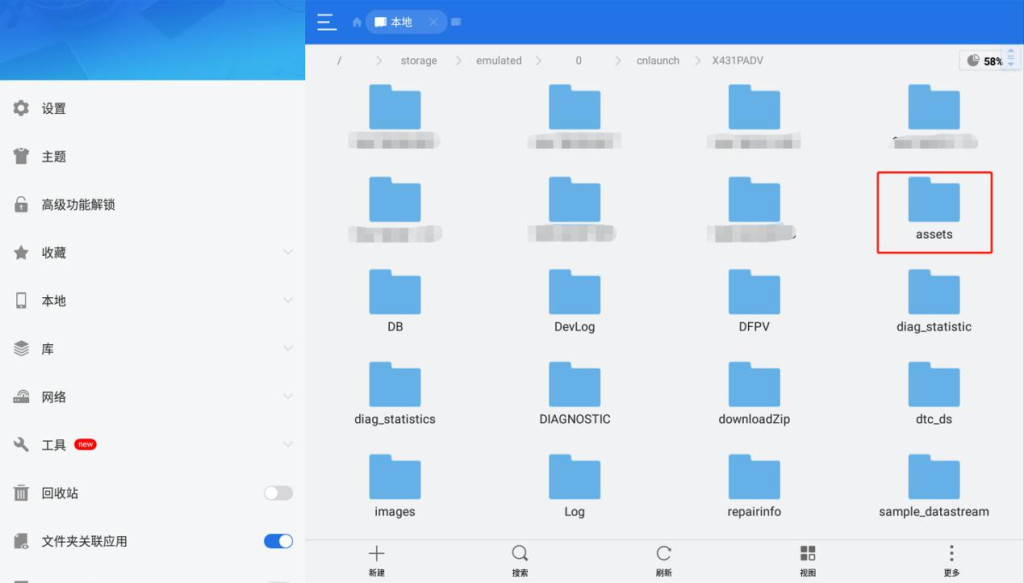
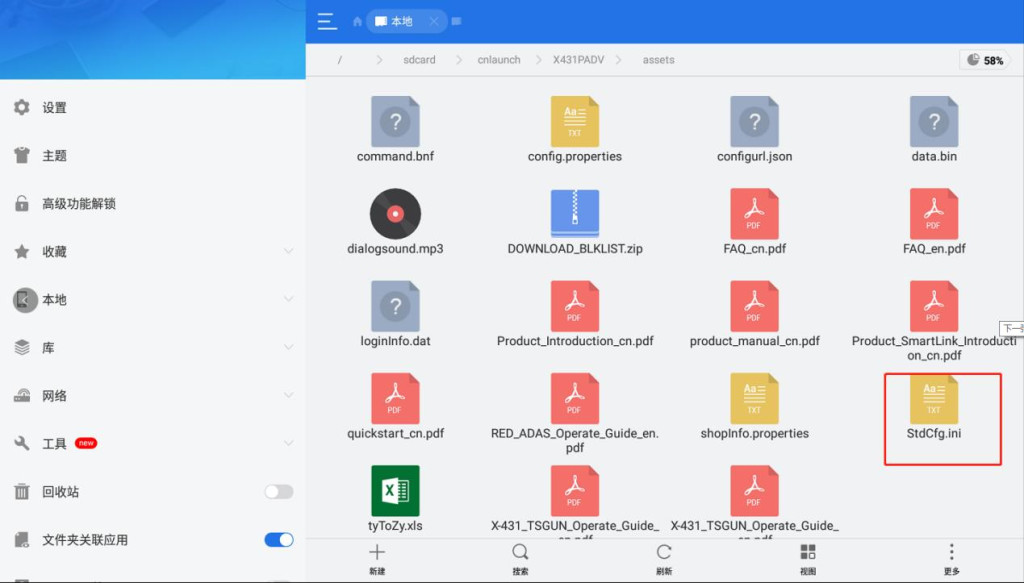
Firstly,Go to Other – Device – File Management – cnlaunch folder – X431PADV – assets directory and find the file named StdCfg.ini.

online-programming-configuration-1

online-programming-configuration-2

online-programming-configuration-3

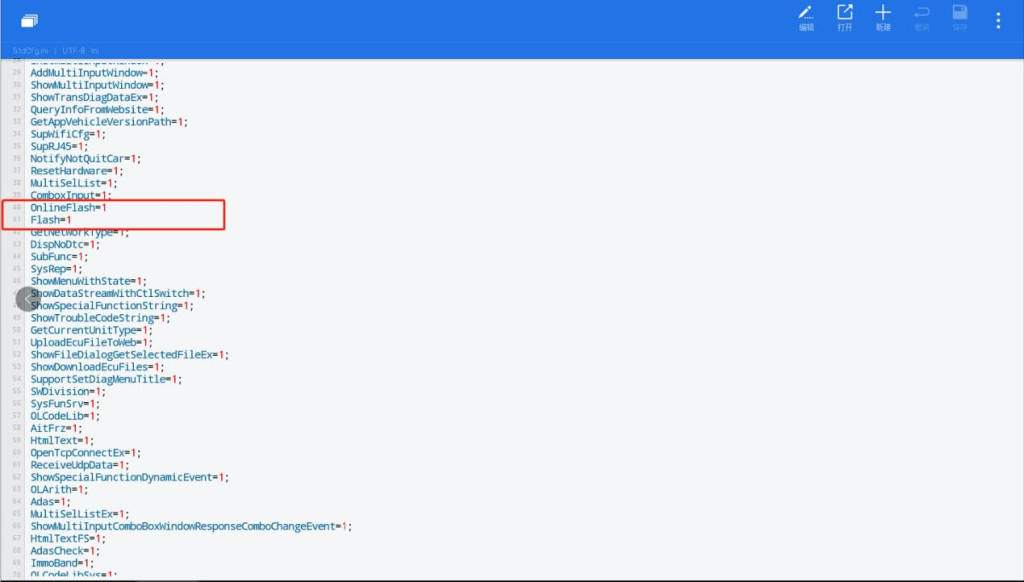
Open StdCfg.ini with a text editor, click the edit button on the upper right to put the file in editing mode, find the fields OnlineFlash and Flash, the default value is 0, which means the diagnostic software does not support online programming, click the corresponding field, and change the value to 1, then save. After successful saving, the corresponding value will change to 1, as circled in the figure below, indicating that the diagnostic software can support online programming function.

online-programming-configuration-4

Autel MaxiPro MP900 VS MP808, MP900BT VS MP808BT, MP900TS VS MP808TS

Autel MaxiPro MP900 VS MP808, MP900BT VS MP808BT, MP900TS VS MP808TS

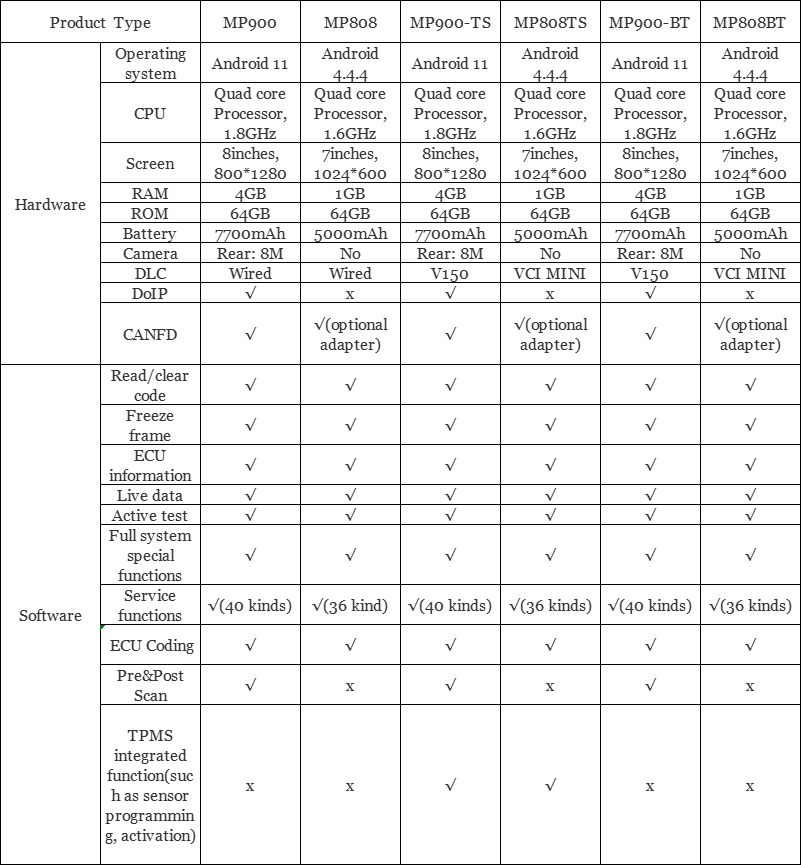
In this article, we will compare six of the most popular OBDII Diagnostic Scanners from Autel: Autel MaxiPRO MP900, Autel MaxiPro MP808, Autel MaxiPRO MP900TS, Autel MaxiPro MP808TS, Autel MaxiPRO MP900BT, Autel MaxiPro MP808BT. Many people may get confused when they need to make a decision among the six Diagnostic Scanners. This does not come out with no reason. They have similar features and functions. Read this blog and you will learn the difference among these four diagnostic scan tool.

Comparison Chart

comparison chart

for more informations,please visist

https://www.carobd.de/search/?q=MP900&DirID=