
Autel Update Subscription
Factory Flash Sale
Salve Up to 25%
Promtion Time:1st July-31th July


Free Download Land Rover Jaguar SDD VMware:
Land Rover-Jaguar SDD VMware.
JLR SDD download: https://mega.nz/#!dFVF3CqD!wPsCBxQWmAhkgumPkqSCEImJ4GTDTiRc1vOXkDRgWi8
Activated, not tested with interface.
Please use Vmware 15 , when open first time click I moved.
VMware v15 download: https://mega.nz/#F!5Zsw0KLI!GI88kqwLmRJo8iiOA4i0FA
Latest vmware 15 pro with activation included.
Free for all.
The advantages are simply that you don’t have to spend hours installing on old past their prime laptops with dodgy batteries liable to die while your flashing something on your car. Also i have included Mongoose toolkit in the VM that will auto flash the correct firmware into your cable for the version of SDD your using.
These can be ran on any system that can also run Oracle’s Virtualbox. That includes Windows, OSX and Linux machines. You don’t need a particular beefy laptop either.
1.How to install
a. Install your version of Virtual-box. Virtual-box for Windows PC or OSX for Apple Mac
b. Go to file and Import Appliance and select one of the two images you downloaded
c. Sit back, maybe put the kettle on.
d. You can now if you want, right click on the image and create a clone. So you have a backup.
e. Double click the file that now appears called WinXPJLR 130 or WinXPJLR 138 (which ever one you used). It should now load up windows XP in a window
2. How to use JLR SDD in a VMware
a. You should now have a window running XP. If you are using Version 130. A black window will appear. That is the auto script to set the date and time to 01/08/2012 each time you start it. It needs that date for the password and account to work. Just click in the black box and press a key.
b. Any windows boxes that pop up to search for hardware. Just cancel. Its looking for the drivers of hardware you don’t have. Ignore.
c. Plug your mongoose into the car and the other end into the laptop. Turn the ignition of your car to position 2. Go to devices on the top of the image, USB and select the mongoose. Should be Drews!
d. Now one of two things will happen. It will automatically detect the mongoose and update the firmware on the device or not. If not then double click on the icon for Mongoose JLR Configuration.
You should see your mongoose in the white panel in the configuration menu. Select it and flash firmware.
(It will send the right firmware to be compatible with the version of SDD you are using. If you use a different version of SDD. It will flash whatever one you need)
e. Now if you want to you can change the resolution of the virtual XP just like normal windows. I have set it at a low 800×600 so it is compatible on everyone’s screen resolution. So right click on the window and adjust to your own laptops specifications. If you press RIGHT CONTROL BUTTON and C for scaled mode or RIGHT CONTROL BUTTON and F for full screen mode.
d. Now double click on JLR SDD. It should now load up Internet explorer (yes it is browser based!!). If it fails to load, close the browser and stop the application. Double click again Jaguar SDD, and it will load.
f. If you are confronted with the password screen only with Version 130. Which sometimes happens? It is below
(Also there is a password.txt on the VM images desktop with it)
USER ID – JLR9A8172
Password – L538X760
Then press identify
g. You should be now confronted with the vehicle identification number (VIN) screen. If read is greyed out. Then your mongoose is not talking to the car.
Is it plugged into the car and laptop?
Is the car ignition in position 2?
Did the mongoose configuration tool flash the firmware?
Did you activate USB in the image?
If you followed all my steps to the vehicle identification number (VIN) screen. The read option should be coloured. Select it and it will retrieve your VIN, and then you’re on your own adventurer!
Good to know: it’s risky!!!
For sake of security, tested SDD is your way to go.
JLR SDD diagnostics & programming – tested OK!
http://www.carobd.de/wholesale/jlr-sdd2-diagnose-and-programming-tool.html
JLR SDD diagnostics – tested OK!
http://www.carobd.de/wholesale/jlr-mangoose-sdd-pro-v139-jaguar-and-land-rover.html
JLR SDD online programming – tested OK!
http://www.carobd.de/wholesale/jlr-doip-vci-sdd-pathfinder-interface-for-jaguar-land-rover.html
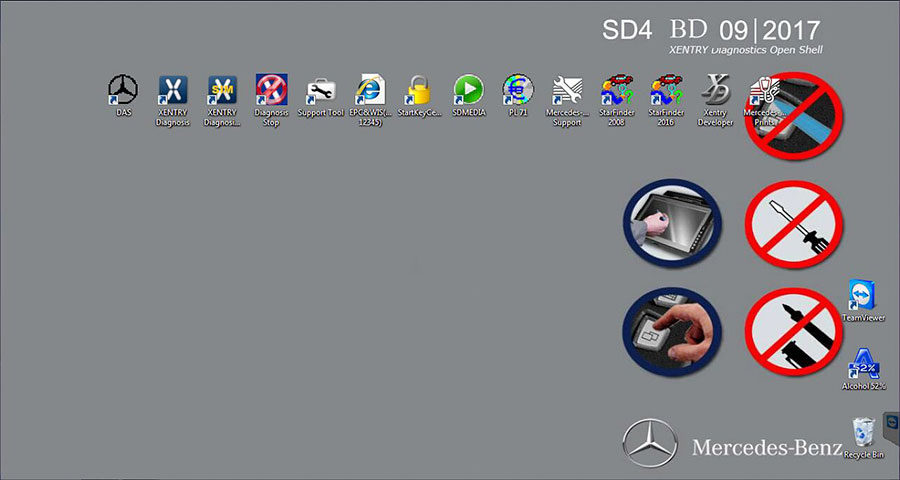
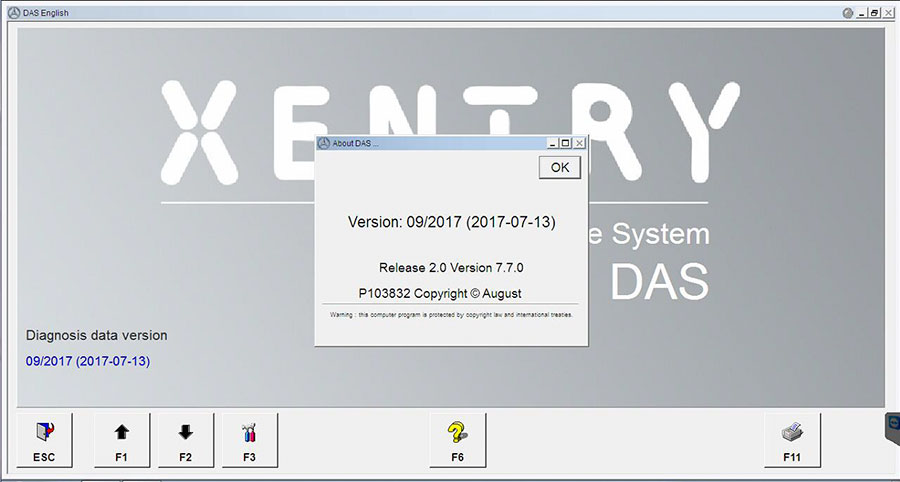
Starts with Mercedes Benz Xentry OpenShell XDOS 2017.09 free download, then reliable source of Xentry OpenShell XDOS 2017.09, ends with Xentry OpenShell XDOS 2017.09 setup.
Mercedes Benz Xentry OpenShell XDOS 2017.09 free download
https://mega.nz/#F!ZUZz3JBL!0NSwL9wyFV9ApFqRR0Jofw (28774.84MB)
PW: OpenShell9.2017
Mercedes Benz Xentry OpenShell XDOS 2017.09 software analysis:
Starkey like old version 7 2017 and 5 2017
More secure
Data is not visible
DAS Controlled from xentry
AddOnCenter doesn`t close to a tray, if it was once opened , to get create controlled for Message Queue (MSMQ) Server, that why show error on shutdown
Security analysis:
There new security not activated, may be will activated on next version
2221-XX Verify by server
3.91 Verify by vehicles
DAS License verify by Xentry
XDOS_09.2017_Missing_Pics_Fixed_x86_x64 free download:
https://mega.nz/#!gdIV1CzA!XGlvg0Ckh65uQcXkFMJfwqQ_5QV0grfAqYL-QIDyVQQ (46KB, No pass)
Enjoy at your own risk.
Tip: the 28774.84MB files is a little pain to download online.
Any reliable source to have Mercedes Benz Xentry OpenShell XDOS 2017.09?
Yes! I prefer to this Mercedes Benz Xentry OpenShell XDOS 2017.09 (common HDD)
Or Mercedes Benz Xentry OpenShell XDOS 2017.09 (SSD Hard disk) which is more stable.
Enjoy it at easy, because it is verified working like a charm, so easy to gain the software instead of taking much time to download online, if any installation problem, the technical support is available.
Wallpaper:
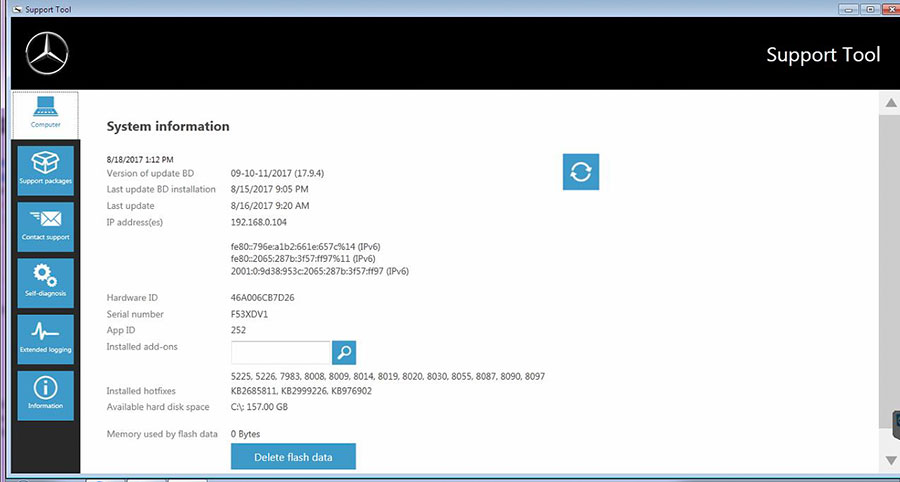
Xentry OpenShell 2017.9 support tool
Xentry OpenShell 2017.9 installation:
1.You need absolute clean windows. choose win 7 32bit
2.Available hard disk space: C:\:157.00GB.
Here I’d share the solution to the Xentry OpenShell 2017.9 installation problem: The InstallShield Wizard was interrupted before Xentry Diagnostics Openshell could be completely installed.
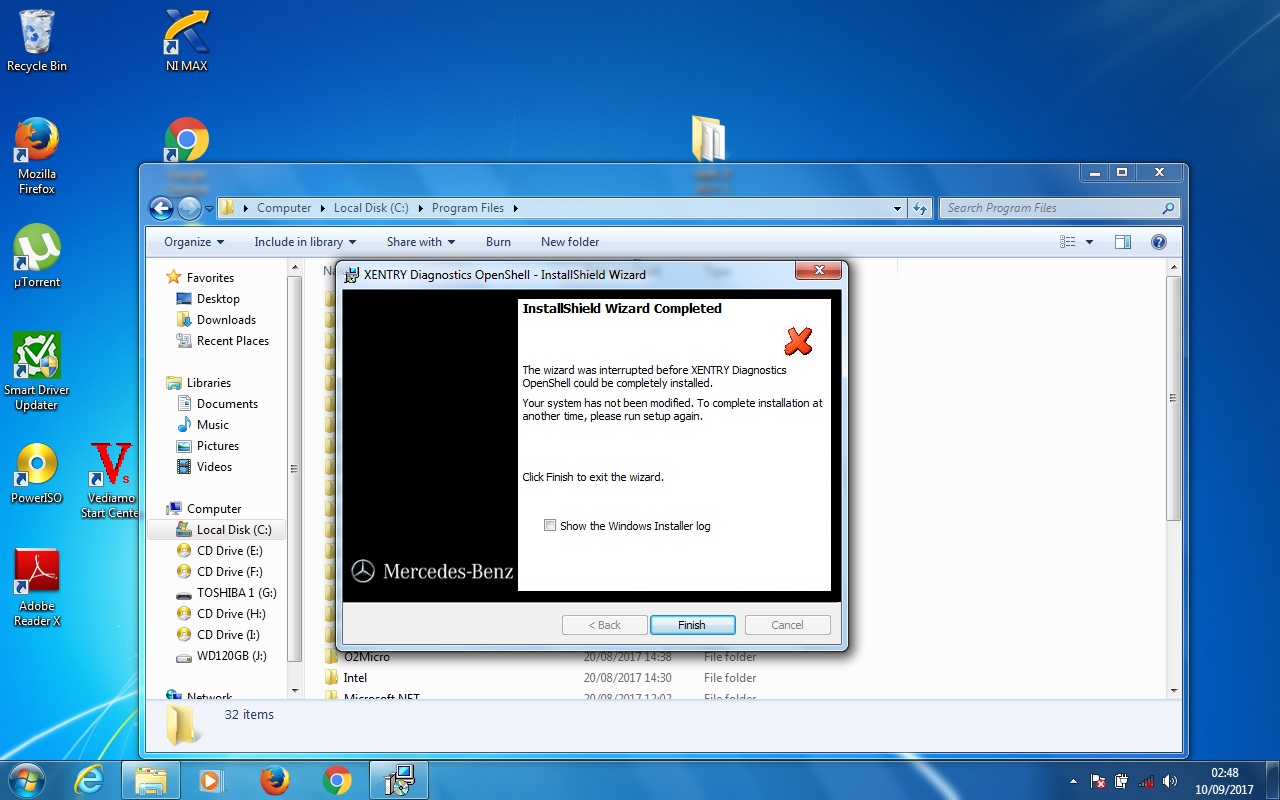
Possible reasons:
1- from virus
2- or Microsoft Message Queue Service is not enable
Please ensure you did like bellow tips:
1.You need absolute clean windows. choose win 7 32bit
2.Click to show you the log file and read that. It will be specified what has gone wrong with your install.
3.Be sure to run your install with administrator rights and have enough room on your HDD.
Finally, the problem is fixed.
It was the Microsoft Message Queue Service not enabled now is installing fine.
To sum up:
This post provide two source of Xentry OpenShell 2017.9 download, which one to go for? It’s up to you, personally, I’d prefer to the reliable source.
Good luck.
Free download Scania VCI 2 VCI 3 software SDP3 2.31.1 on Mega: (tested)
https://mega.nz/#!Dd1gTbKT!oY2Z4uNUtneIRf5DGZdPWhZAQR3rfNaN0LsEFl9HZww
Scania SDP3 2.31 download: (Win7 64 bit,WIN 10 32/64 bit)
https://mega.nz/#!DYExVD7Y!Z7vVu-KB6hwABJ8LOyYeyd4VyhuI7w6nAqsVDYUzbrw
Password: cimi
Scania SDP3 2.30 download free:
https://mega.nz/#!dcU3WLJL!iNjRAo_zKbkEoI0ArlBoXfcBvRvrLlKlB7IJnqN6SLo
No pass!
Scania SDP3 2.31 test report: successful, safe to use
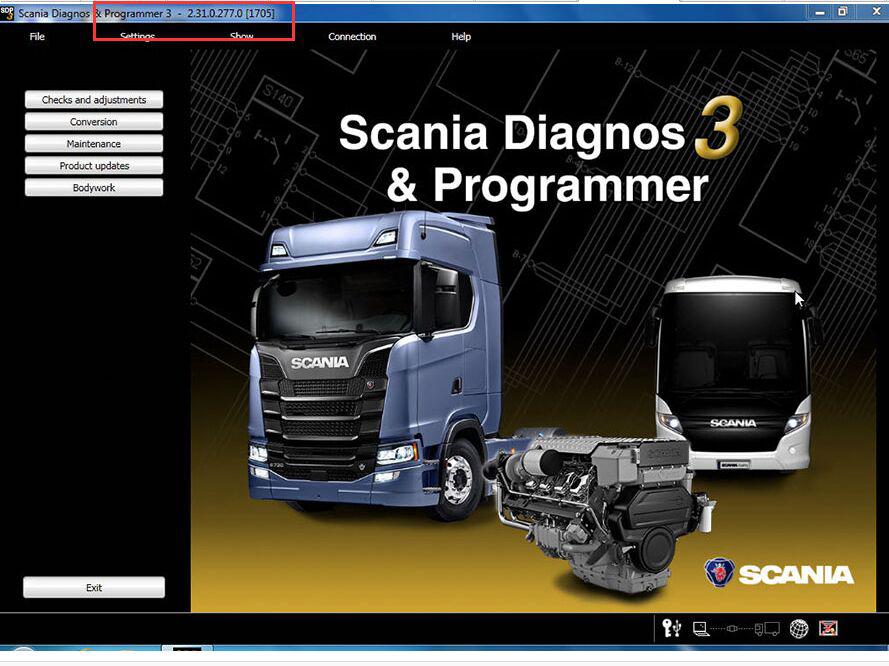
Note 1: without USB dongles
Note 2: SDP3 2.31 activation help with professionals at carobd.de
Test result: Scania SDP3 latest version 2.31.1 is verified to work no issues and is released on 09/07/2017: (works perfect)
http://www.carobd.de/wholesale/newest-scania-vci-2-sdp3-for-trucks-buses.html
Scania SDP3 2.31.1 system requirements:
Windows 7 32 bit, Windows 8/8.1 32 bit, Windows 10 32 bit.
■Microsoft .Net Framework 4.6.2 must be installed.
• There is no longer support for Windows 7 32 bit. For more information, see Ti 00-17 01 25.
Scania SDP3 2.31.1 features:
Function view
By using the search box at the top of the window you can now search directly in the function view. You can choose to search in the Adjustment, Check or Calibration tab.
Troubleshooting
The procedure for defect reporting in SDP3 has been improved to make it simpler to follow.
Instead of a guide in several steps, there is now a simple dialogue box. In the dialogue box you can select if you want to save the defect report locally or if you want to send it via e-mail. To be able to send the defect report via e-mail you must have Microsoft Outlook. You can choose to create a defect report for a specific individual product or to make a general defect report.
The dialogue box for defect reports you find in the Help menu.
Note: As from SDP3 2.31, the dialogue box is no longer available for use if you are connected to a job type. Scania CV AB 2017
Communication troubleshooting
• The instructions& solution for communication errors has been updated. You access the document via the Help menu.
System specifications
CUI –Infotainment system
• Support resume an interrupted download of software has been introduced.
COO – Coordinator
• The new guide verify and check switch modules in the steering wheel according to the version and the vehicle’s SOPS file.
EMS – Engine Management System
• Vehicles with the S8 engine control unit have previously lacked support for Default setting of power take-off adaptation. This has now been rectified.
• The Spark check guide has been removed for vehicles of the P, G, R and S series with Euro 6 gas engine. As the support in SDP3 has been improved, the guide tool is no longer required. Instead, use the Electrical system view for troubleshooting.
RES – Rechargeable energy storage system
• For the sake of clarity and uniformity, the hybrid battery has been changed to propulsion battery in all instances in SDP3.
TMS – Transmission management system
• New parameters have be added to TMS2:
o Clutch monitoring
o Downhill speed control with active prediction
o Reduced use of the clutch (new values) Scania CV AB 2017
• After a product update of the transmission management system, the Accelerometer adaptation must always be run. It now starts automatically after an update of the control unit.
GMS – Gearbox management system
• A function guide which shows how the power is transferred in the gearbox for different gears in real time has been added. You can also see how the gear shift forks move and which sleeves are affected.
The guide applies to the following gearboxes:
o GRS905
o GRS905R
o GRSO905
o GRSO905R
o GRSO925
o GRSO925R
o GRSO935
o GRSO936R
The guide also applies to the following transmission management systems:
o OPC4,
o OPC5
o TMS1
o TMS2
CMS – Chassis management system
• A guide for bleeding control circuit 2 has been implemented.
• Circuits, I/Os and the functional description of differential locks has been improved.
TSS/TSA – Tag axle steering system
• Function guides for activating and deactivating service mode have been implemented. Scania CV AB 2017
• A function guide for checking EST and ESTA has been implemented.
• A new parameter for the centring function has been implemented.
Scania SDP3 2.31.1 car list:
To work with Scania VCI2: can support vehicles after the year 1995:
Scania P, G, R, T, buses Scania series K, N, and other vehicles using engines Scania
To work with Scania VCI3: support vehicles after the year 2004:
trucks, buses and other heavy vehicles, which produces the corporation Scania
In short, Only hardware difference, they can use the same software
Scania vci 3 diagnostic tool highlights its high-speed WI-FI connection
Scania diagnostic codes:
000 00 No Fault
01 001 less than the rated voltage – heater works
02 002 higher than the rated voltage – heater works
004 03 Short circuit fan (D2I)
005 05 Short-circuiting the wires from alarm (D2I)
009 09 Heater off system TRS (D2I / D9W)
010 0A higher than the nominal voltage (heater stopped)
011 0B voltage less than the nominal (heater stopped)
012 0C overheat – fuel pump is turned off
013 0D temperature sensor recorded a high temperature
014 0E big difference values of t. sensor. overheating sensor. regulation. t (D3W / D9W)
015 0F heater overheated many times – the heater is turned off (D2I / D9W)
017 11 Reusable overheating (t exceeds the second threshold) (D3W)
020 14 Candle / rod defective bulbs
021 15 Short candle / bar bulbs
022 16 Faulty relays candle / bar bulbs (D2W)
023 17 Internal defect relay control R2 candle / bar bulbs
024 18 Short-circuit switch controller candle / bar bulbs
025 19 Short-circuit diagnostic socket
029 1D fan air gap 5 does not operate R3
030 1E air fan does not work in all positions (R3-D3W)
031 1F air fan does not work in all positions (R3-D3W)
032 20 Air fan does not work in all positions (R3-D3W)
033 21 Air fan does not work in all positions (R4-D2I / D9W)
034 22 there is no contact with the solenoid valve of the cooling system. (D2W / D9W)
035 23 No contact with the relay average performance
036 24 Short-circuit relay average performance
037 25 Do not rotate water pump (D2W / D9W)
038 26 No contact with the fan relay cab heating (D2W / D9W)
039 27 Short cab heating fan relay (D2W / D9W)
040 28 Short circuit solenoid. valve cooling system. (D2W / D9W)
042 2A Short circuit water pump (D9W)
043 2B Short cable from the computer to the heater fuel pump (D9W)
047 2F Short circuit of the fuel pump
048 30 No contact with the fuel pump
050 32 Heater run many times but have not worked (relay R3)
051 33 Flames emerged immediately after pressing the start button heater
052 34 No start (restart purge)
053 35 Stop flame during startup
36 054 Stop flame position max. productivity
055 37 Stop the flame in a position average performance
056 38 Stop the flame in the position of poor performance
057 39 Flame sensor short circuit (photoresist)
058 3A heater is turned off, but the flame in the combustion chamber (D2W)
059 3B Water temperature rising too quickly (D9W)
060 3C No contact with the sensor temperature control
061 3D sensor short circuit temperature control
062 3E No contact with the potentiometer (D2H / D2I)
3F 063 Short potentiometer (D2H / D2I)
064 40 No contact with flame sensor
065 41 Flame sensor short circuit
071 47 No contact with the sensor overheating (D3W / D9W)
072 48 Short-circuit overheating sensor (D3W / D9W)
073 49 Overheating sensor recorded the fastest increase in temperature (D9W)
090 5A Spontaneous error
091 5B high surge (high-voltage wires, CB-radio, etc.)
092 5C Faulty heater control unit – fault ROM
093 5D Faulty heater control unit – faulty RAM
094 5E Faulty heater control unit – fault EEPROM
096 60 Temperature sensor faulty heater ECU (D2I)
097 61 Faulty heater ECU (D2I / D2W / D9W)
255 FF cleared but faulty memory EEPROM
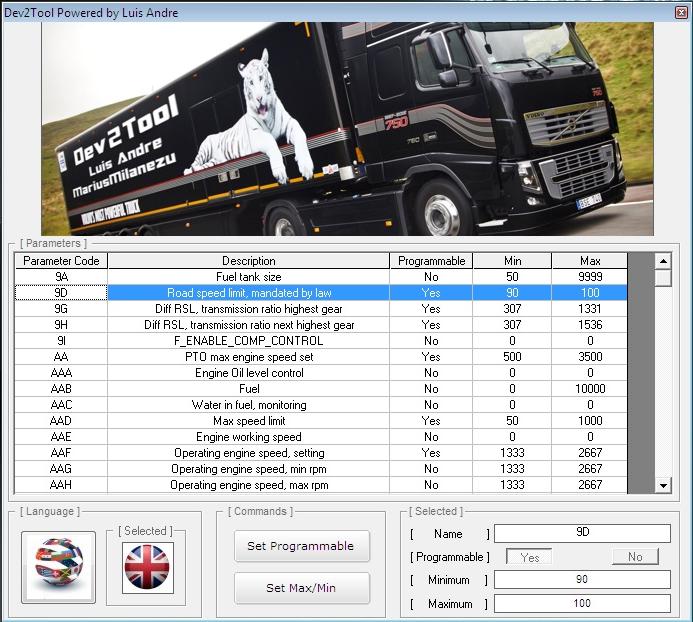
Volvo premium tech tool 2.5.86 software download:
http://www.carobd.de/wholesale/volvo-88890300-vocom-ptt-20455.html
This is the latest Volvo Tech Tool 2.5.86 crack… works perfect with Nexiq, Xtruck, DPA4+, DPA5, Vocom, 88890020, Noregon, for diagnostics via tech tool/ programming via dev2tool/ reprogramming via visfeed on old or new trucks (2017).
Volvo PTT 2.5.86 software update:
* Full Techtool Activating (For all volvo brands !!!)
* Last ACPI+ update for standard and for development AND special DESIGNER user !!!
* You can Choose User ID like: A123456 or M555555 OR TECHTOL OR ANY OTHER..
*You can choose your logo or name to stay in tech tool
*NOT DLL PATCHED registration. Real registration for Tech tool
– Connection on real vehicle – NEW Verion
7.Volvo/ IS File Encryptor/Decryptor
Tech Tool 2.5.86 Windows 7 32/64bit install:
Windows 7 32/64 Ultimate or Professional or Enterprice With service pack 1.
DONT WORK With Home Edition

1/ open in admin setClientID.exe set ID: 190430
2/ TechToolInstaller_Dev.reg
3/ TT204-Prerequisites.cmd (client update ID:190430)
4/ TT204-MainInstallationPackages.cmd
5/ TT204-MainInstallationPackages2.cmd
6/ TT204-Patches.cmd
(don’t open tech tool)
open client update and make all update 2.04.87(is very long)
—
Copy and Replace
APCIPLUSDATA.DLL
C:\Program Files (x86)\Tech Tool\Tech Tool\Apciplus
BaldoLocal.Data.dll >>
C:\Program Files (x86)\Tech Tool\Tech Tool\BaldoLocal
VolvoIt.Waf.Login.Ui.dll >>
C:\Program Files (x86)\Tech Tool\Tech Tool\Login
BaldoLocal.sdf >>
C:\ProgramData\Tech Tool
copy and raplace apci+ update / in these path :
C:\ProgramData\Tech Tool\Waf\DtR
and
C:\ProgramData\Tech Tool\Waf\OtD
open tech tool
Tech Tool and Update Product Information
Disclaimer: premium tech tool software installation is time-consuming (usually needs one day) and it’s not easy for most of diy users. Usually, volvo tech tool for sale comes together with free installation service on many eshops, such as carobd.de and the like.
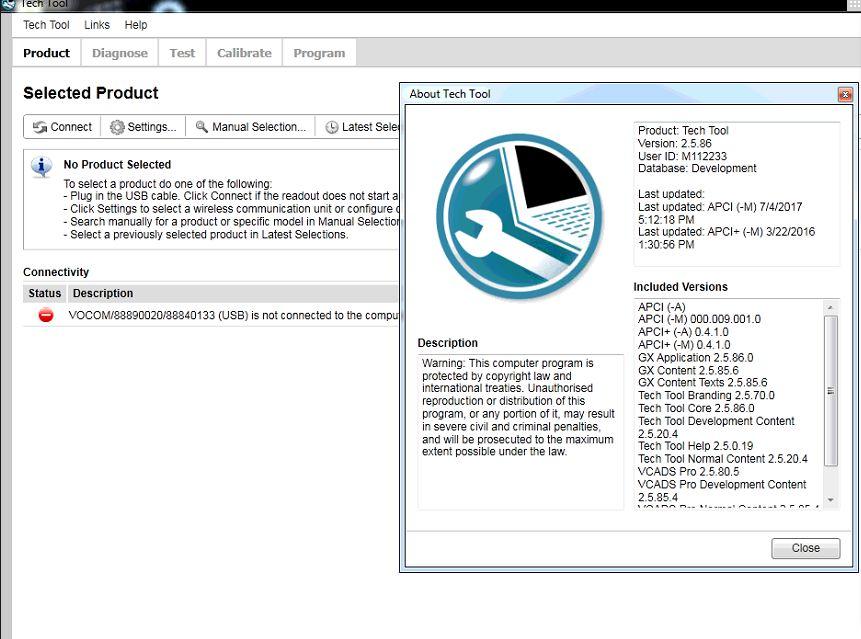

Volvo Tech Tool 2.5.86 activation:
The latest version is Tech Tool 2.5.86.0 and the latest have new update technology
and it’s because of bad activation. new 2.06 not could work with old activators.
Usually KG doesn’t activate properly. Version 2.5.86 has RSS feeds that it calls to in order to initialize the application. If you’re not connected to the internet during this, it will fail and timeout causing that drop down to become blank, and also stopping use of PTT altogether.
How to fix for tech tool activation:
First, make sure to use a USERID that follows Volvo standard or you won’t be able to program parameters and will result in an error.
– you must use two alphanumeric characters followed by an even number of numbers. For example, AB1234.
Also, you must check the box “No central” if using the popular KG floating around or you will need to background sync. This is the reason your databases are coming up blank and I’m guessing it’s running slow when this occurs. The temp fix is to connect to the internet, then open Tech Tool. Problem solved for a week then it will occur again unless you re-run the KG, erase DB and re-activate using “No central store” checkbox and correct user ID fingerprint.
* The last important for newbies: to buy Premium Tech Tool PTT 2.5.86 with FREE installation & activation service. Now, many Chinese vendors sell Premium Tech Tool crack and offer free service like this as far as i know. carobd.de is one of them.
Premium tech tool truck list:
Volvo Trucks (Older electrical system, Vehicle electrical system \`98);
Volvo Trucks (VERSION2, VERSION3 – PARAMETER PROGRAMMING);
Volvo Trucks (VERSION4 – FH4/FM4 – PARAMETER PROGRAMMING);
Volvo Buses (Conventional, Multiplexed, Multiplexed v2, Multiplexed v3);
Volvo Construction Equipment;
Volvo Penta (VERSION2, VERSION3);
Volvo OEM Component Customer (VERSION2, VERSION3);
Mack Trucks (V-MAC I/II/III, ITC, IV, IV+ – PARAMETER PROGRAMMING);
Renault Trucks (VERSION2, VERSION3, VERSION4 – PARAMETER PROGRAMMING);
UD Trucks (VERSION2, VERSION3).PARAMETER PROGRAMMING);
2016.04 Porsche PET 7.3
PET revision 7.3 Spare Parts Catalog V2016 compatible vehicle coverage: Works with Porsche’s vehicle lists to the whole year long till 2016.
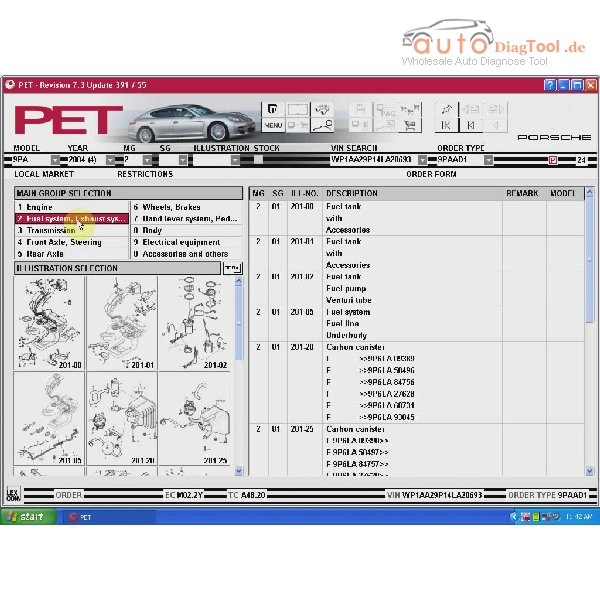
How to install the software?
1. Copy “PET” to C:\
2. Copy the shortcut “C:\pet\PET7” file to desktop.
3. Run hardlock, select “US English”, then click “Next” till you get prompt “…Successfully”.
4. Run “emulator” and select the first option icon and get prompt “…Successfully”.
5. PET program start, it is ready to use.
Note: it is only compatible with XP or win7 32bit
For how to install, please check the text file named “How to” in the folder.
New 256GB SSD 2016.7 MB SD Connect Compact C4 Software DELL D630 Format
256GB Complete New SSD, High quality!
Latest software version: V2016.7
Support Windows 7/8 system.
New 256GB SSD 2016.7 MB SD Connect Compact C4 Software DELL D630 Format
Top reasons to choose SSD(Update to 2016.07 version WIN7 32bit OS):
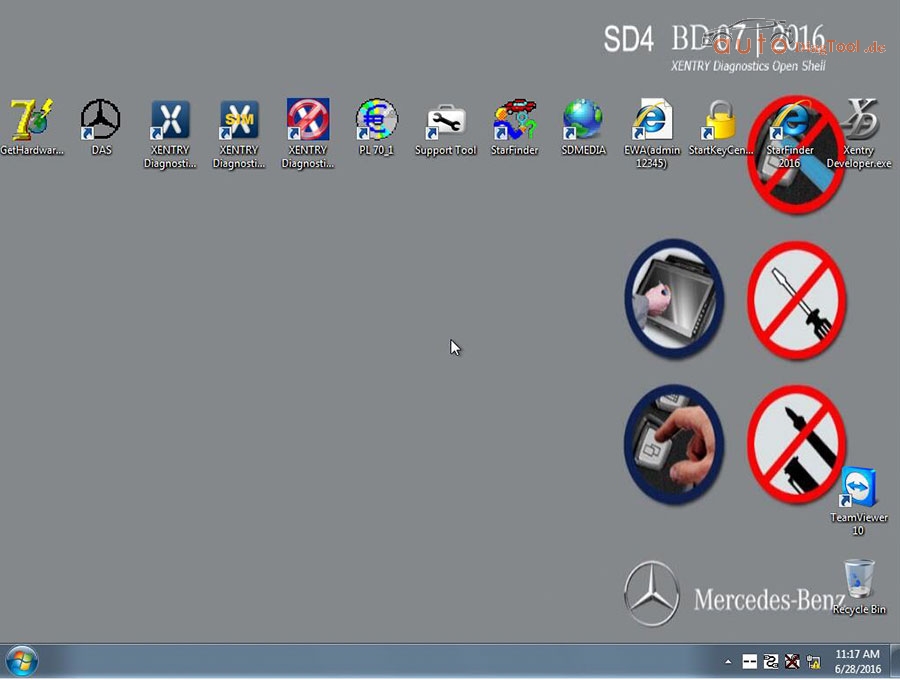
V2016.7 SD C4 software works with MB SD Connect Compact C4, support latest Mercedes Benz car and truck models. The new generation Mercedes Benz diagnostic equipment Star Diagnosis compact 4 is the latest one on market for all current and new coming MB vehicles.
Please Note: WIN7 do not support HHT-WIN! Software newer version than V2015.12 do not support HHT-WIN!
Software languages: English, Croatian, Czech, Danish, Dutch, Finish, French, German, Greek, Hungarian, Italian, Japanese, Korean, Polish, Portuguese, Romanian, Russian, Spanish, Swedish & Turkish, Chinese
V2016.7 MB SD C4 Software FUNCTIONS
1.1989~up to now Car, Bus, Truck, Sprint, Smart ;
2.All electric system Diagnostic;(Do not include flash code)
3.reading trouble code
4.erasing trouble code
5.live-data
6.adaptation
7.component testing
8.maintenance
9.information consultation
10.component location diagram
11.wiring diagram
Few days ago,one of my customer told me that his Bosch ESI 2014.1 asked the activate code,or can’t be used.
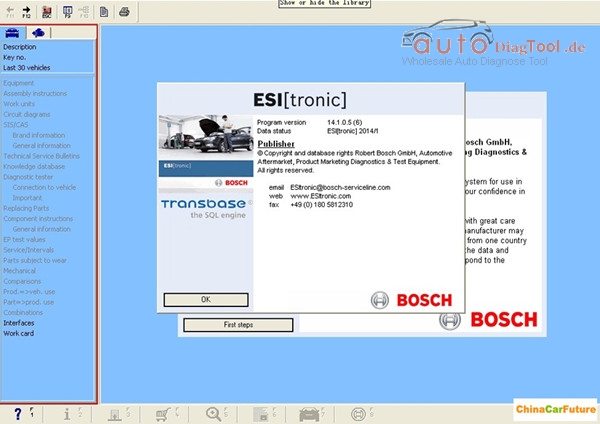
Look like this picture:

Solution way:
there has a crack(esi2.exe) on CD,you need replace the file which below installation directory,then use the activate code to activate it.(the activate code you can ask us to send to you.)
also,you can use this file to replace the esi2.exe,here is the download link for the replace file.
https://mega.nz/#!kI5j2DZB
And with this method,our customer said his problems is resolved.
Hope this article can help you solve your same problems.
Here is the multilanguage Porsche PET 7.3 342 Spare Parts Catalog 07.2015 with all information here including PET 7.3 update 342/31 spare parts catalogue basic information and installation for all regions, which uses for genuine parts numbers translation by VIN number.
PET 7.3 basic info:
Version: 2015.07 (Software Never Expire.)
Free-download versions on webs require update account subscription!!
Language: English, Dutch, Spanish, Italian, German, Turkish, French, Swedish
OS requirement:
Porsche PET 7.3 work fine on
Windows XP,
WIN 7 32 bit,
WIN 8 with VMware player
(Users feedback on : PET 7.3 operting system)
PET 7.3 Spare Parts Catalog setup procedure:
Open my computer, click disk “(D:) “, creat new folder named “Program Files”
Open DVD “PET7.3”, extract the bigger “.rar” file to the new folder “Program Files”, and the smaller “.rar” file to the desktop.

Extract the “PET7.3″ folder on the desktop and the folder in the Program Files”.
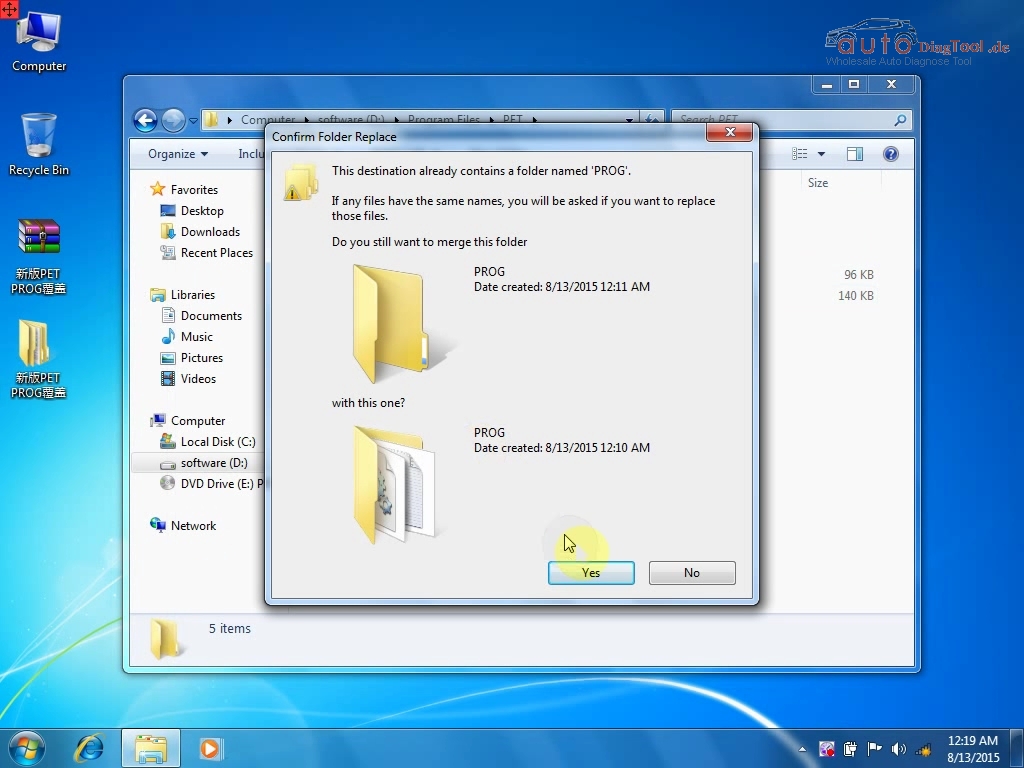
Open disk “(D:) ” – “Program Files” – “PET”, and meanwhile cut the folder “New PET…” on the desktop to replace the same named file
in the “Program Files”.
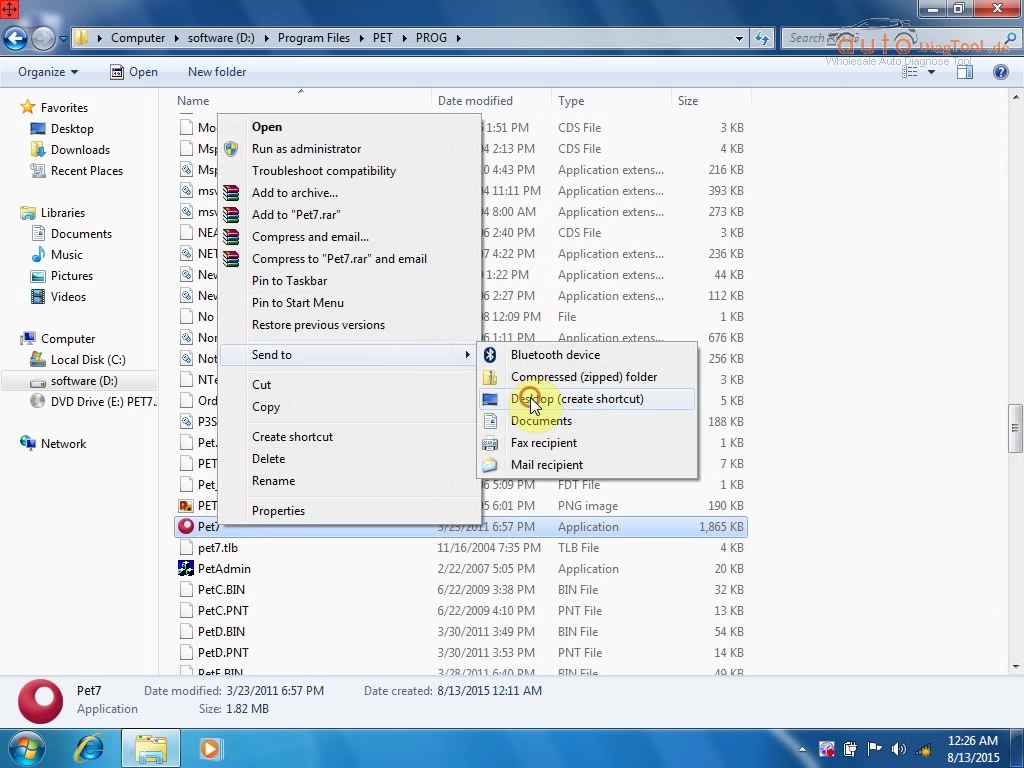
Open “Program Files” – “PET” – “PROG” , right click “Pet7” application, send to desktop (create shorcut)
Back to “Program Files” – “PET”, click “Porsche PET Emulator”, then pop up a window, click “Install / Start Emulator” , then get another message reading “ The dependency service does not exist or has been marked for deletion.


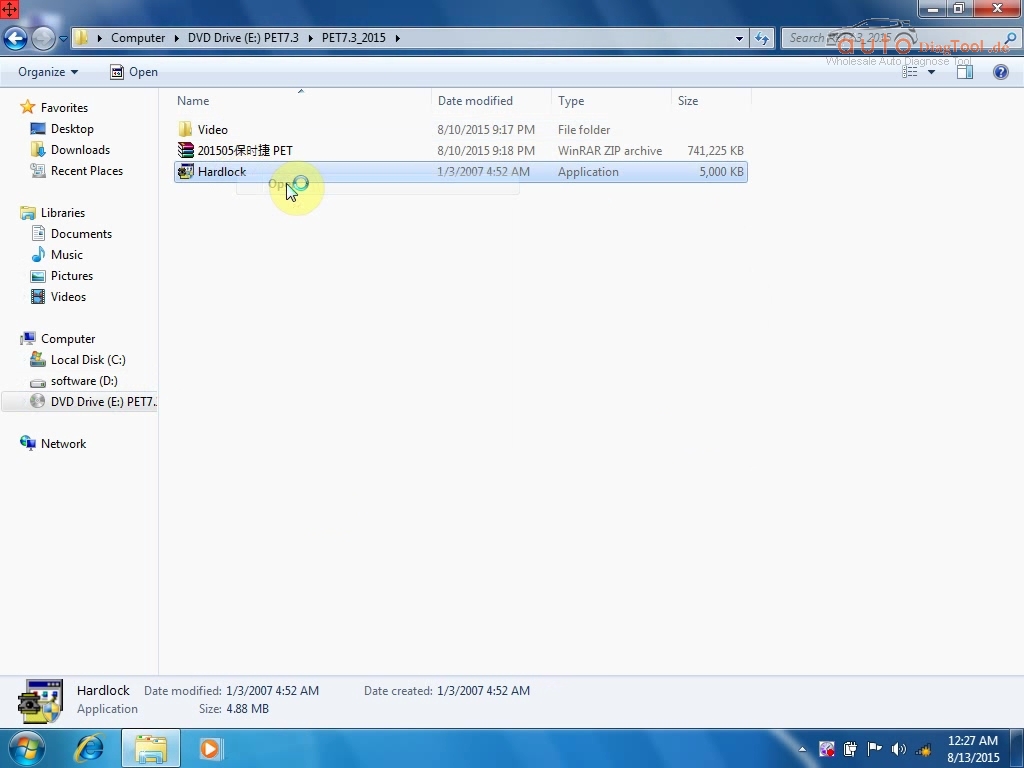
Open DVD Drive (E) PET73 – “PET7.3_2015” – “Hardlock” to install driver, it is one-step job. Then close //E disk.

Again click “Pet7” on the desktop, the following message pops up, click “Ok”.

Open //D disk – Program Files – PET, click “Porsche PET Emulator”, then click “Install/Start Emulator”, then get message “The specified service already exists”.
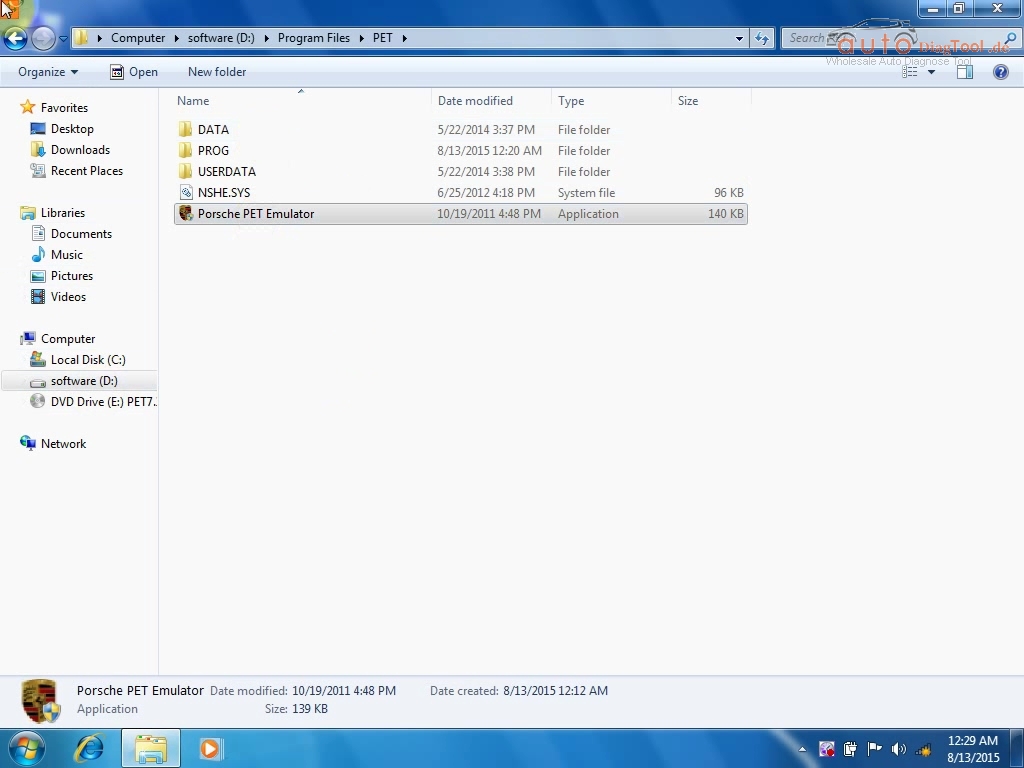
Restart the computer.
Click “PET7” on the desktop to operate. PET 7.3 is multilanguage, click “Menu” to set the language you like.

If you click “PET7 shortcut” on the desktop and get error 607, ignore it by click OK or continue.
Now ready to test PET7.
Free download:
Nissan Consult-3 Plus V32.11 – (tested by OBD365 technicians)
Nissan_Consult-III_Plus_v54.20.rar [298.64 MB]- (from a forum)
Code: http://www.nissan-global.com
NOTE: you may be at risk to update consult 3 +, and please take responsibility for your try.
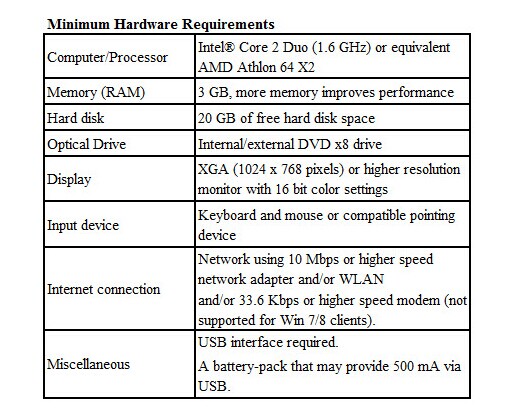
Computer requirements:
– O.S.: Windows XP
– CPU: Pentium/Athlon 400 MHz or higher
– RAM: 512 MB of system memory
– Hard Drive: 2 GB of available space
– Bluetooth or USB interface
– DVD-ROM
Language:
English/ French/ German/ Spanish/ Italian/ Japanese/ Russian/ Finnish/ Greek/ Chinese(Simplified)/ Chinese(Traditional)
Consult iii plus software installing steps:
1. Install the software in the “CONSULT-III_APPL” file folder;
2. Install the patch in the “CONSULT-III Patch” file folder;
CONSULT-III PLUS function:
work for all Nissan car , Infiniti car and Nissan GTR car to 2012.
work with obd-16 connector for the new kind of car, work with 14 pin connector for the old kind of car.
support Nissan car electronic system diagnostic
Nissan electromobiles such as Leaf.
support all Renault.