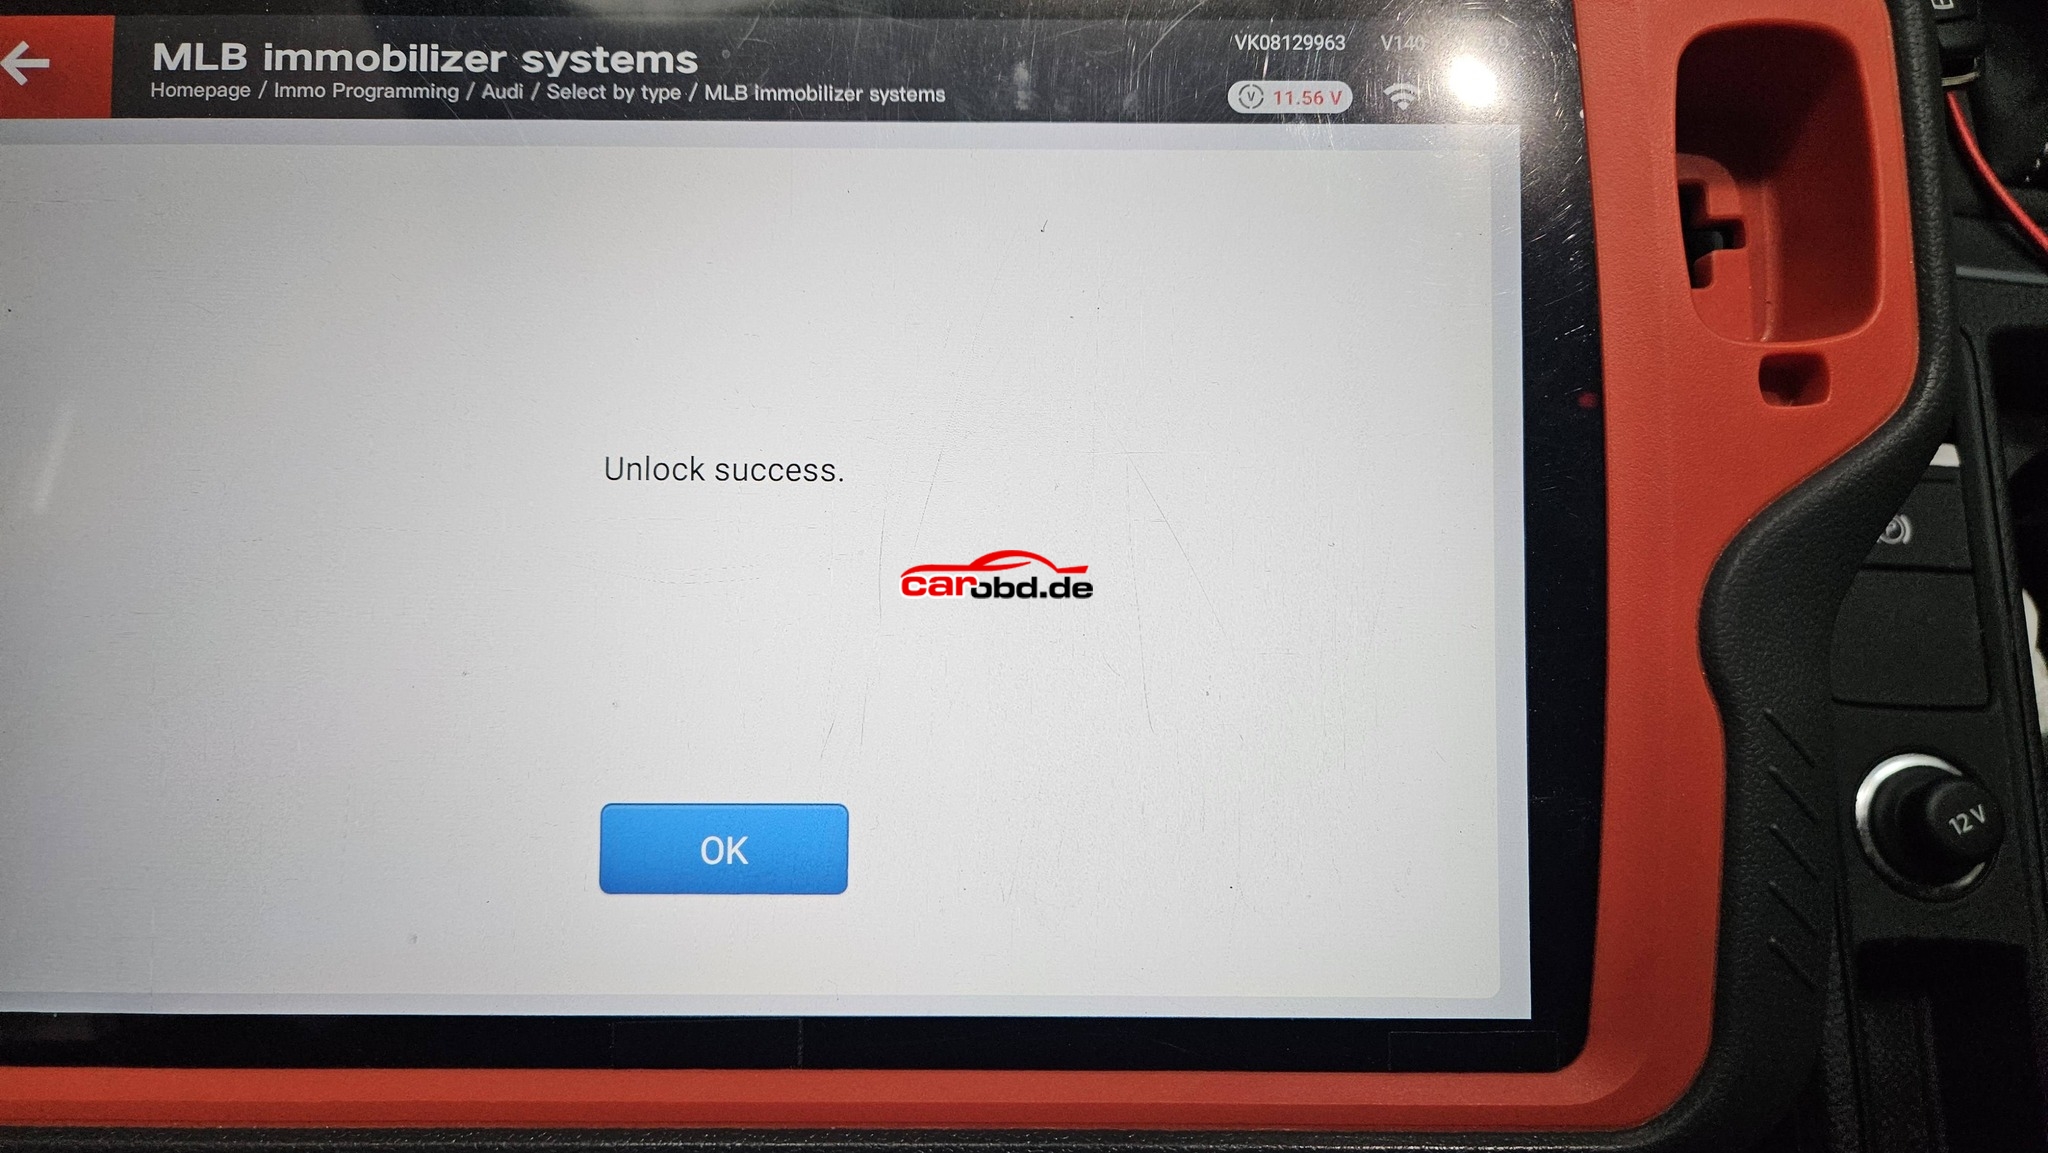
Audi Q3 2024 MQB48 SFD1 or SFD2 protected disable via Xhorse KTP

for more informations ,please contact
Whatsapp: +86 19947637411
Email: Sales@Carobd.de
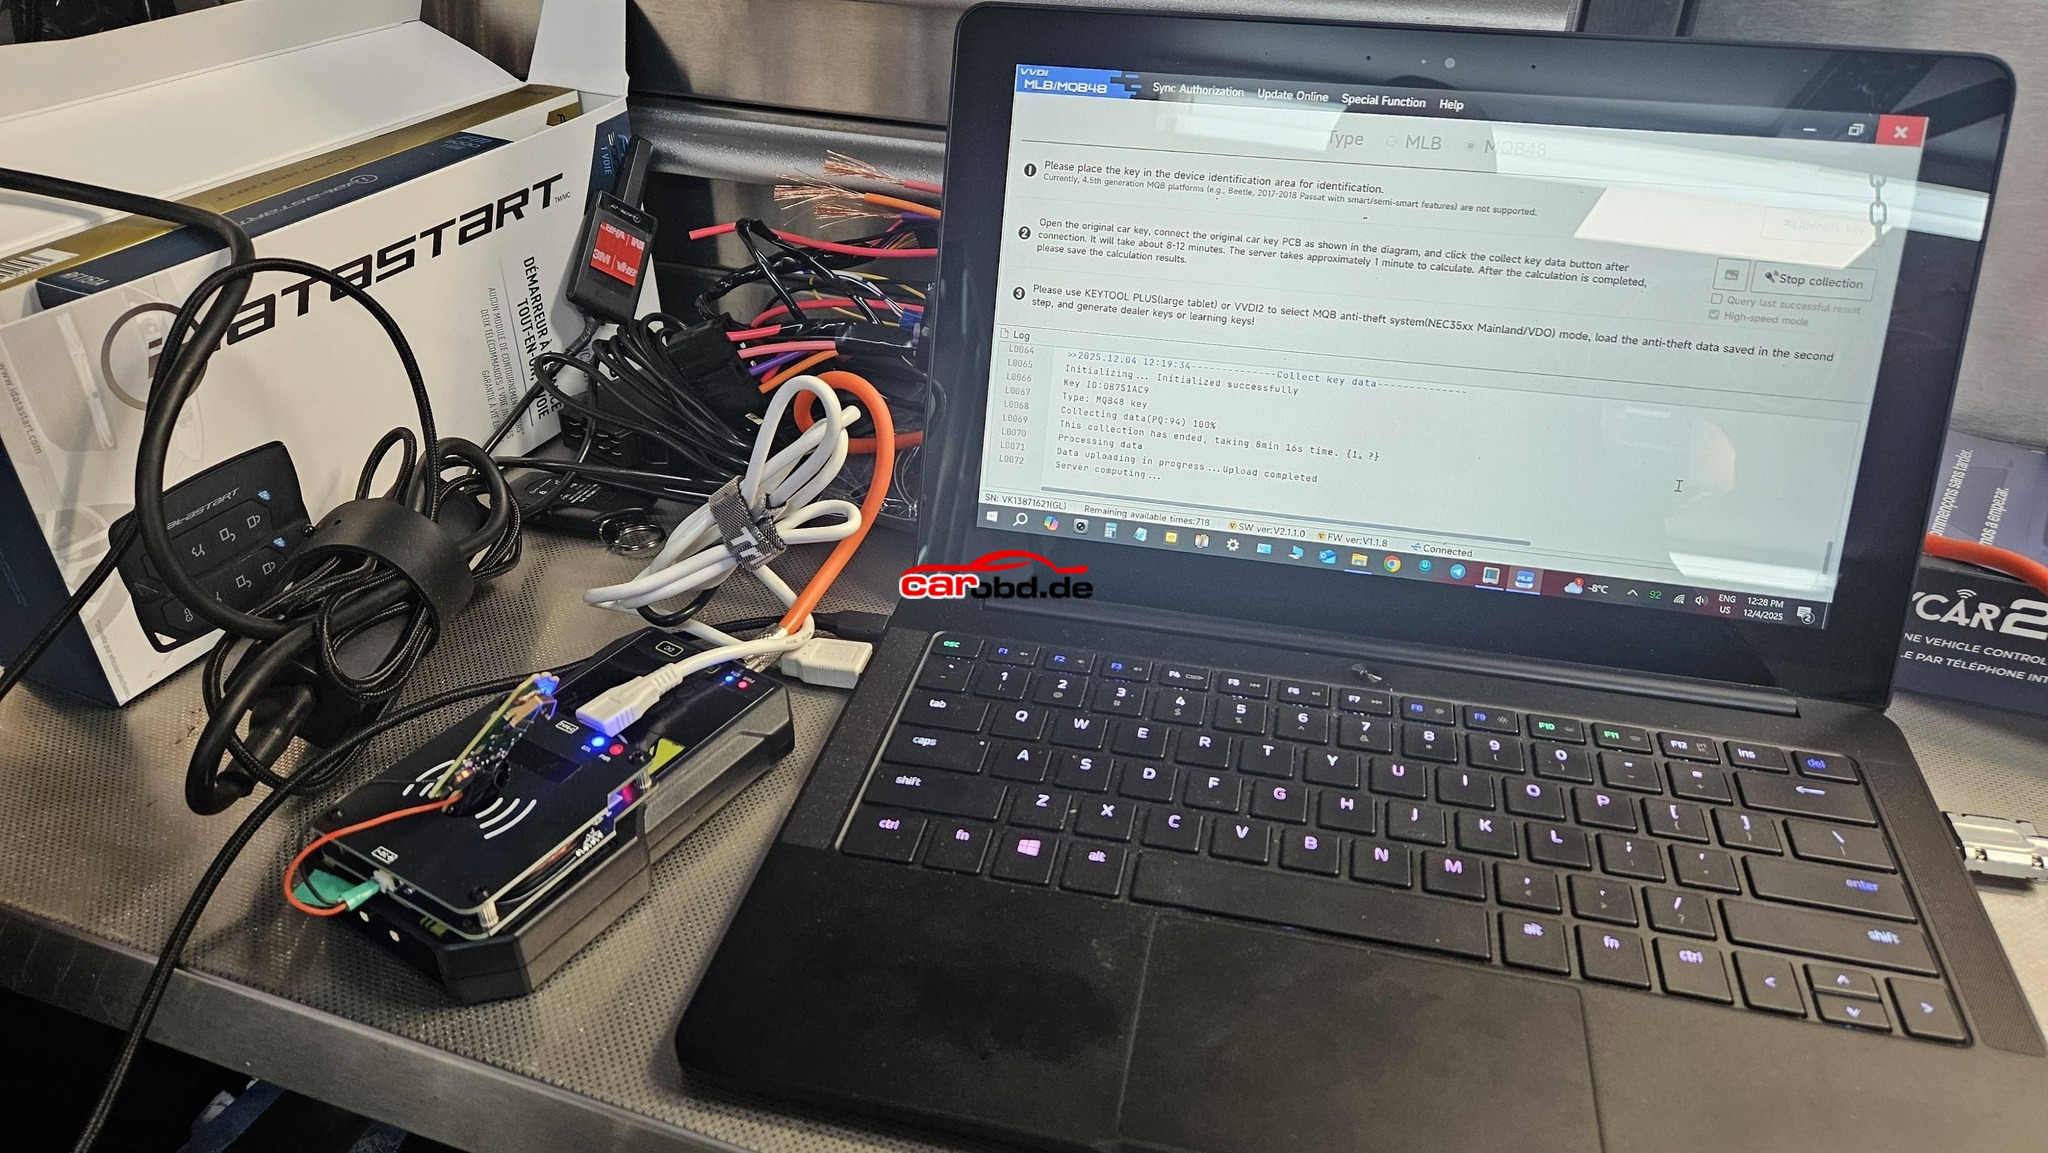
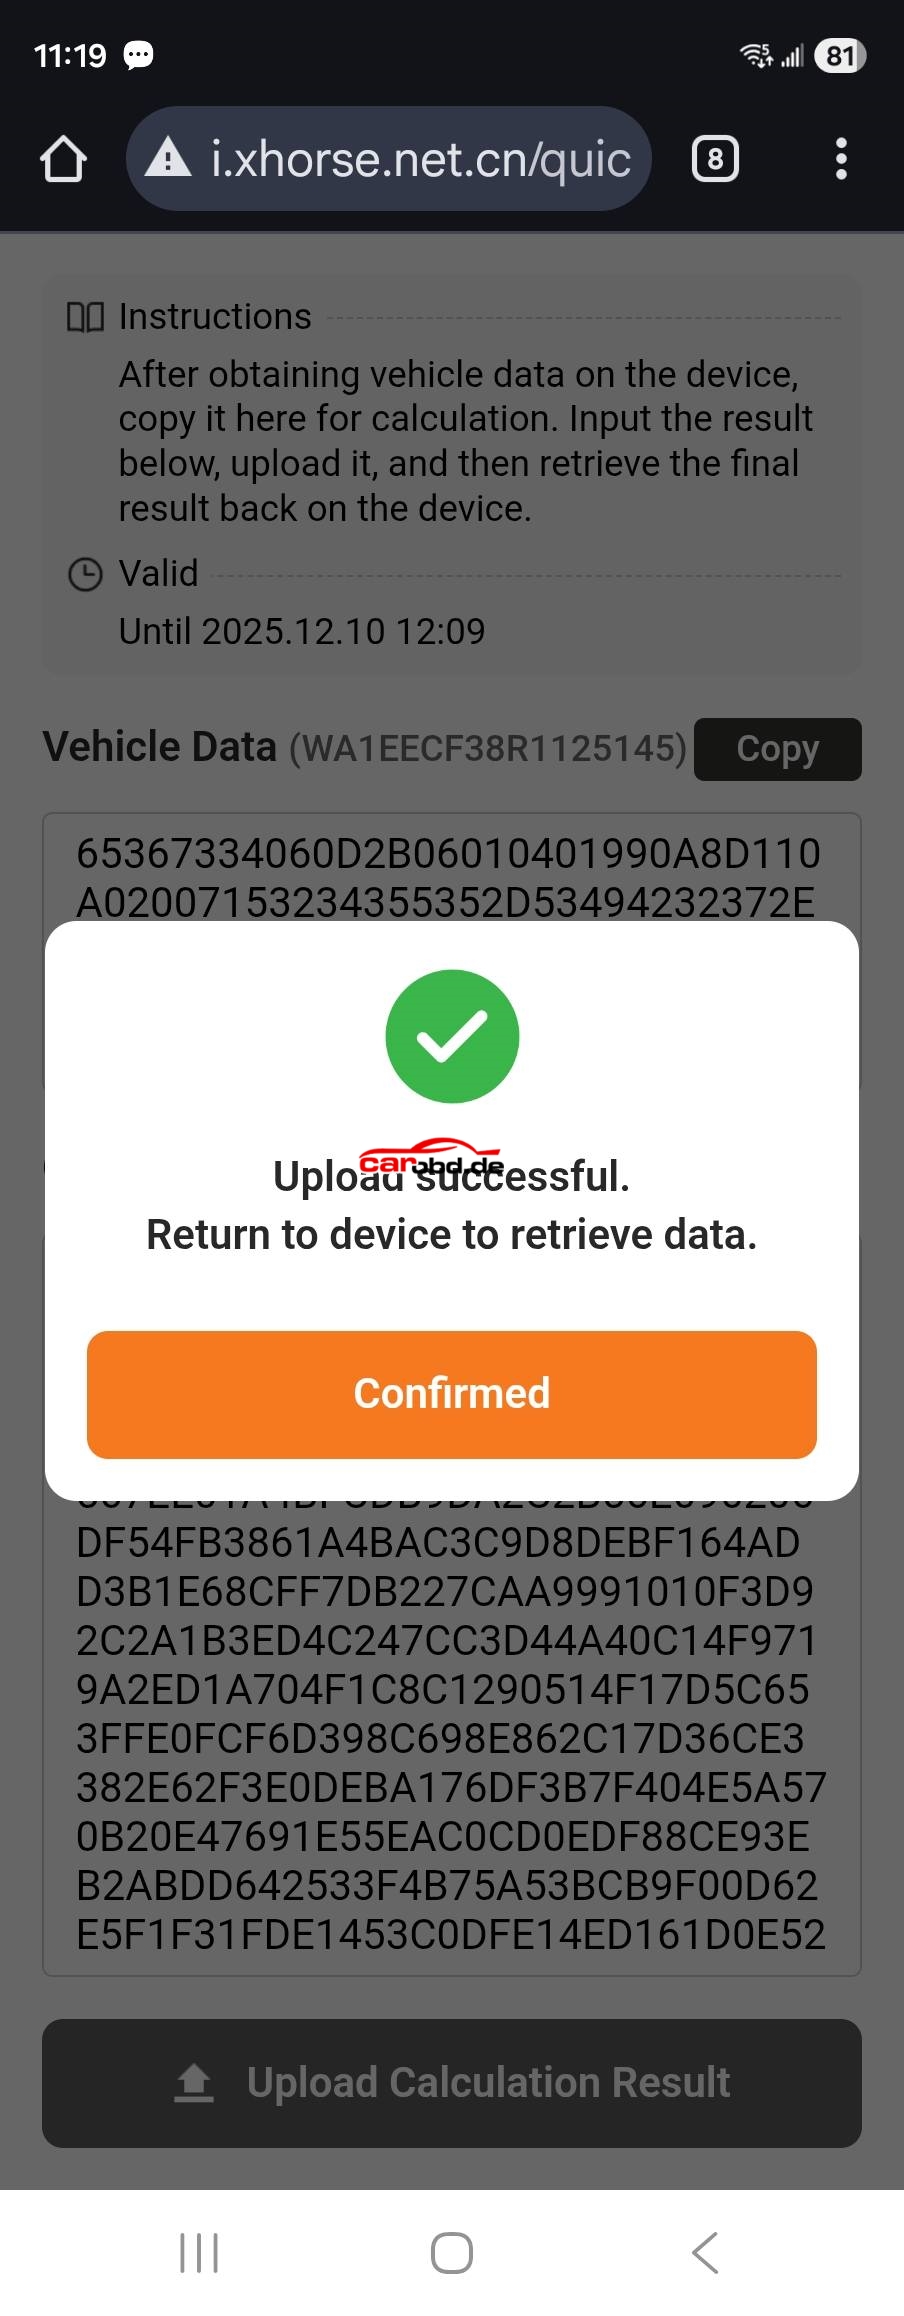
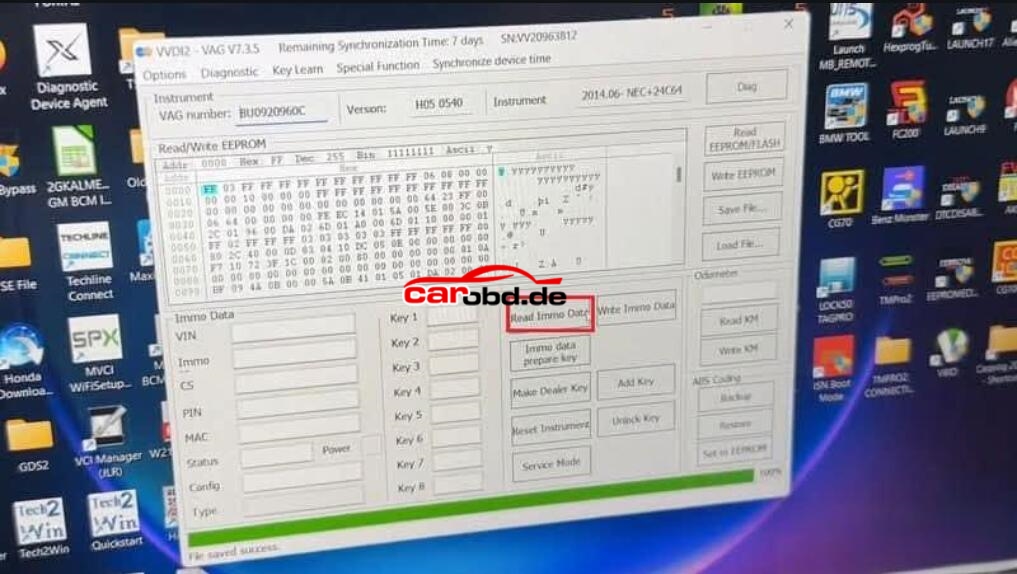
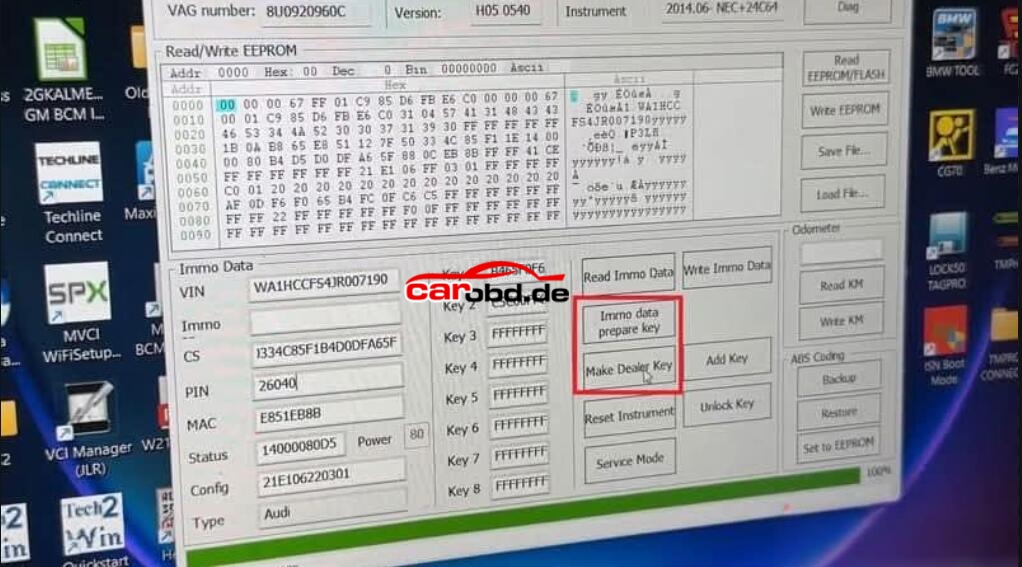
🔴Xhorse VVDI2 Read 2018 Audi Q3 NEC+24C64 AKL IMMO Data
2018 Audi Q3 with all keys lost. turn the odometer on and extract immo data with Xhorse VVDI2.
👉1. The dashboard is dark when you see this tips. You need finish all operation before reset instrument.
👉2. Read EEPROM and save it.
👉3. Read immo data and save it.
👉4. Prepare a dealer key(You can go to step7 if have working key also don’t want add key).
👉5. Reset Instrument.
👉6. Add key, use immo data to learn the new dealer key to car.


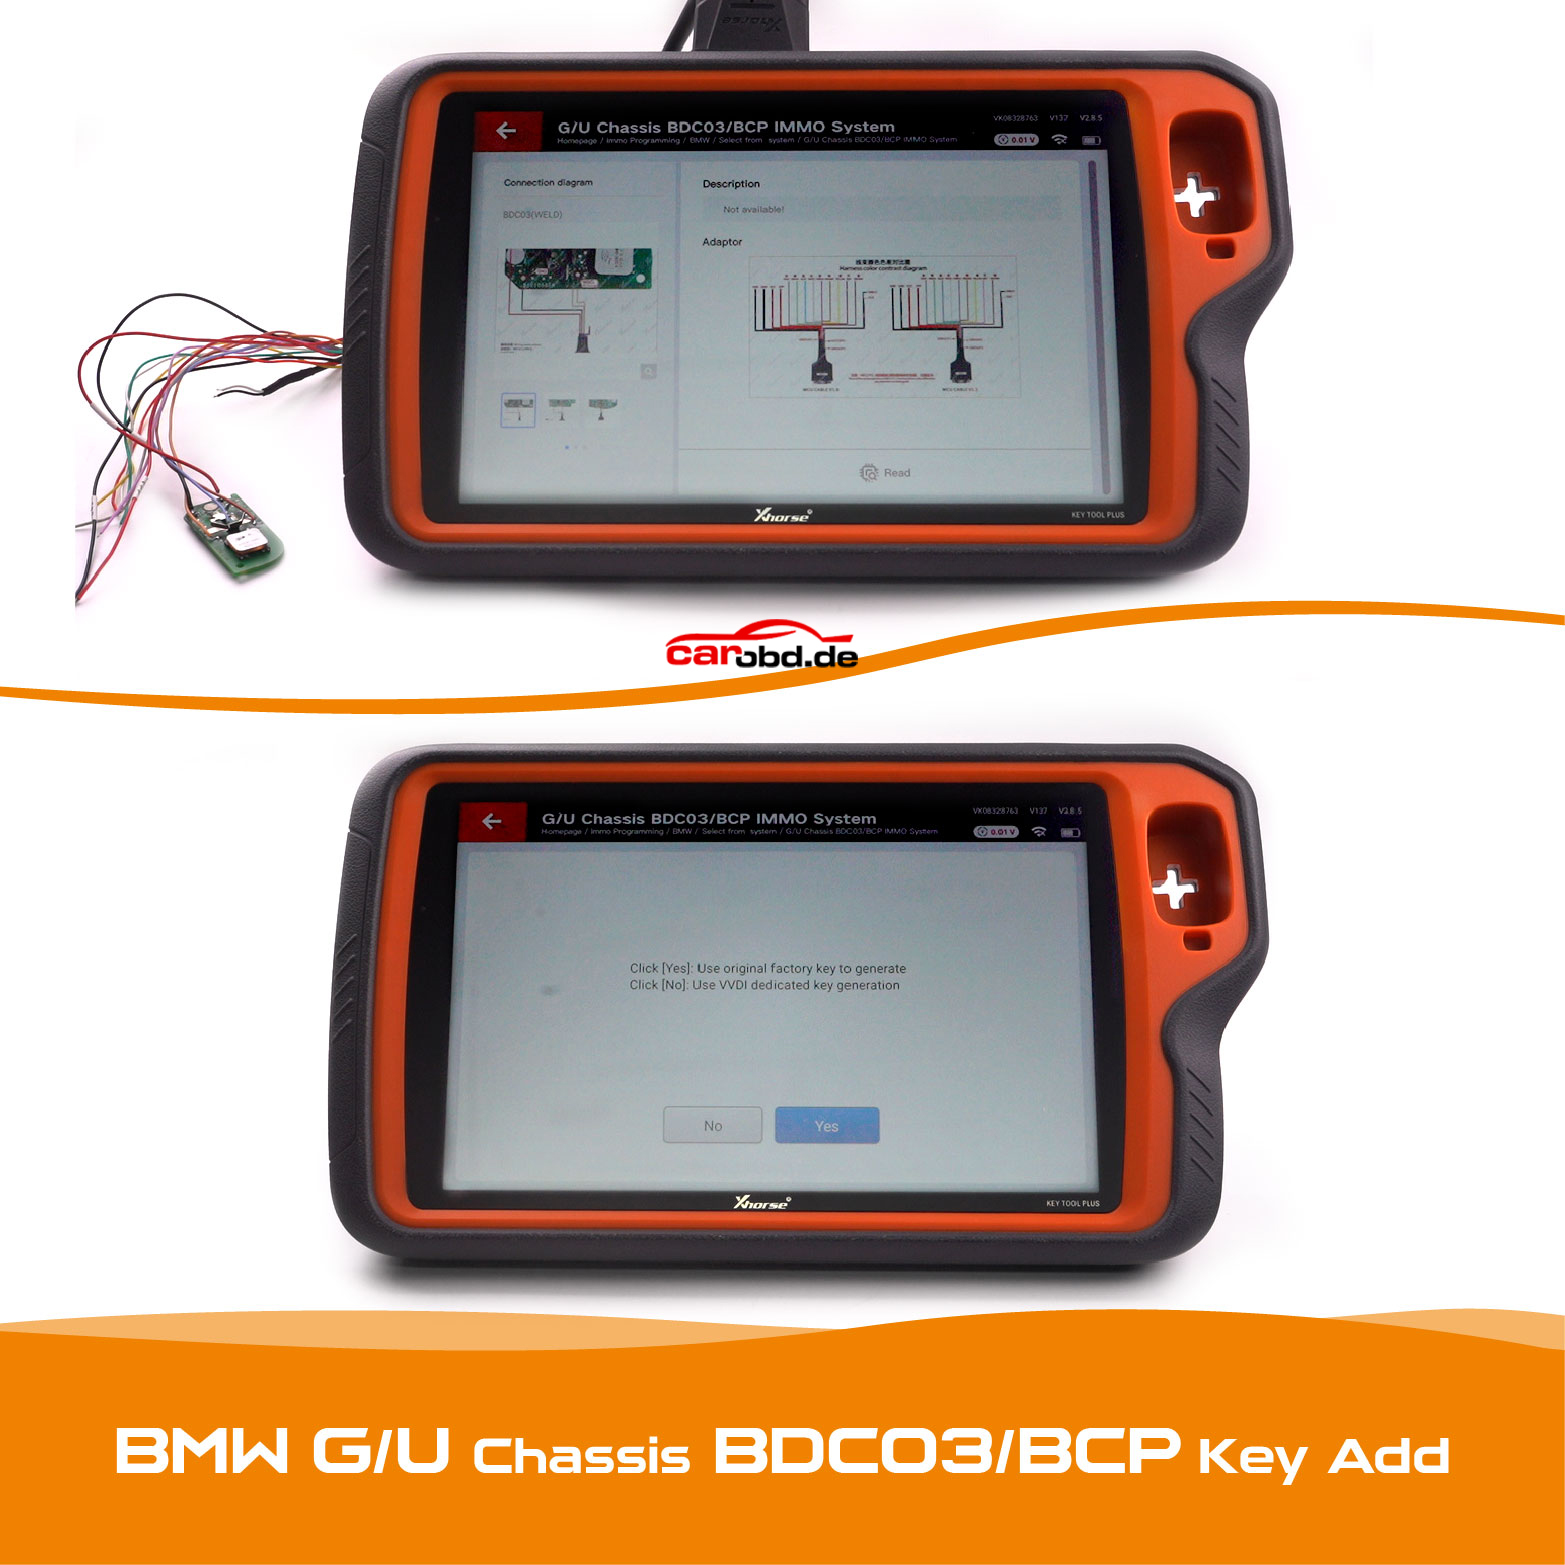
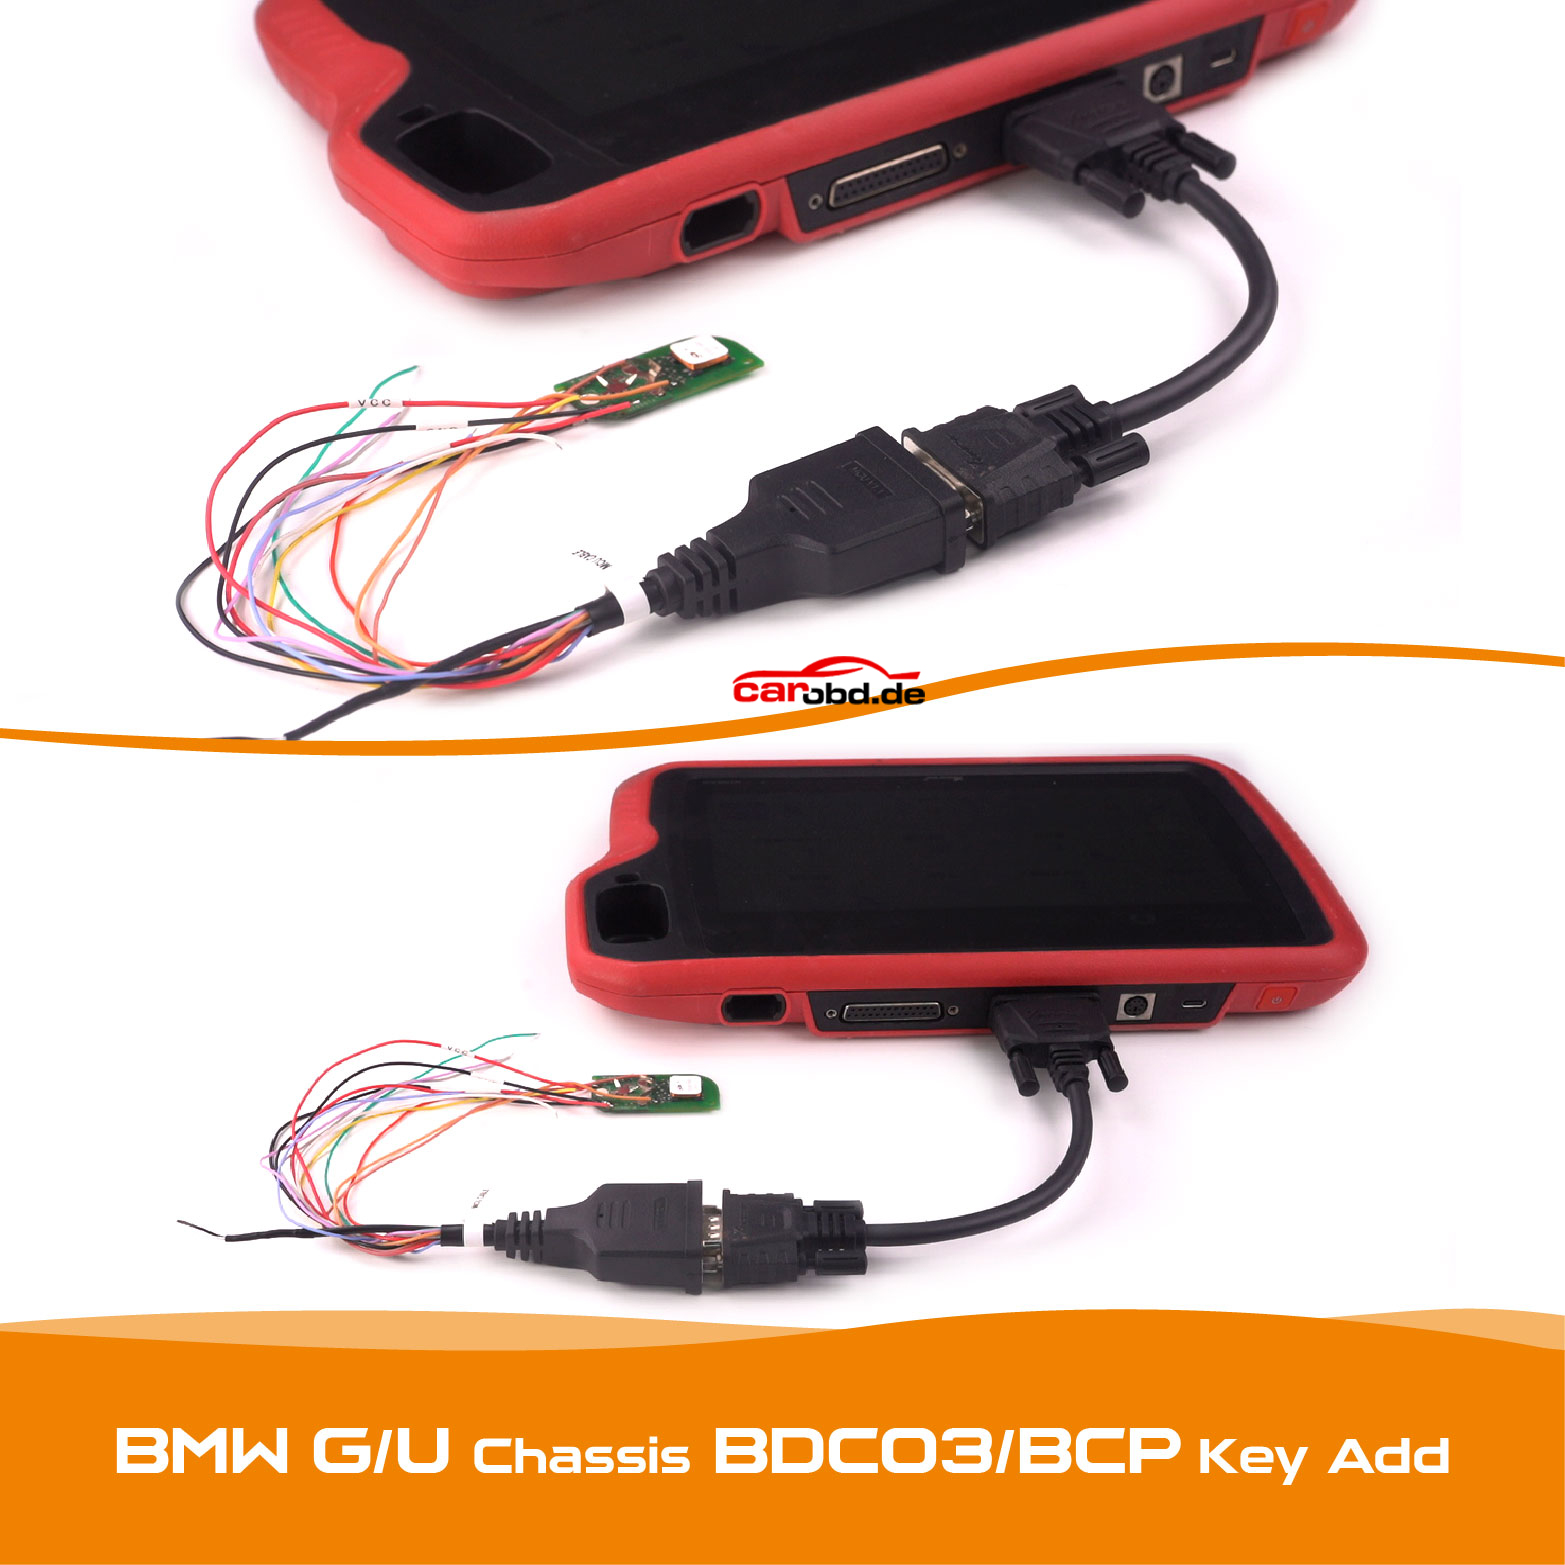
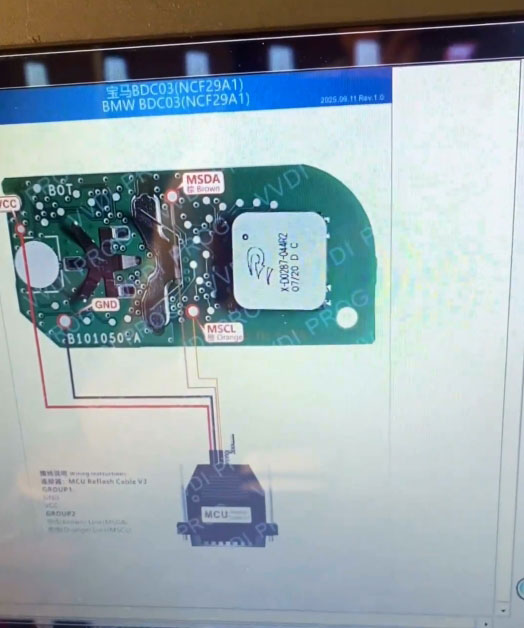
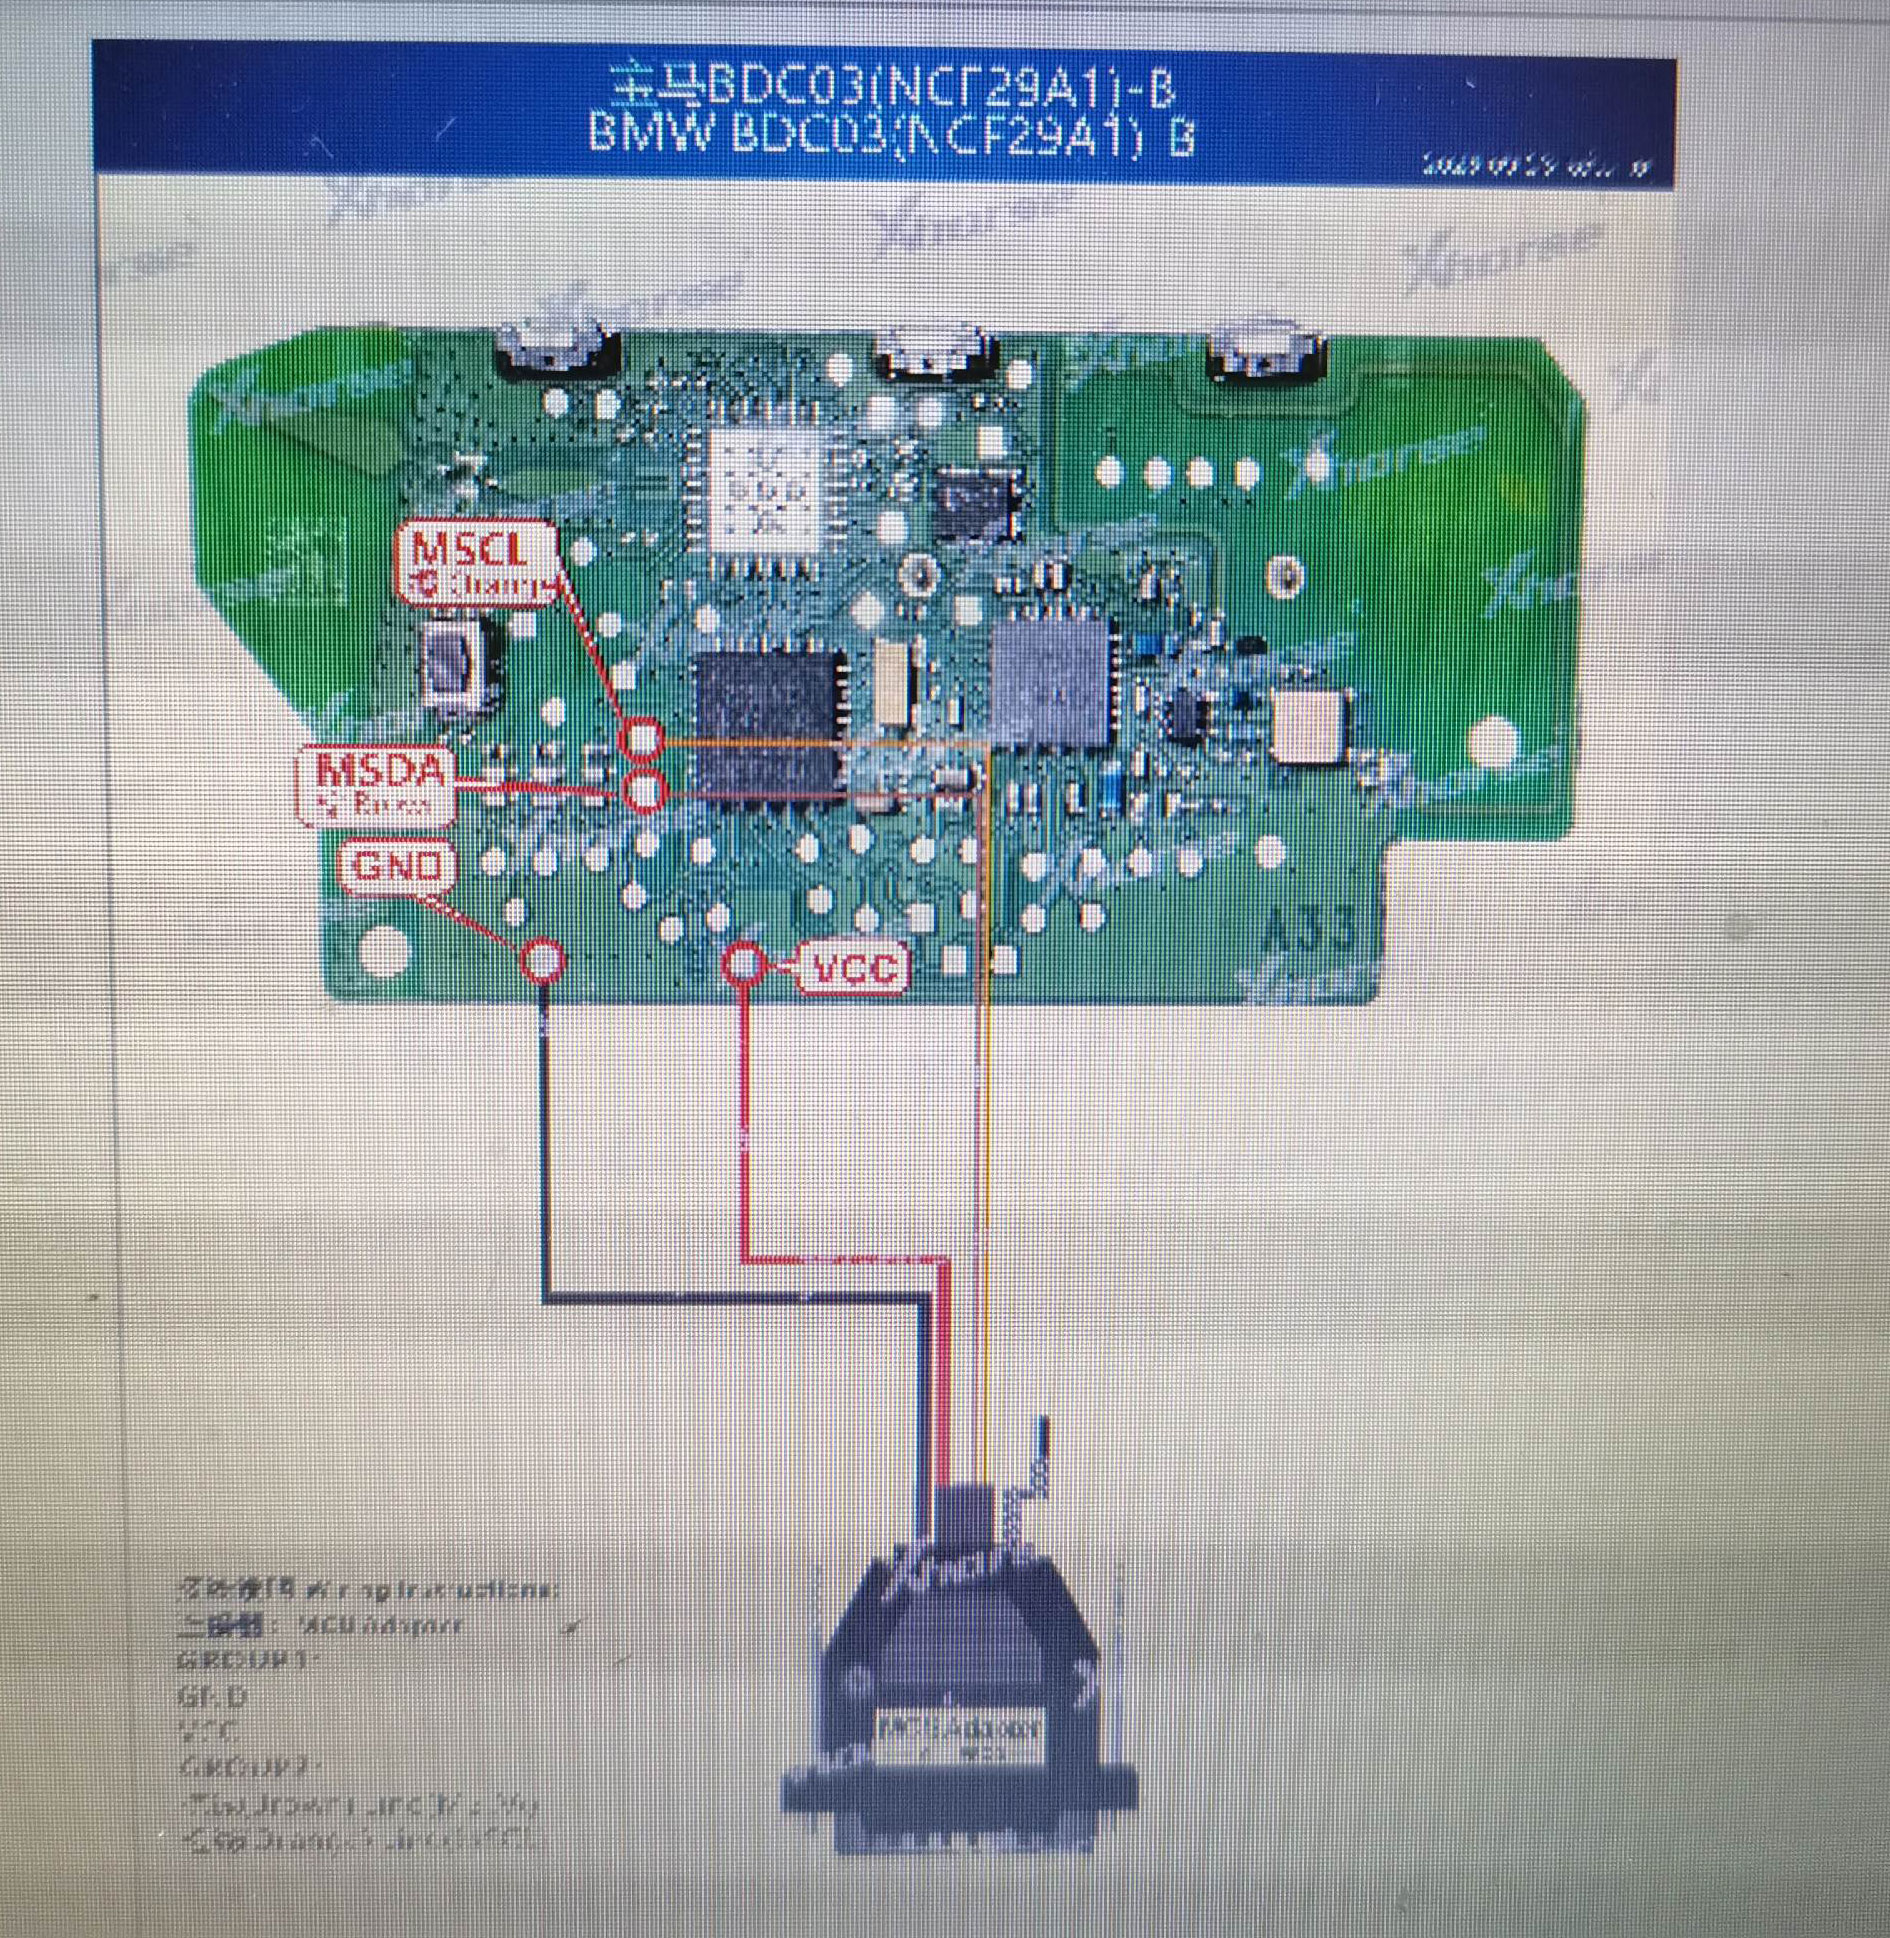
Check Out BMW G/U Chassis BDC03/BCP IMMO System
Find the feature that supports BMW G/U Series from 2020-2024.
Compatible with KEY TOOL PLUS, KEY TOOL MIDI and VVDI2.
Supports both original key and VVDI key generation!
Grab your device and give it a try now!
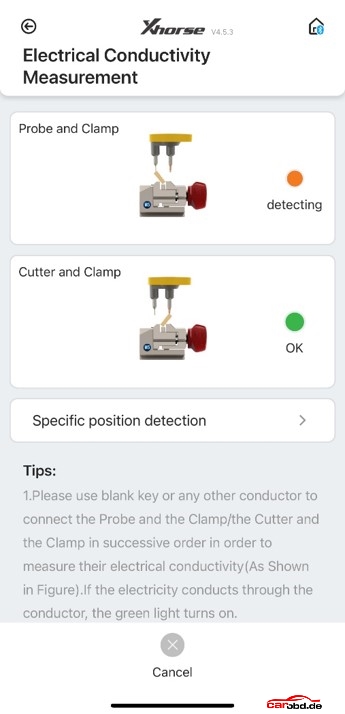
Dolphin XP-005/XP005L display error 6/56/3 while decoding or cutting keys, indicating that there is a problem with the conductivity of the machine
Please follow the steps on the following page to enter the conductivity measurement interface for relevant testing.
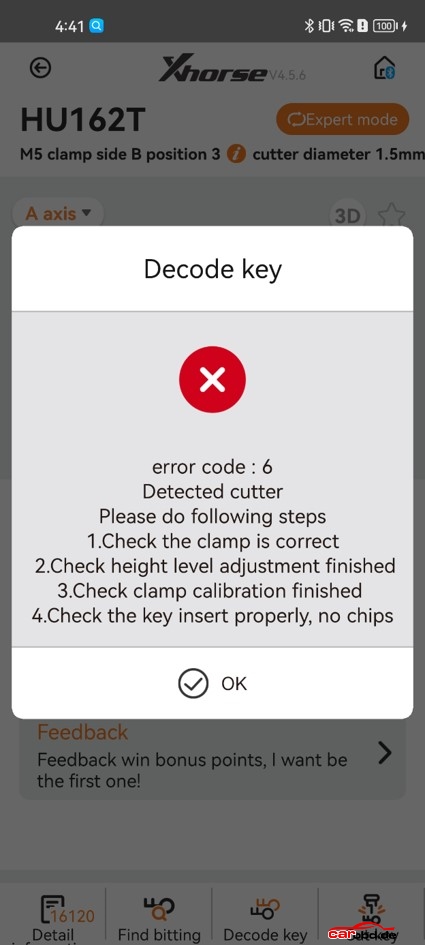
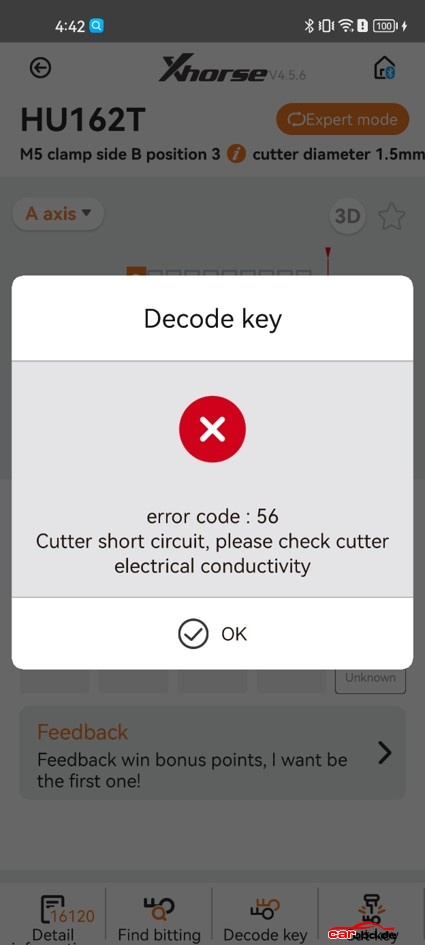
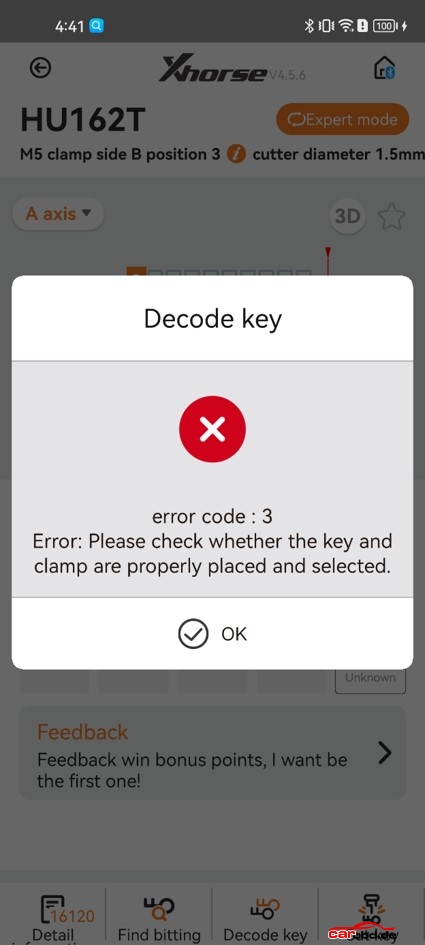
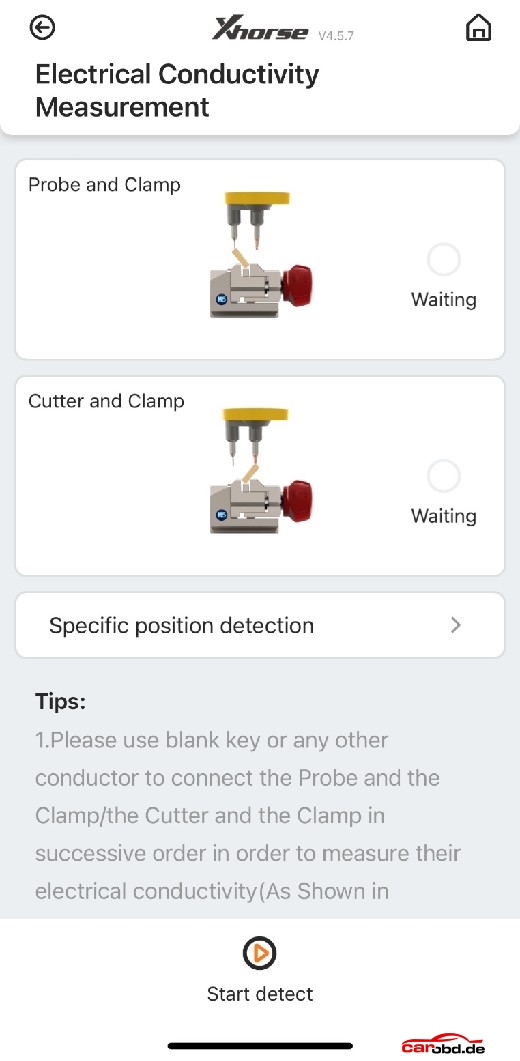
After entering the testing interface, click on start to test. If the connection has not been made according to the prompts on the diagram, the cutter will directly display OK, indicating that the device cutter is in a short circuit state;
Solution: Please refer to the next page
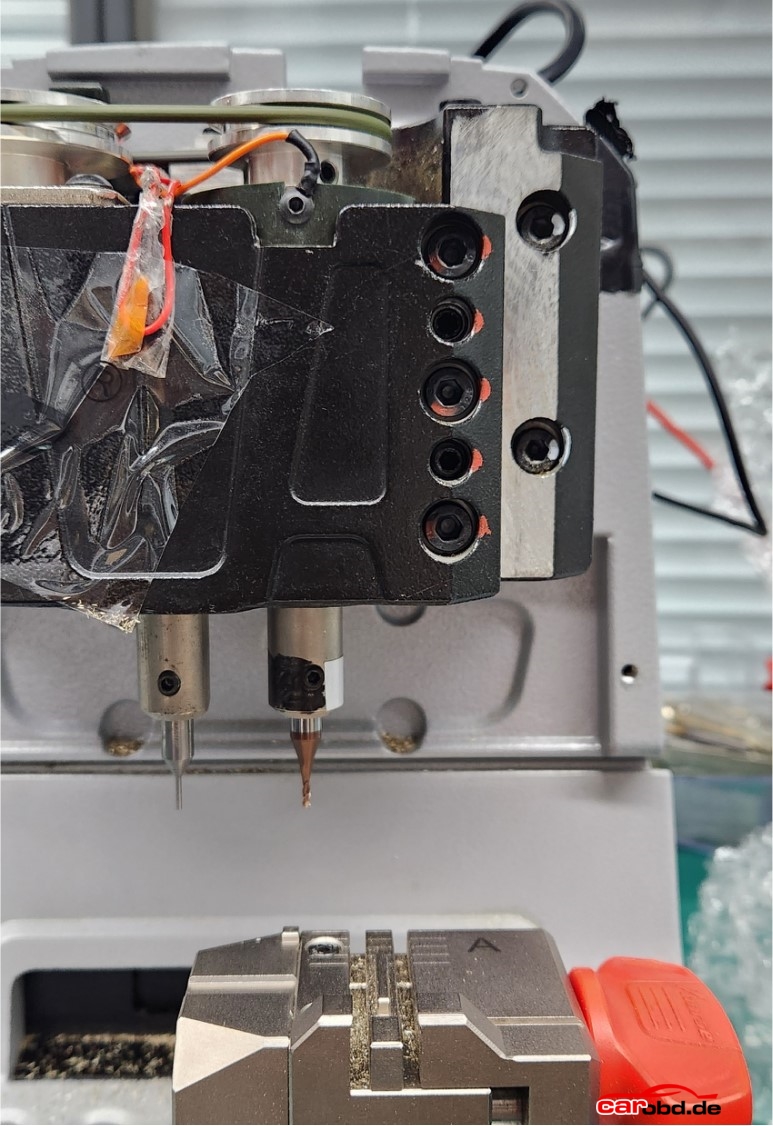
If the cutter is in a short circuit condition, first remove the back cover and front cover of the device,
Then turn counterclockwise to loosen the screws 1, 3, and 5 in the figure on the right, and remove these three screws,
Then tighten the screws 2 and 4 in the right figure clockwise, and push open the black metal structural component,
Remove the main axis assembly connected to the cutter again.
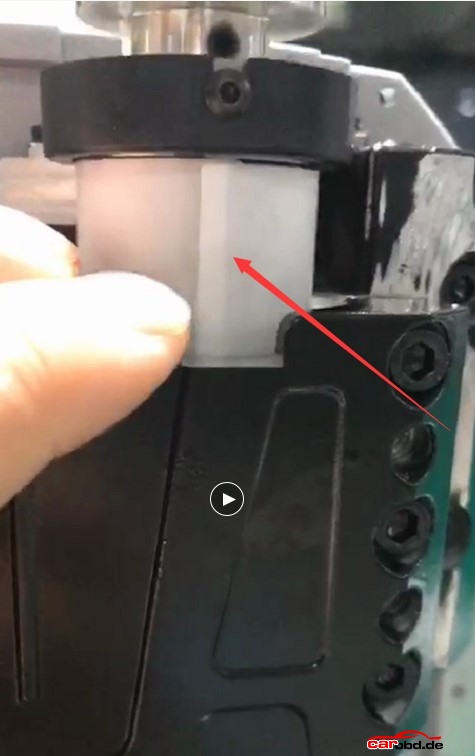
Pull the main axis assembly upwards and observe if the white insulation paper is damaged.
If it is damaged, please replace this insulation paper,
If there is no damage, remove the entire main axis and clean the iron filings inside,
The usual reason is that the cutter is in a short circuit state due to iron filings at the bottom, after cleaning, reinstall the screws, when installing screws, pay attention to the order.
First, loosen the screws 2 and 4 in the diagram on the previous page clockwise, then tighten the screws of 1, 3, and 5.
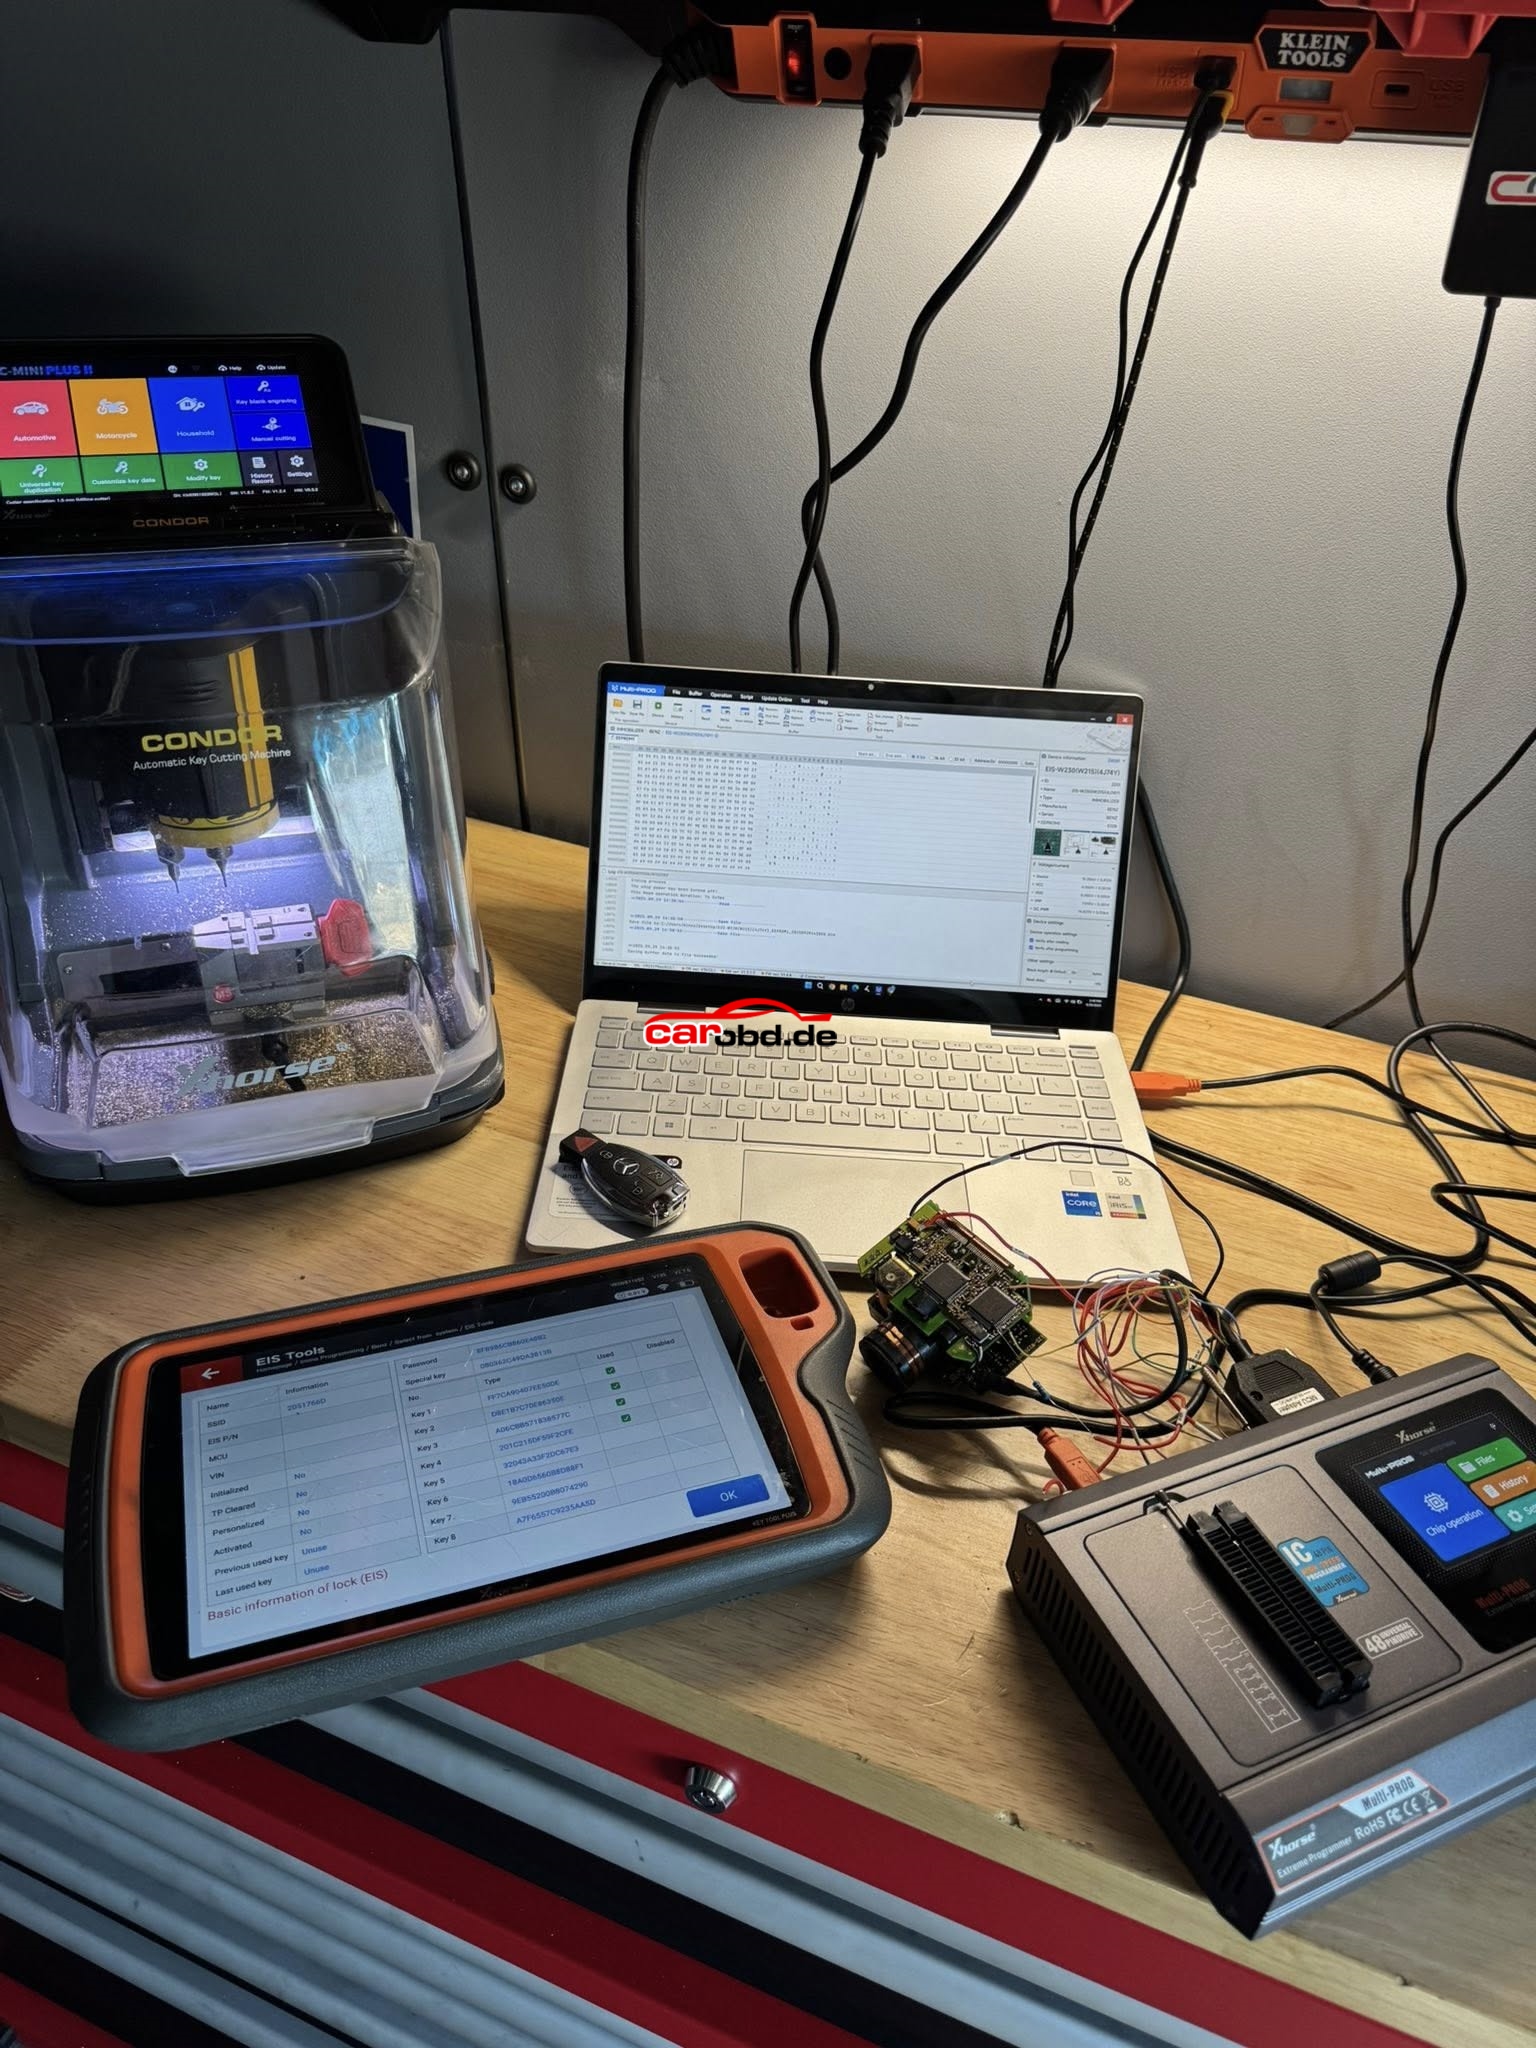
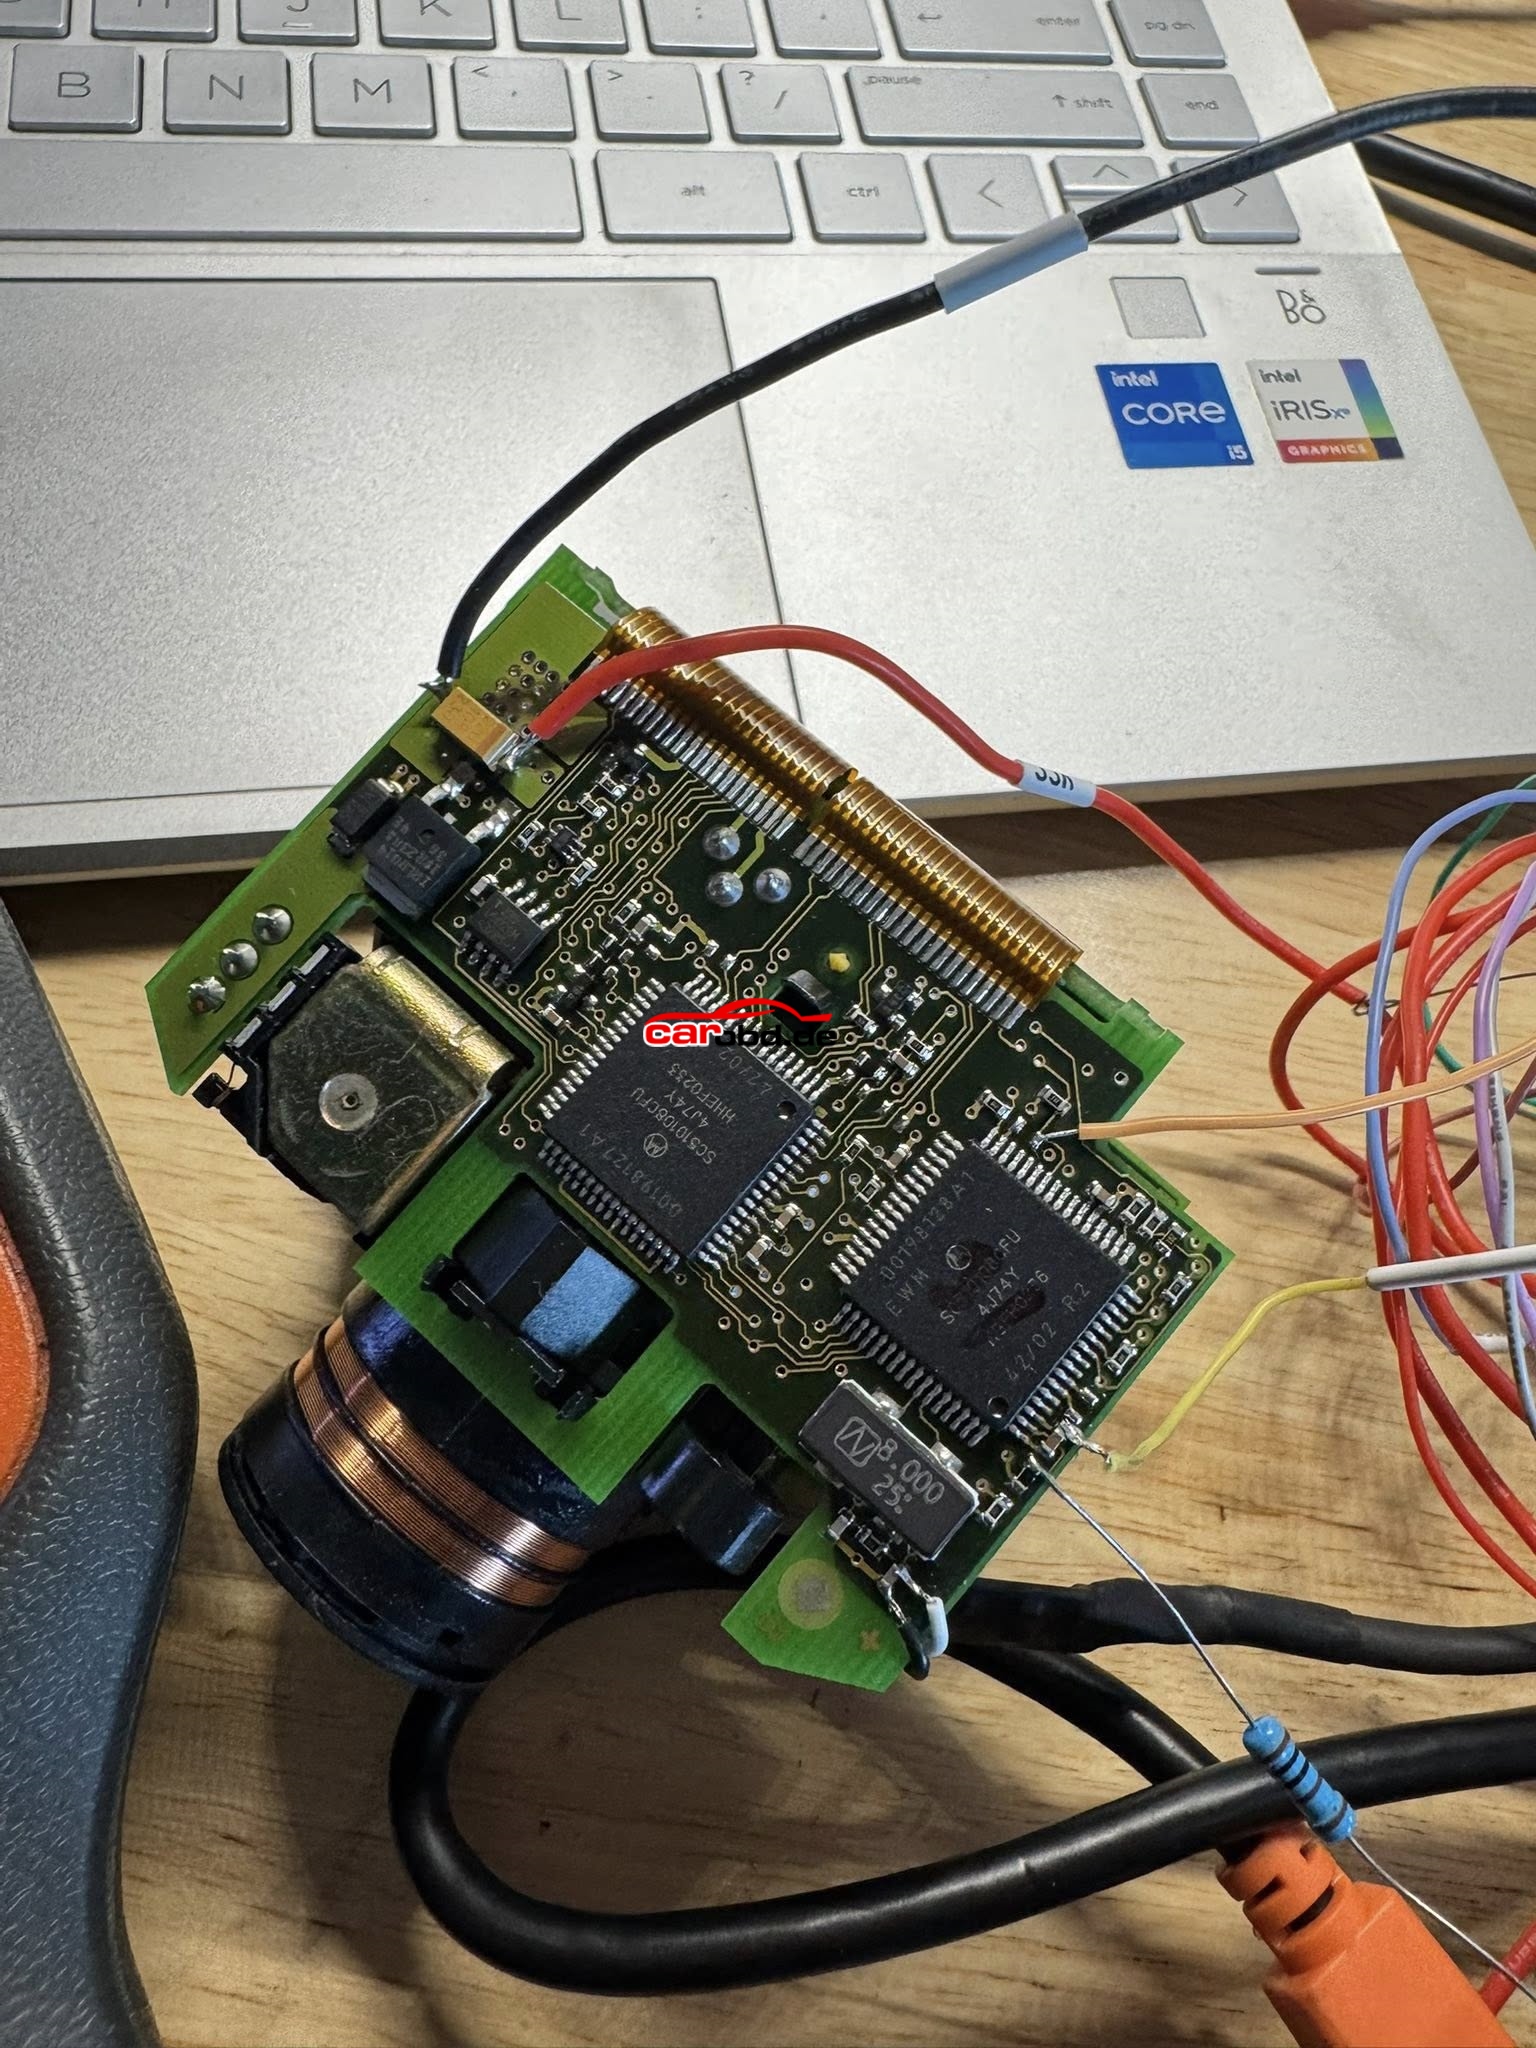
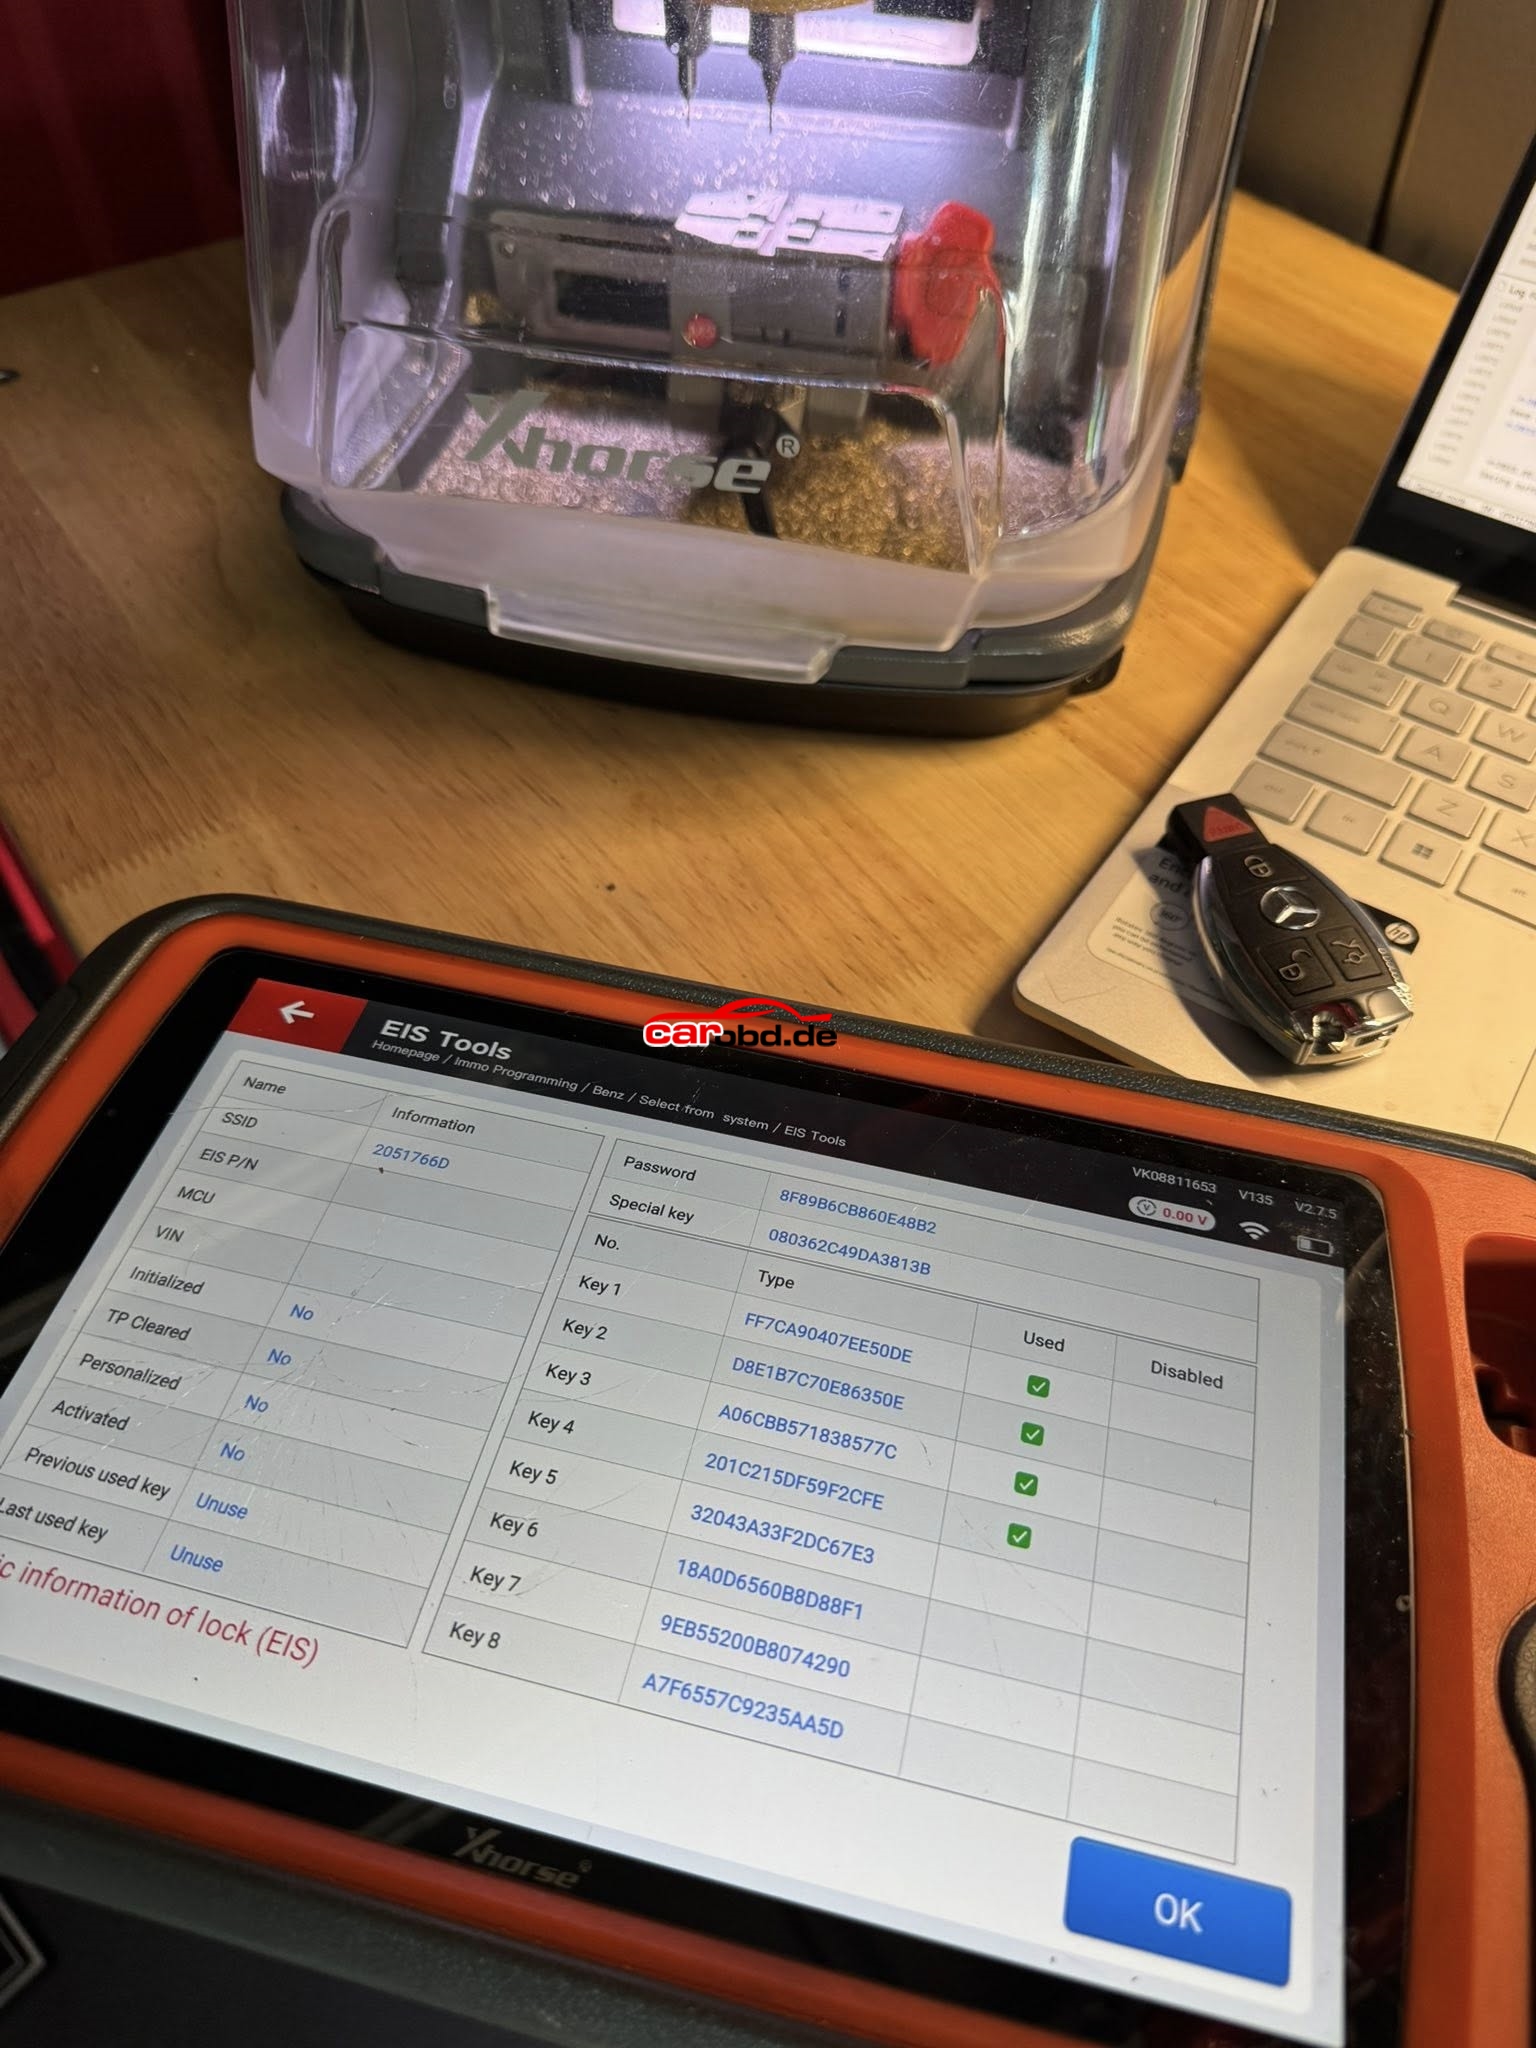
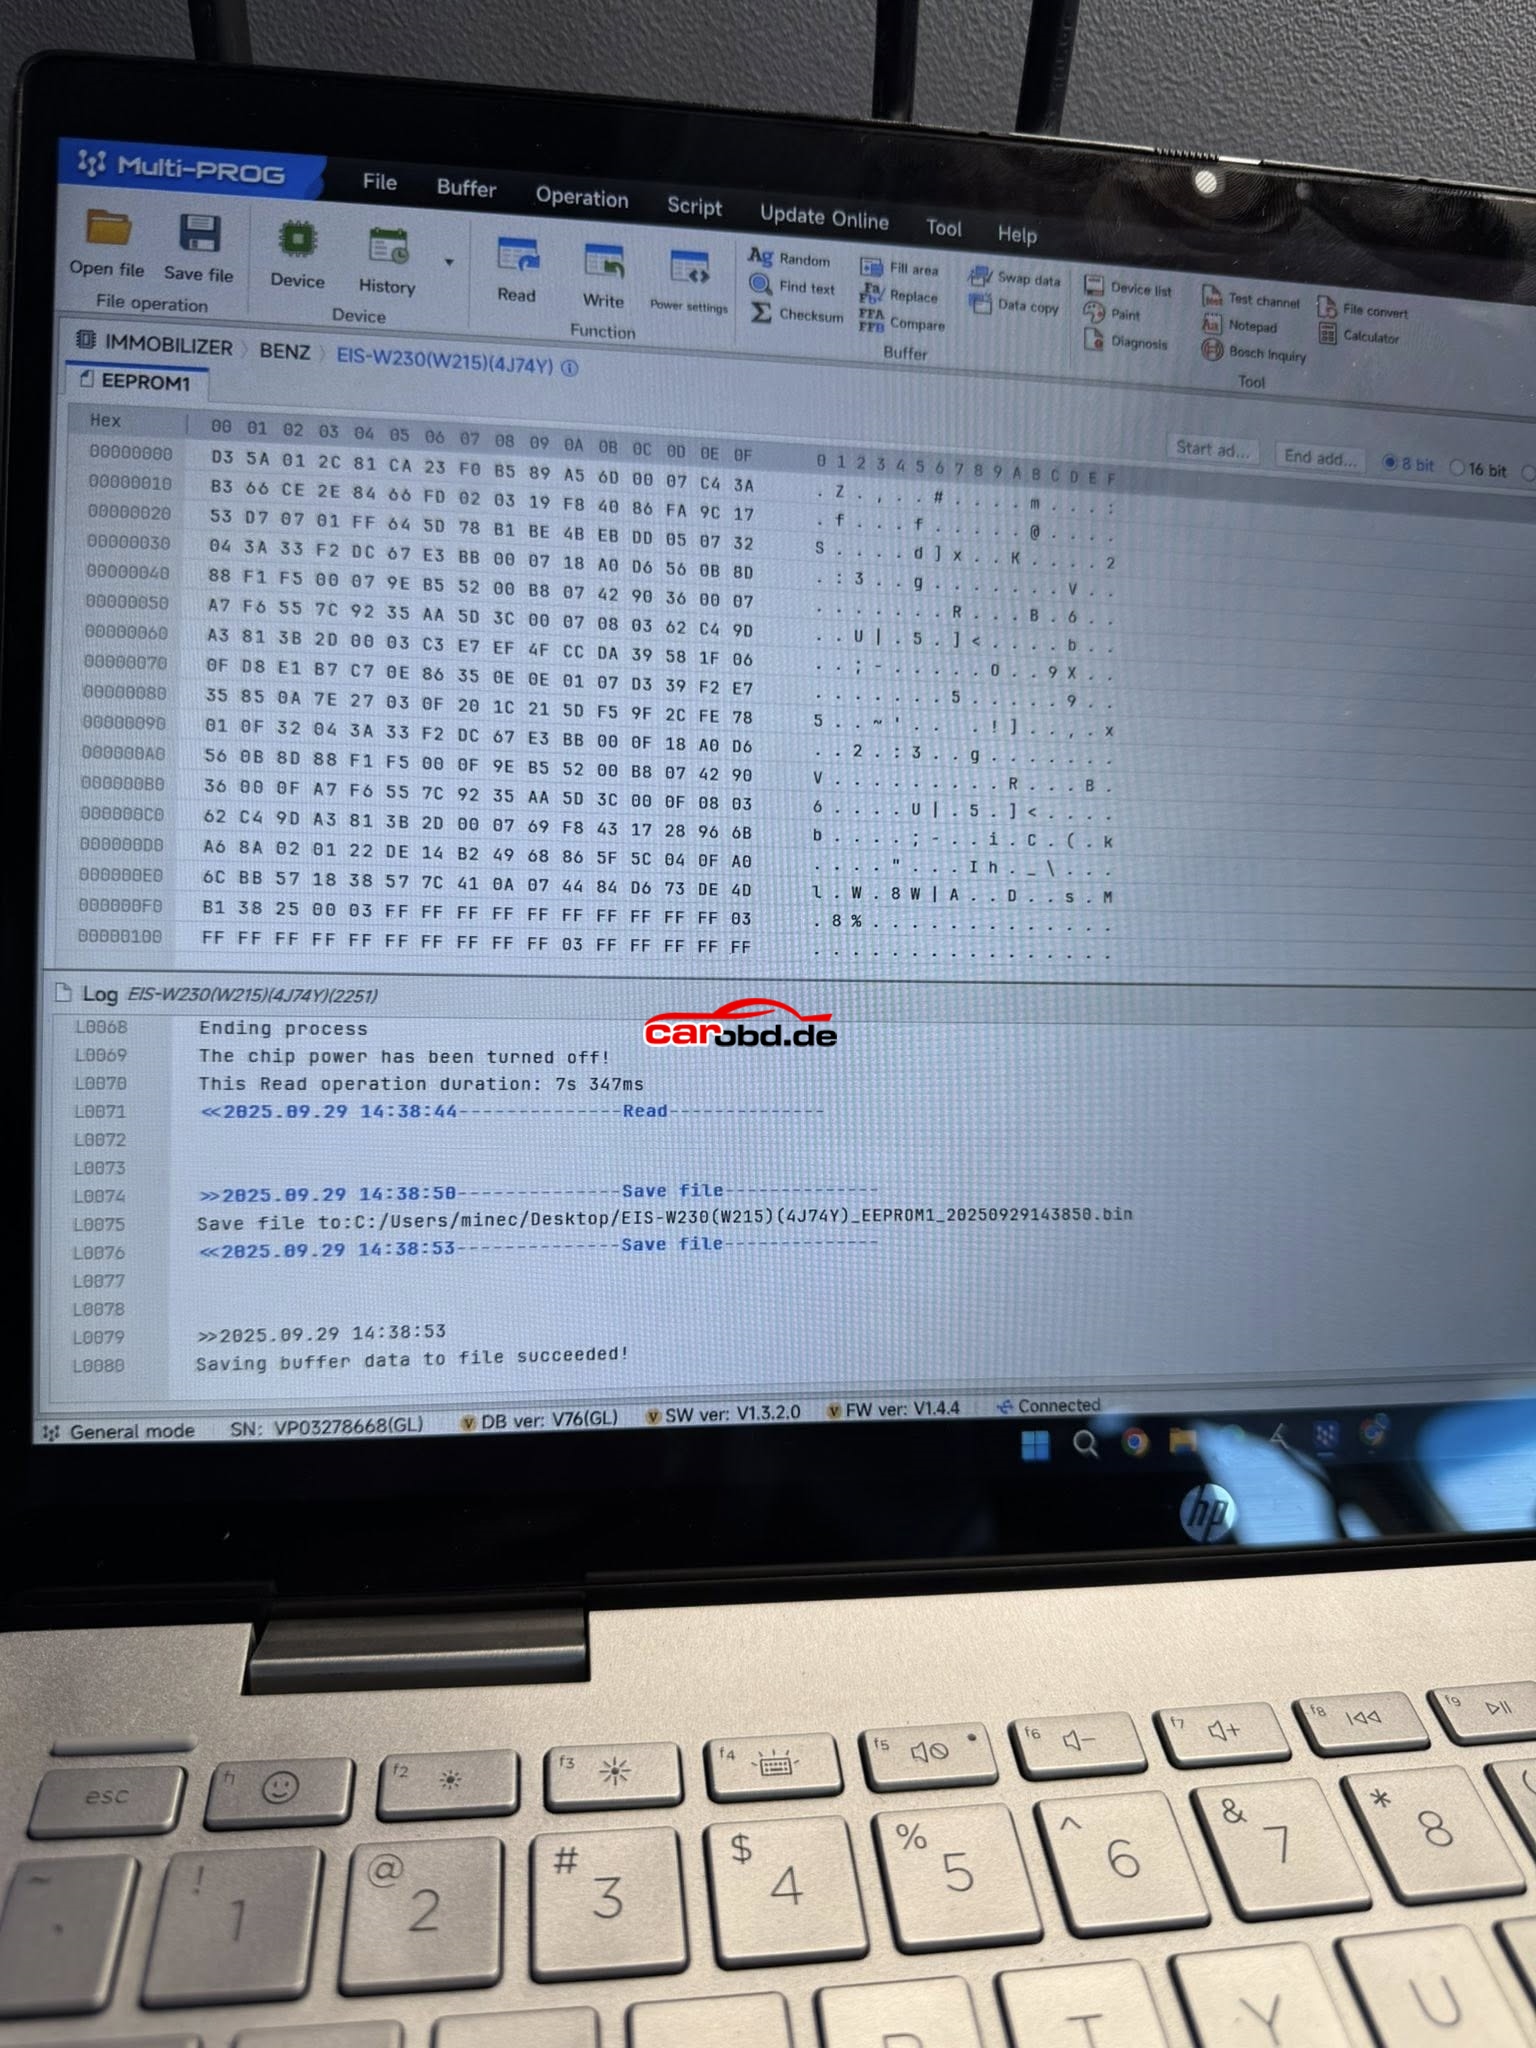
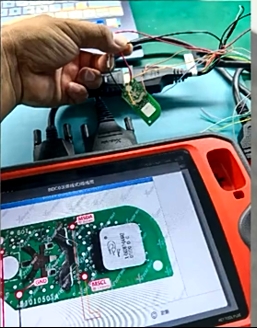
Vehicle Model: 2002 Mercedes S500 (W220)
Function: -All Keys Lost-
Product:
VVDI Key Tool Plus Failed Via IR ❌
Autel IM608 Failed Via IR ❌
CGDI MB Failed Via IR ❌
Xhorse Multi-Prog + VVDI Key Tool Plus
Success ✅
EIS/EZS: W215/W220 (K-Line)
Chipset: Motorola (4J74Y)
•Read EEPROM1 with Xhorse Multi-Prog
•Transfer File to VVDI Key Tool Plus (Xhorse Cloud)
•Load & Decode File
•Prepare Key File
•Write Key file
Here is the operation steps
Xhorse update BMW G chassis BDC3/BCP key copy function
free to update BDC3 function if have BMW G-BDC2 license activation.
🔴Key Tool Plus BMW BDC3 function is ready. Also compatible with VVDI2 + VVDIProg/Multi prog or Key Tool
MIDI + VVDIProg/MultiProg.
https://www.carobd.de/wholesale/xhorse-bmw-g-bdc2-authorization.html
Collect original key data with vvdi prog/multi prog, then load key data to VVDI2 or MIDI to copy key.
VVDIProg and MultiProg BDC3 function is under testing. Coming soon.
Copy VVDI BDC XM38 key (not released yet) or original key. Don’t deduct points.
🔴Xhorse supported BMW G/U Chassis BDC03/BCP model list:
BMW G Chassis BDC03 IMMO System
Series Model Year
2 Series G42/G87 2020-2024
3 Series G20/G21/G28/G81/G80 2020-2024
4 Series G22/G23/G26/G82/G83 2020-2024
5 Series G30/G31/G38/G60 2020-2024
6 Series G32 2020/07-2024/06
7 Series G11/G12/G70 2020-2024
8 Series G14/G15/G16 2020-2024
X3 G01/G08/G45 2020-2024
X4 G02 2020-2024
X5 G05 2020-2024
X6 G06 2020-2024
X7 G07 2020-2024
Z4 G29 2020-2024
BMW U Chassis BCP IMMO System
Series Model Year
1 Series 120 2021-2024
2 Series U06 2021-2024
X1 U11/U12 2022-2024
X2 U10 2022-2024
TechSupport;
Whatsapp: +86 19947637411
Email: Sales@Carobd.de
Xhorse BMW G series BDC2 immo key programming function is ready on VVDI2 and Key Tool Plus programmers. To use the add key function, users have to purchase an Xhorse BMW BDC2 adapter separately. Xhorse provides free activation of the BMW G-chassis -BDC2 immo system for users who buy this adapter.
Here we will show how to install and uninstall the Xhorse BMW BDC2 adapter.

Step 1: Align the Adapter
Precisely align the 3 positioning points on the adapter with the 3 corresponding points on the BMW BDC2 module.

Step 2: Press Down
After alignment, firmly press the adapter downward until it seats properly.

Step 3: Secure the Adapter
Locate the locking clip on the adapter and fasten it to ensure a stable connection.


Connect BDC2 adapter with VVDI2 or key tool plus. Take VVDI2 as an example.

Connect the VVDI2 device to the BDC2 module using the BDC2 adapter.
Supply the adapter with 12V power.

Turn on the switch on the BDC2 adapter.
White indicators turn on, allowing you to confirm whether the pins are correctly aligned

The Power indicator will turn on if the adapter is well connected.

Part II: Uninstall Xhorse BDC2 Adapter
Step 1: Unlock the Adapter
Release the locking clip on the adapter.

Step 2:Prepare the Workspace
Place the module on a flat, stable surface to prevent damage to the adapter or BDC2 module.

Step 3: Press to Release
Use both hands to simultaneously press down on the edges of the BDC2 module.
This will gently push the adapter’s pins upward, disengaging them from the module’s interface.

Step 4: Remove the Adapter
Lift the adapter straight upward in a parallel motion.
Note: The 3 positioning pins ensure smooth removal and prevent bending of the pins.

🔴🔔Xhorse new vs old Audi BCM2 solder free adapter
🟥new BCM2 adapters supports all BCM2 versions, old adapter only does some versions.
🟥new BCM2 adapter allows full reading (Dflash + PFlash), it does BCM2 cloning, old adapter does not.
🟥new BCM2 adapter works with KTP and Multi Prog only. Old adapter also works with vvdi prog.


VW Golf 7 MQB add spare key done completely by OBD and completely by Xhorse equipment. 👍🔐🔑✅
Key Tool Plus
Xhorse Dolphin II XP-005L
and the Xhorse VVDI MQB smart remote key


“Hello. Please maybe you can help me. i registred HW and maked fw update but it is now 40 mi utes in stis status. What to do ? “
here is the message we got from customer who just got an xhorse multiprog machine, when he used the machine, he encounter an error, when install software on computer .It shows”Downloading the upgrade file” always without any change.
nothing helped so it is stucked on 0percent and windows didnt recognize device connected
is something what can help me remotely or somhow? because when need send device to china will be “excellent” because brand new device never used and connected for first time for registration and upgrading and this happened . what you save money on total price I will pay for shipping, and be without anything for not short time …. ( you know what Im trying to tell )
Finally aslfter some hours of working I used another PC and install device and upgrade passed and all is OK. But on originalmone device is not recognized even after reinstallnsoftware. But multiprog working now ( seems )
I changed laptop. Maked new inatallation of software and connect it . It was recognized as HW but name I don’t remember ( it was not as multiprog device or something. ) so tryed to make again FW update and it start working and making update. On multiprog too as Insend last picture. Yhan device start working OK and was not stucked anymore. Than tryed to connect to original computer and still wnas not recognized as it was before. So today will try to reinstall it if it will be recognized or not.
Before changing PC I tryed all what i can reinstall driver, repair driver…..
So for this kind of issue, customer can try to change a PC to install software again. Then machine will work.


