Archive | August 2017

Volvo Tech Tool 2.5.86 Win 7 download, install, activate

Volvo premium tech tool 2.5.86 software download:

http://www.carobd.de/wholesale/volvo-88890300-vocom-ptt-20455.html


This is the latest Volvo Tech Tool 2.5.86 crack… works perfect with Nexiq, Xtruck, DPA4+, DPA5, Vocom, 88890020, Noregon, for diagnostics via tech tool/ programming via dev2tool/ reprogramming via visfeed on old or new trucks (2017).


Volvo PTT 2.5.86 software update:


  1. Last official version Volvo Tech Tool 2.5.86 Development maximal authorized

* Full Techtool Activating (For all volvo brands !!!)

* Last ACPI+ update for standard and for development AND special DESIGNER user !!!

* You can Choose User ID like: A123456 or M555555 OR TECHTOL OR ANY OTHER..

*You can choose your logo or name to stay in tech tool

*NOT DLL PATCHED registration. Real registration for Tech tool


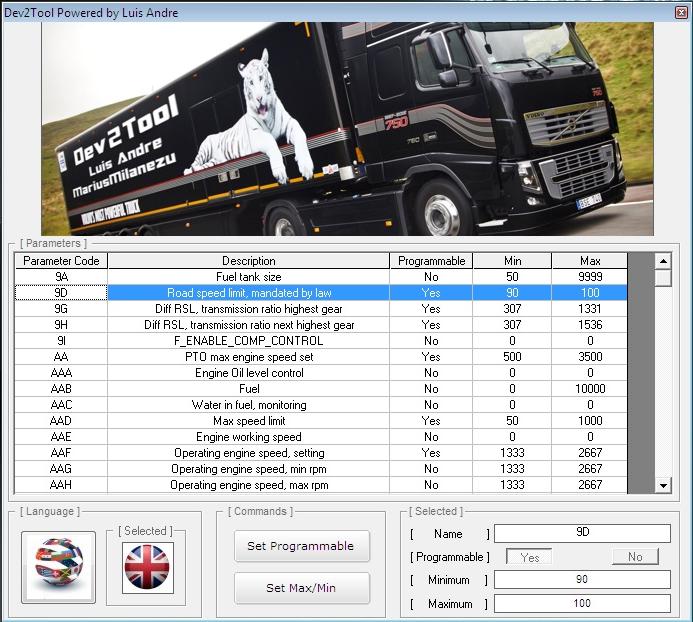
  1. Dev2tool (for programming parameters on older trucks)
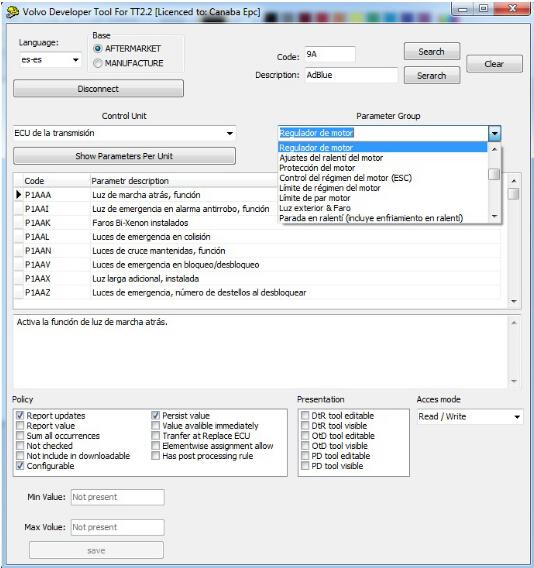
  2. Developer tool Acpi+ Ultimate pro v3 (for programming parameters on newer trucks)

– Connection on real vehicle – NEW Verion

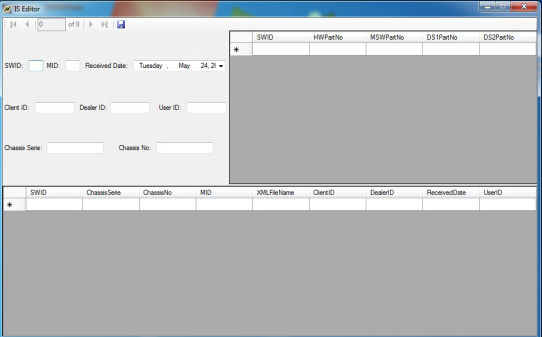
  1. IS editor Encriptor/ Decriptor
  2. Visfeed + Volvo xml editor + instruction
  3. Parameter description for all version (2 3 and 3 version ) -New Version

7.Volvo/ IS File Encryptor/Decryptor

  1. Dtc error info – New Verison –
  2. TT old electrical system converter tool
  3. VISFEED ENC/DEC TEA2 ULTIMATE version


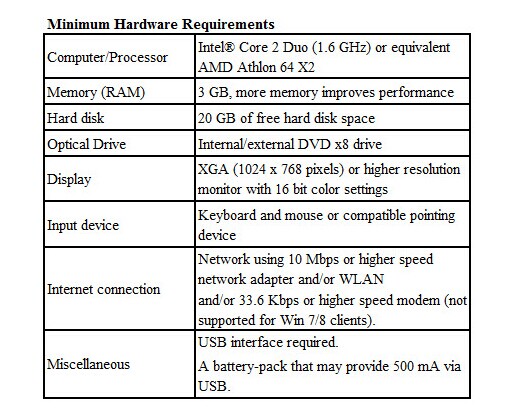
Tech Tool 2.5.86 Windows 7 32/64bit install:

Windows 7 32/64 Ultimate or Professional or Enterprice With service pack 1.
DONT WORK With Home Edition

volvo-88890300-vocom-ptt-20455-1

volvo-88890300-vocom-ptt-20455-2

1/ open in admin setClientID.exe set ID:   190430

2/ TechToolInstaller_Dev.reg

3/ TT204-Prerequisites.cmd (client update ID:190430)

4/ TT204-MainInstallationPackages.cmd

5/ TT204-MainInstallationPackages2.cmd

6/ TT204-Patches.cmd


(don’t open tech tool)


open client update and make all update 2.04.87(is very long)


Copy and Replace

APCIPLUSDATA.DLL

C:\Program Files (x86)\Tech Tool\Tech Tool\Apciplus


BaldoLocal.Data.dll >>

C:\Program Files (x86)\Tech Tool\Tech Tool\BaldoLocal


VolvoIt.Waf.Login.Ui.dll >>

C:\Program Files (x86)\Tech Tool\Tech Tool\Login


BaldoLocal.sdf >>

C:\ProgramData\Tech Tool

copy and raplace apci+ update / in these path :

C:\ProgramData\Tech Tool\Waf\DtR

and

C:\ProgramData\Tech Tool\Waf\OtD


open tech tool


Tech Tool and Update Product Information


Disclaimer: premium tech tool software installation is time-consuming (usually needs one day) and it’s not easy for most of diy users. Usually, volvo tech tool for sale comes together with free installation service on many eshops, such as carobd.de and the like.

volvo-88890300-vocom-ptt-20455-3

volvo-88890300-vocom-ptt-20455-4

volvo-88890300-vocom-ptt-20455-5

volvo-88890300-vocom-ptt-20455-6

volvo-88890300-vocom-ptt-20455-7

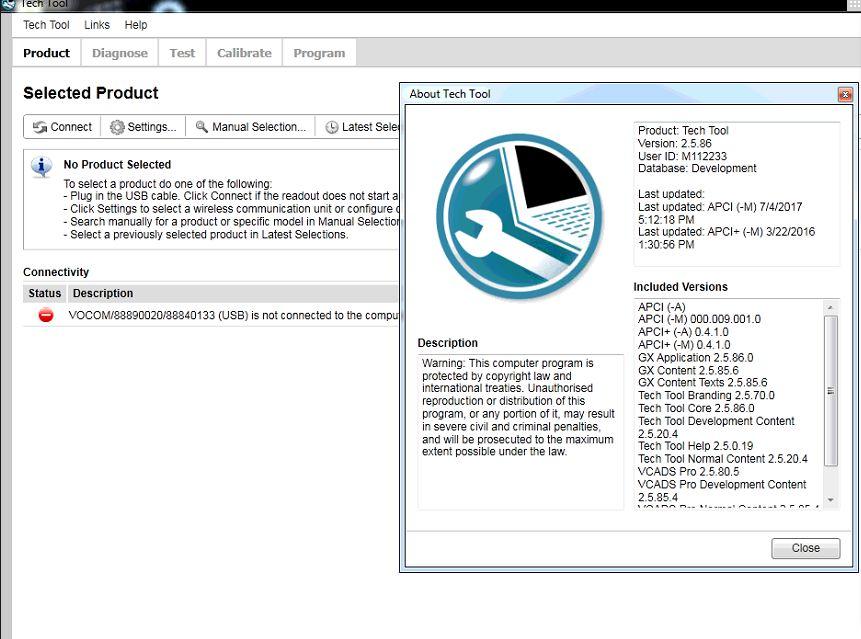
Volvo Tech Tool 2.5.86 activation:


The latest version is Tech Tool 2.5.86.0 and the latest have new update technology
and it’s because of bad activation. new 2.06 not could work with old activators.

Usually KG doesn’t activate properly. Version 2.5.86 has RSS feeds that it calls to in order to initialize the application. If you’re not connected to the internet during this, it will fail and timeout causing that drop down to become blank, and also stopping use of PTT altogether.


How to fix for tech tool activation:

First, make sure to use a USERID that follows Volvo standard or you won’t be able to program parameters and will result in an error.
– you must use two alphanumeric characters followed by an even number of numbers. For example, AB1234.

Also, you must check the box “No central” if using the popular KG floating around or you will need to background sync. This is the reason your databases are coming up blank and I’m guessing it’s running slow when this occurs. The temp fix is to connect to the internet, then open Tech Tool. Problem solved for a week then it will occur again unless you re-run the KG, erase DB and re-activate using “No central store” checkbox and correct user ID fingerprint.


* The last important for newbies: to buy Premium Tech Tool PTT 2.5.86 with FREE installation & activation service. Now, many Chinese vendors sell Premium Tech Tool crack and offer free service like this as far as i know.  carobd.de  is one of them.


Premium tech tool truck list:


Volvo Trucks (Older electrical system, Vehicle electrical system \`98);
Volvo Trucks (VERSION2, VERSION3 – PARAMETER PROGRAMMING);
Volvo Trucks (VERSION4 – FH4/FM4 – PARAMETER PROGRAMMING);
Volvo Buses (Conventional, Multiplexed, Multiplexed v2, Multiplexed v3);
Volvo Construction Equipment;
Volvo Penta (VERSION2, VERSION3);
Volvo OEM Component Customer (VERSION2, VERSION3);
Mack Trucks (V-MAC I/II/III, ITC, IV, IV+ – PARAMETER PROGRAMMING);
Renault Trucks (VERSION2, VERSION3, VERSION4 – PARAMETER PROGRAMMING);
UD Trucks (VERSION2, VERSION3).PARAMETER PROGRAMMING);


Volvo tech tool full kit:


  1. Dev2tool (for programming parameters version 2 – older trucks)
    2. Developer tool Plus(Acpi+) (for programming parameters version 3 and 4 – newer trucks)
    3. Visfeed + Xml Editor
    4. Volvo/ IS File Encryptor/Decryptor
    5. Volvo Traing Files (Flash, PDF,Video) 3gb

How to DIY: BMW 2012 528i CAS4+ add new key using VVDI2 key pro?

So I’m the type of person who will NOT take my car to the dealer. All DIY maintenance and if I don’t have the equipment for it I will buy or borrow it and watch youtube videos and do it myself. I have come to the conclusion it’s better to go to the dealership to get keys rather than ebay and a locksmith or DIY. I will roughly explain the process of how the key making/programming is.

vvdi2-key-programmer-21


I just bought a 2012 528i and it came with one key. I wanted another one but I HATE going to dealers for anything. It’s always at least 50% more expensive and I leave feeling like a chump being taken advantage of. I searched high and low for people in the LA area that can program a virgin key fob from ebay and cut the slide out key. Cutting it is not a big deal but programming it is.

So BMW has a pretty interesting system for authorizing keys. There’s a module under the instrument cluster called the CAS4 module. I don’t know what it stands for but the two functions that I know about it are keeping the mileage of the car and authorizing key fobs to work. It comes from the factory with 10 pre-authorized key fobs setup on it. The car is also has two fobs with it when it leaves the factory. Those take up slot 1 and slot 2. The other 8 fobs are not made yet but the car knows when it sees those keys that it’s authorized to start and unlock with them. It requires the key to be synced but other than that they keys are ready to go as soon as you sync them using the process of holding it against the steering column like in the many other threads on this website. BMW is the only place that knows what keys are authorized. When you go to the dealer and buy another key they send an order to some BMW place in NJ that can look up that highly secretive information and make a key. They go down the list until you get to 10 keys then you need a new CAS4 module (about $900). You then have to get it programmed including transferring the mileage over from your old module. You probably have to get the driver door and center console lock cylinder rekeyed too. I’m not sure if the old keys get deactivated when new keys are activated. Maybe someone else knows.

The 2nd method bypasses all the pre-authorized system that BMW has in place. You can get a virgin key fob off of ebay or at a locksmith and they can reprogram the CAS4 module. It is quite the ordeal because you have to override the memory on it with programming tools. If you have a hiccup in the transfer or transfer the wrong file you can brick it. I’m not sure if the dealer can fix it after. Maybe but maybe you have to get a new one. They have several different hardware/software setups that can do this. They each cost several thousand dollars and have a very steep learning curve. I’ve seen BMW Explorer, VVDI2 commander BMW, FVDI2, or a R270 programmer. They can also be used to change the mileage.
VVDI2 being used with Xhorse. It involves soldering hires directly to the CAS4 module. Not for the faint of heart. Apparently there’s a way to do it through the OBDII port but I don’t have any more info on that.

https://youtu.be/ZsueRvrg_KM

That’s the only way I know of for getting new keys to work with your BMW. I could not get anyone in the Los Angeles area to offer to program the key for less than $500. Why not get it from a dealer and do it the right way for that kind of money?

I called several dealers and they all wanted from $300-$500 to order a fob and cut the metal key even though it all comes from the same place in NJ and they don’t have to do anything except put in the order. I actually had a dealer give me a number for BMW USA to call or order the key from and it will be delivered to the dealership so they can verify the registration and my ID when I pick it up. BMW USA wanted $150 for it and they said I could probably sync it myself but I should not be charged anything by the dealer unless I have them do the syncing. The number is 1-888-575-5397 and is only for California residents for some reason.

I hope this can help someone. I spend half a day doing this research and calling many locksmiths and dealers. I understand that I don’t know exactly how this system works but I wrote this post up to the best of my knowledge. In your situation it still might be better to go to a locksmith and have them program your key. It might be cheaper elsewhere in the country to do that since there is not much demand for method 2 in California because of the BMW USA key hotline. If I was in NYC or so I would probably send my CAS4 module to the same guy who sells the keys on ebay since he offers the service for $250. It does not make economical sense for me to have a key made outside of the proper channels here in CA. If you find any mistakes please let me know and I will be happy to fix the post.

If you do decide to try and DIY, here’s a website that will probably help.

How to fix Passenger seat recline issue on Jaguar XK / XKR ( X150 ) by Mangoose SDD?

Let’s start with my car models and issues: I have Jaguar XK / XKR ( X150 ), my passenger seat will back will not sit up correctly. It appears to only travel about 1/3 of the driver, leaving the seat and passenger leaning back very far.

I loath having to go there and have not found any indy in my area that has the diagnostic tools.


Then is solution:

If you have a spare laptop, you can get set up yourself for as little as $50.
I have had my Mangoose SDD (Chinese clone of a Mongoose) for 5 or 6 years and have been able to do most things dealers do, including updating firmware in various modules.

As you can see from the attached screen shot the seat calibration routines are in one of the menus done through SDD.

how-to-fix-passenger-seat-recline-issue-on-jaguar-xk-xkr-x150-by-mangoose-sdd-pic-1


If you have a few hours to spare you could start with this thread:
Cloned dealer scan tool – Jaguar Forums – Jaguar Enthusiasts Forum

There are quite a few suppliers and some people have had mixed success with them but I think I bought mine from here:

JLR Mangoose SDD V145 for Jaguar and Land Rover

They also do a copy of the Mongoose Pro now as well:
V145 JLR Mangoose SDD Pro for Jaguar and Land Rover

how-to-fix-passenger-seat-recline-issue-on-jaguar-xk-xkr-x150-by-mangoose-sdd-2

As you can see from the above I mentioned, the cable should come with a copy of SDD (Jaguar supplied diagnostic software). You may or may not be able to read the CD the software comes on and it may or may not work fully! SDD V131 seems to be the sweet spot for functionality and least issues and there may be a link to a copy in that thread somewhere.

You can buy the cable plus a complete image of a virtual PC from a few suppliers which means you don’t have the hassle of installing the diagnostic software yourself. I have not had many problems myself but some people have wasted days trying to get theirs working . Once you have it working though it is an invaluable tool and will pay for itself over and over again.

If you use it to update firmware you must make sure you have a decent (at least) 25 amp power supply connected to the battery otherwise you run the risk of bricking modules

BMW X3 2006 angle sensor fault internal AND 04 slider fault (Solved)

Let’s start with a issue: Have BMW X3 2006, I have no ideal what the “slider” is? Is it something connected with the steering angle sensor? I’m getting andgle sensor fault internal AND 04 slider fault..


Then followed with diagnostic procedure and result:

So curiosity got the better of me and i removed the steering angle sensor.

There was probably an easier way than removing the entire column but whats done is done.

I had only the yellow 4×4 light on and the calibration of turning the wheel back and forwards worked but the error came back on almosts instantly, even after driving it for a few kms.


I was getting the following codes consistently after clearing many times with my Creator C310:


“5EB1 Steering Angle Sensor, Supply”

“04 Slider Fault, Adjust Operation”

“5EB0 Steering angle sensor, Internal”


I was also getting intermittent issues with the Creator C310 Code Scanner not being able to read live data stream of the steering angle sensors output. Sometimes it would appear to be registering, other times it would simply read 0.0 no matter the steering wheel movement.

Once i had removed the angle sensor from the splines i opened the little black casing and peered inside. It is a form of potentiometer (or how ever its spelt) and the brushes that carry current have worn away as you can see in the last photo. I bent them out a bit further so they contact what i can only assume is the “slider” and reassembled everything. My guess to the cause of the intermittent live data stream from the sensor is as the temperature in the car changes the metal flexes slightly and no longer makes contact.

Anyway, no more yellow 4×4 light and its been 2 days.

One would argue that’s a lot of effort for only buying a few months of time from an old worn sensor that needs replacing but at least now i know

If i was to replace the sensor with a new one it would need coding programs above my knowledge base that I don’t have and that cost money, so ill cross that bridge when i get to it.

Cheers.

Attached Creator C310 diagnostic procedure:

bmw-x3-2006-angle-sensor-fault-internal-and-04-slider-fault-solved-pic-1

bmw-x3-2006-angle-sensor-fault-internal-and-04-slider-fault-solved-pic-2

bmw-x3-2006-angle-sensor-fault-internal-and-04-slider-fault-solved-pic-3

bmw-x3-2006-angle-sensor-fault-internal-and-04-slider-fault-solved-pic-4


This entry was posted on August 24, 2017, in Code Reader.

R270 Read/Write BMW CAS 9S12, Xprog R/W Mercedes EZS 9S12

Here is the CAS/EZS 9S12 reading/writing manual with wiring diagrams.

R260/R270 programmer can read/write BMW CAS 9S12 and EWS4 9S12:

•BMW 1,3,5,6,X5 Series CAS3 Black (MC9S12X)

r270-readwrite-bmw-cas-9s12-xprog-rw-mercedes-ezs-9s12-1
•BMW 1,3,5,6 Series CAS3 Black (MC9S12)

r270-readwrite-bmw-cas-9s12-xprog-rw-mercedes-ezs-9s12-2
•BMW 1,3,5,6 Series CAS2 White (MC9S12)

r270-readwrite-bmw-cas-9s12-xprog-rw-mercedes-ezs-9s12-3

r270-readwrite-bmw-cas-9s12-xprog-rw-mercedes-ezs-9s12-4

•BMW 1,3,5,6 Series CAS2 White (MC9S12)

r270-readwrite-bmw-cas-9s12-xprog-rw-mercedes-ezs-9s12-5

r270-readwrite-bmw-cas-9s12-xprog-rw-mercedes-ezs-9s12-6

•BMW 7 Series CAS 2002(9S12)

r270-readwrite-bmw-cas-9s12-xprog-rw-mercedes-ezs-9s12-7

•BMW 7 Series CAS 2005-up(9S12)

r270-readwrite-bmw-cas-9s12-xprog-rw-mercedes-ezs-9s12-8
•BMW X3/X5 EWS4 (MC9S12)

r270-readwrite-bmw-cas-9s12-xprog-rw-mercedes-ezs-9s12-9

These are connections for Motorola 9s12 family…for those who prefer colours rather than numbers…

YELLOW = RESET

PURPLE = BKGD/BDM

BLACK = VSS/-

RED = VDD/+

GREEN = PE7 / xclks

R260 – R270

Black – 26

Red – 1

Yellow – 7

Purple – 19

XCLKS – 5

Coaxial

White – 8

Black – 24

Also R270 BDM programmer work perfect with 9S12 below:

•Ford Mustang 2007 (MC9S12)
•Mercedes A-Class 2004 Key Module (MC9S12)
•Mercedes C/CLK C209 ZGW (MC9S12)
•Mercedes E/C W211 Key Module (HC12)
•Mercedes E/C/CLK/SLK W211 Key Module (MC9S12)
•Mercedes ML/R W164 Key Module (MC9S12)
•Mercedes S/SL EZS R230 (MC9S12)
•Mercedes Sprinter EZS (MC9S12)
•Mini One/Cooper Dashboard (HC12)
•Mini One/Cooper EWS4 (MC9S12)
•Mini One/Cooper CAS3 Black (MC9S12X)
•Volkswagen Crafter EZS (MC9S12)

But for Mercedes-Benz 9S12, you have a cheaper solution: Xprog

Xprog (Xprog-m, Xprog-box) is verified to work no issues with Mercedes 9S12:

Mercedes-Benz EZS Motorola 912 or 9s12

r270-readwrite-bmw-cas-9s12-xprog-rw-mercedes-ezs-9s12-10

Almost all control points joined with service connector of EZS – black painted connector.

You should have a cable to connect for EZS reading with XProg

Also,it’s ok to make it yourself with other programmers.

r270-readwrite-bmw-cas-9s12-xprog-rw-mercedes-ezs-9s12-11

Use the following wiring connection diagram:

1 – EXTAL

2 – GND

3 – RESET

4 – BKGD

The EXTAL signal doesn’t joint to service connector, so we have to make jump according to CPU type.

To read Mercedes EZS 912:

If you see on board

r270-readwrite-bmw-cas-9s12-xprog-rw-mercedes-ezs-9s12-12

It means you have 912 CPU. Do make a jump like in picture (you can keep this jump even after reading/writing finishing).

r270-readwrite-bmw-cas-9s12-xprog-rw-mercedes-ezs-9s12-13

Find resistor on RESET line and make a jump on it for good communication. (you can keep this jump even after reading/writing finishing).

r270-readwrite-bmw-cas-9s12-xprog-rw-mercedes-ezs-9s12-14

Then solder the red wire of our cable for power supplying.

r270-readwrite-bmw-cas-9s12-xprog-rw-mercedes-ezs-9s12-15

Now plug in the connector to Xprog programmer board:

(Xprog with red PCB nowadays is out of date and stops production; better with XProg with green PCB)

r270-readwrite-bmw-cas-9s12-xprog-rw-mercedes-ezs-9s12-16

mount the part of cover on to the EZS, and you would make no mistake
while connecting the cable to EZS.

r270-readwrite-bmw-cas-9s12-xprog-rw-mercedes-ezs-9s12-17

Run Xprog software and press “Device” tab.

r270-readwrite-bmw-cas-9s12-xprog-rw-mercedes-ezs-9s12-18

Choose the EEPROM Type, 1,2,3 in following

r270-readwrite-bmw-cas-9s12-xprog-rw-mercedes-ezs-9s12-19

Press “New” button, then press “Read” button to read eeprom

r270-readwrite-bmw-cas-9s12-xprog-rw-mercedes-ezs-9s12-21

r270-readwrite-bmw-cas-9s12-xprog-rw-mercedes-ezs-9s12-22

the eeprom data

r270-readwrite-bmw-cas-9s12-xprog-rw-mercedes-ezs-9s12-23

Save the EEPROM data

r270-readwrite-bmw-cas-9s12-xprog-rw-mercedes-ezs-9s12-24

To read Mercedes EZS 9S12:

If you see on the board

r270-readwrite-bmw-cas-9s12-xprog-rw-mercedes-ezs-9s12-25

It means you have 9S12 CPU. Do make only one jump like in picture

r270-readwrite-bmw-cas-9s12-xprog-rw-mercedes-ezs-9s12-26

Then solder red wire of our cable for power supply.

r270-readwrite-bmw-cas-9s12-xprog-rw-mercedes-ezs-9s12-27

Then do the same job like with the previous CPU type but kind of different when you choose microchip in Xprog programmer software.

r270-readwrite-bmw-cas-9s12-xprog-rw-mercedes-ezs-9s12-28

Sometimes the new board types with 9S12 CPU have not some jumps (it has zero resistance as
usual). Make the- se jumps yourself.

r270-readwrite-bmw-cas-9s12-xprog-rw-mercedes-ezs-9s12-29

r270-readwrite-bmw-cas-9s12-xprog-rw-mercedes-ezs-9s12-30

How to retrofit Porsche 991.1 MF steering wheel successfully?

My story is about retrofitting the new 991.2 MF steering wheel to my 2012.5 991S.

Background:

I bought my car CPO and I love the specs on my car. I really liked having the carbon MF wheel match my interior. My 991S is a cab, so the heated wheel is a must. But I hated the shifters (never made sense to me), so I got the Techart Paddle shifters. After spending all the $$ I really wanted to believe that I was going to be happy with those Techart shifters, but truth is – those shifters were flimsy, and also obstructed the dashboard view. They just didn’t feel and look right and they weren’t from the Porsche factory. So I was excited to see the first 991.2 steering wheel retrofits being posted. Of course, MF was a no go at first.


Here retrofit solution supplied by maker…

The perfect steering wheel for my car is actually a Macan steering wheel. So I bought it new with a new airbag. I also bought the retrofit kit from Yuan Li. I actually thought to myself this isn’t going to work. Yesterday I did the retrofit. Beginning to finish in exactly two hours. I am experienced in electronic engineering and have a lot of soldering experience which you need if you have a heated wheel. You need to remove an SMD resistor and swap another one out on a tiny circuit board. Throughout working on the new steering wheel, I was very nervous. But after installing the conversion module into the Macan wheel, and finally swapping steering wheels, everything worked just perfectly!!!


It is just amazing to me that it all worked out. I absolutely love the new look – it actually feels like I have a new car. The MF controls are much improved (very precise), the paddles are absolutely perfect. It really is a dream come through for me.


I posted some before / after pictures. Also a video that shows that all buttons work properly, included backlight function, and the steering wheel heat.


Before

how-to-retrofit-porsche-991-1-mf-steering-wheel-successfully-1

After

how-to-retrofit-porsche-991-1-mf-steering-wheel-successfully-2

how-to-retrofit-porsche-991-1-mf-steering-wheel-successfully-3

how-to-retrofit-porsche-991-1-mf-steering-wheel-successfully-4

Followed questions and answers:

Question 1:

Looks great!
I do think my 991.1 SD wheel feels a bit dated in comparison to the newer ones.
Question – I don’t care about the multifunction as much as my desire for a heated steering wheel. Can this be easily added?
Also – if you don’t mind, what was your total cost?

Answer: Adding heat will at a minimum require a different clock spring, but I am not sure if you can get the 911.2 wheel with heat and without multifunction without modifying the steering wheel.
Cost to me:
$1,500 steering wheel
$750 airbag
Less than $400 adapter
$2,650 total

Attach adapter picture:

porsche-stmv1-steering-master-adapter-6


Question 2: is it easily reversible back to the original steering wheel in case you wanted to resell with original parts in the future?

Answer: Yes and no, depending on your definition of “easily” reversible. With the exception of the switch that controls the steering wheel heat, everything else is plug and play – mostly rerouting wires and plugging them into the adapter. The heat switch circuit board in the steering wheel requires minor soldering (change of resistors) but that can be reversed too.


Question 3: The newer wheel has a different feel to the paddles. Less travel and more of a mouse click than the old one. Does this add to the experience vs an older SD wheel paddle shift?
My hypothesis is that this has more impact to reviews than the software.

Answer: I don’t have experience with the SD wheel. It’s a day and night difference compared to the Techart paddles. To me the shifters on the new wheel are absolutely perfect, and really the main reason I did the swap. Second reason being optics, and third reason just wanting to mod the car to make it mine.


Question 4: It looks amazing! I would be very interested in a similar upgrade. I have no idea what a standard leather steering wheel would cost. Time to call the dealer.

Answer: Cost will probably vary depending on the wheel you get. My expenses are listed above. I bought my steering wheel and airbag from Europe. They were in the original Porsche packaging and had a manufacturing date of May 2017. Contact at email at Sales@CarOBD.de


Question 5: Can a MF wheel be added to a non MF wheel? Can a harness be added to activate multifunction? How about the Sport/Sport Plus ****, can that be retrofitted also?


Answer:

Original with sport style steering wheel car upgrade multifunction steering wheel,need coding the vehicle from sport style wheel to multifunction by PIWIS.Based several retrofit 991.1 to 991.2 wheel projects,no need purchase “multifunction enable code” for 991.1,MF can works.
Coding the car following this:https://gpsadapter.us/blogs/installa…n-coding-guide
Adapter only support switch mode LED indicator N S S+, not support switch S S+ use switch mode dial, works this video

Question 6: Is it the same size wheel as the 911 wheel?

Answer: Yes, exactly the same size as the old MF wheel.

VVDI2 BMW V4.3.0 FEM BDC key program & KM reset tested 100% works

VVDI2 BMW V4.3.0 FEM BDC key program & KM reset tested 100% works

VVDI2 latest software version V4.3.0 update: BMW V4.3.0 adds BMW FEM/BDC key learn, erase key, FEM/BDC KM reset etc. Below parts incl. VVDI2 BMW FEM /BDC authorization, update content, free download link and using tips.

VVDI2 BMW V4.3.0 FEM/BDC system function is optional, the supplier could help you in the authorization of VVDI2 FEM / BDC, you could contact email at: Sales@CarOBD.de for a best price and after-sale service.

  1. Xhorse VVDI2 Key Programmer BMW FEM/BDC Function Authorization Service (with mini condor key cutting machine)
  2. Xhorse VVDI2 Key Programmer BMW FEM/BDC Function Authorization Service (without mini condor key cutting machine)

VVDI2 BMW V4.3.0 Update:

*** Require firmware V4.3.0

VVDI2 BMW V4.3.0 Capabilities:

1.support make new key with ignition switch(support adding spare key and all key lost, all key lost require ISN)

2.support reset FEM/BDC KM(cluster require reset manually)

3.support erase key(after erasing the key position become blank position)

4.support backup coding

5.support restore coding

vvdi2-program-bmw-fem-bdc-key-user-instruction-step-by-step-2

vvdi2-program-bmw-fem-bdc-key-user-instruction-step-by-step-1

VVDI2 V4.3.0 download free:
https://mega.nz/#!W1pSRRTL!0n8OX4wshaB1s0O06SDhTR0KvO32nPHZWg4CQjBMdrA

The user who have VVDI2 interface with BMW software could update SW and FW self directly, only connect your VVDI unit internet and press update FW and SW…

VVDI2 BMW V4.3.0 make FEM BDC keys in 3 steps: get key info->programming FEM/BDC system->make keys

Tips:
1.backup coding and restore coding can direct operation generally.
2.add keys, reset KM, erase key must programming FEM/BDC system first
3.in FEM/BDC interface, if ‘get key info’ the type not support, it will show: customer should use “BMW E-sys software” program FEM/BDC system. then programming FEM/BDC system with VVDI2-BMW
4.when operation on ‘programming FEM/BDC system ‘interface, please don’t close this software window until all procedures completed.
5.programming FEM/BDC system, require soldering and get eeprom.(FEM 95128 chip, BDC 95256 chip)usually there are 2 same chips on the module, please refer to the software diagram, select the correct one.
6.programming FEM/BDC system, must restore the original eeprom, restore coding.if cannot restore coding or after restore coding assemble FEM/BDC module back to car, but with problem (such as the remote control cannot start the car
or the car with window problem)please use “BMW E-sys software” coding for FEM/BDC system.


How does Fcar F502 Heavy Duty truck code reader diagnose Cummins?

Let’s use Fcar F502 Heavy Duty truck code reader to diagnose  Cummins engine and share here one-by-one procedure.

how-does-fcar-f502-heavy-duty-truck-code-reader-diagnose-cummins-1

Select menu, you can see it has options incl.

Vehicle information

Fast scan

Complete Scan (about 60s)

Tool information

setting

Update mode

how-does-fcar-f502-heavy-duty-truck-code-reader-diagnose-cummins-2

Here we come to “Vehicle information” incl.

VIN (1-9)

VIN (10-17)

Total vehicle distance (OMI)

Engine make            (CMMNS)

Engine model          6BTAA5.9 LIT

Total vehicle hours

Total engine hours       Oh

Rated engine power

Average Fuel economy   OMPG

how-does-fcar-f502-heavy-duty-truck-code-reader-diagnose-cummins-3

how-does-fcar-f502-heavy-duty-truck-code-reader-diagnose-cummins-4

Back to choose “Fast Scan” and choose “Engine module”

how-does-fcar-f502-heavy-duty-truck-code-reader-diagnose-cummins-5

Read current code

how-does-fcar-f502-heavy-duty-truck-code-reader-diagnose-cummins-6

how-does-fcar-f502-heavy-duty-truck-code-reader-diagnose-cummins-7

Read live data

how-does-fcar-f502-heavy-duty-truck-code-reader-diagnose-cummins-8

Choose “Setting” to reset language between the English and Spanish, also check the serial number, etc

how-does-fcar-f502-heavy-duty-truck-code-reader-diagnose-cummins-9

This entry was posted on August 18, 2017, in Code Reader.

VVDI2 program BMW FEM BDC key user instruction step by step

Post includes 3 parts: 1. Authorization of VVDI2 FEM /BDC key program & KM reset functions (with & without Condor Mini) . 2. VVDI2 programs BMW FEM BDC capabilities 3. VVDI2 programs BMW FEM BDC key step by step instruction.


  1. Authorization of VVDI2 FEM /BDC key program & KM reset functions

Tools to have: VVDI2 full version or VVDI2 with BMW OBD function


1) with Condor Mini 510 EUR

Requirement: provide VVDI2 and Condor(HKSL273 or SL255) serial NO.


2) without Condor Mini 680 EUR

Requirement: provide VVDI2 serial NO.


  1. VVDI2 programs BMW FEM BDC capabilities

1.support make new key with ignition switch(support add spare key and all key lost, all key lost require ISN)

2.support reset FEM/BDC KM(cluster require reset manually)

3.support erase key(after erase the key position become blank position)

4.support backup coding

5.support restore coding


3. VVDI2 program BMW FEM BDC key step by step instruction

step 1:

  1. read FEM/BDC coding via OBDII or on the bench
  2. you’d better not close this window after starting this procedure


step 2:

  1. open FEM/BDC shell, find out where the 95128/95256 chip is, read EEPROM dump via BDM programmer
  2. load original EEPROM dump and save special EEPROM dump, write special EEPROM dump back to the 95128/95256 chip
  3. Restore FEM/BDC shell, provide -12v and connect it via OBD


step 3:

  1. this operation requires connecting FEM/BDC on the bench, and make sure you finish step 1 ans step 2
  2. provide +12v to FEM.BDC and connect it via OBD


step 4:

  1. open FEM/BDC shell, write original EEPROM dump (read step 2) back to the 95128/95256 chip
  2. restore FEM/BDC shell and connect it via OBD


step 5:

loading coding file (read step 1), write to FEM/BDC via OBDII, finish FEM/BDC programming

Attach two pictures:

vvdi2-program-bmw-fem-bdc-key-user-instruction-step-by-step-1

vvdi2-program-bmw-fem-bdc-key-user-instruction-step-by-step-2

HandyBaby Hand-held update to new version 8.3.0!

Handy Baby Hand-held Car Key Copy Auto Key Programmer update to version 8.3.0! Audi 4th/5th generation keys cloning come true, it’s easy to do and have no risk, and JMD keys can use for cloning and program with other tools too.

A-JMDA01: 754C, half keyless, use for Audi Q5/A4L/A6L/A5/A7/A8

A-JMDA02: 754J,full keyless, use for Audi A4L/Q5

A-JMDB01: ID8E use for Audi A6

Handy Baby Version 8.3.0 :

http://www.carobd.de/wholesale/cbay-hand-held-auto-key-programmer.html

To know more about new version 8.3.0, view the image below:

cbay-hand-held-auto-key-programmer-pic-1