Archive | May 2026

How to Use Xirdecoder ECU Tuning Software for EGR DPF DTC Off Hardcut Stage 1

How to Use Xirdecoder ECU Tuning Software for EGR DPF DTC Off Hardcut Stage 1

Xirdecoder is a leading software platform in automotive chip tuning, offering cutting-edge solutions for vehicle optimization. With a vast database for over 130,000 files,it provides professional-grade tuning for Stage 1 to Stage 3 modifications, including DPF/EGR/DTC/Vmax/Adlue off, Launch control,and Hardcut limiters.

In this guide, we’ll demonstrate how to use XirDecoder ECU Tuning software to modify a BMW Bosch EDC17C50 ECU, covering Hardcut, EGR/DPF removal, and Stage 1 tuning. The same process applies to other programmers like Flex, Autotuner, FC200 and more.

Why Choose XirDecoder ?

Extensive Database-Supports over 130,000 ECU files.
Multi-Function Tuning- Covers Hardcut, EGR/DPF/DTC/Vmax etc removal, Stage 1- Stage 3 tuning and more.
Compatibility- Works seamlessly with Foxflash, Flex, Autotuner, and other leading tools.

Xirdecoder has 3 configurations:

  • Basic Version – 2 files per day
  • Standard Version – 10 files per day
  • Ultimate Version – 30 files per day

If you do not renew your annual license after one year, your access to the system will be temporarily suspended. This is due to the ongoing costs of maintaining our online serve infrastructure and the constant support provided by our engineering and AI teams. However, as soon as you choose to renew your license, your access will be fully restored.

How to use XirDecoder ECU Tuning Software ?

Upload Your File: Use a master device to read your ECU’s file and load it into the system
AI Analysis: The platform’s AI scans your file and suggest the best tuning options.
Select&Download: Upload your file and select the options you need. Within seconds, the AI will process your uploaded file based on your selections.

Additionally, if the uploaded file is not original, XirDecoder will detect non-original maps such as DPF or EGR and notify you. If desired, you can convert only the DPF and EGR maps back to their original state.

Example:

Step1: Read the ECU
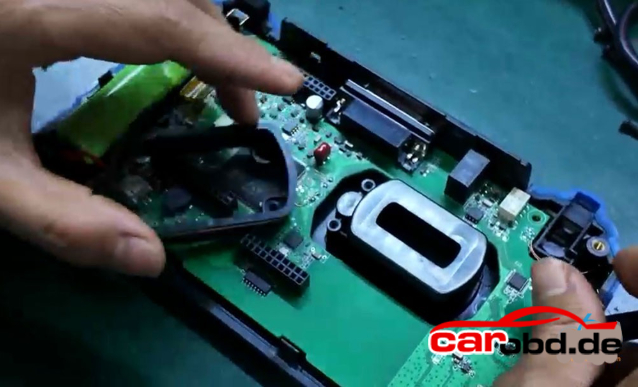
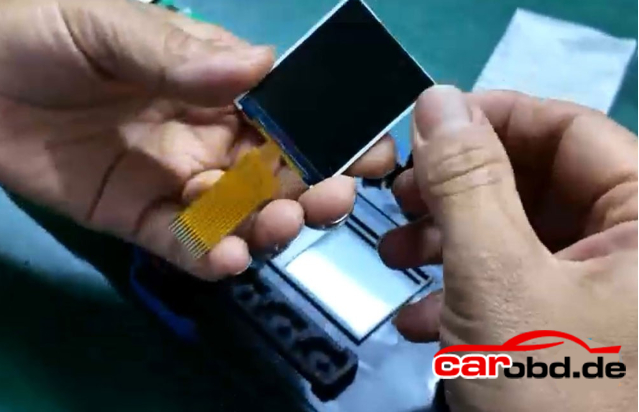
1. Connect the ECU programmer to the EDC17C50 ECU(bench mode)
2. Read and save the original ECU data.

Step2: Perform hardcut function:
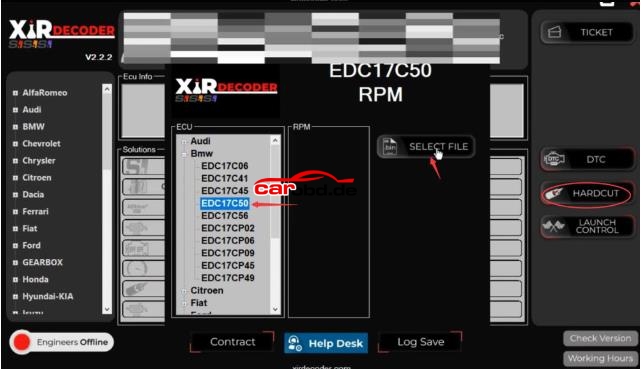
1. Open XirDecoder software and select Hardcut function.
2. Choose the vehicle brand and ECU model (EDC17C50)
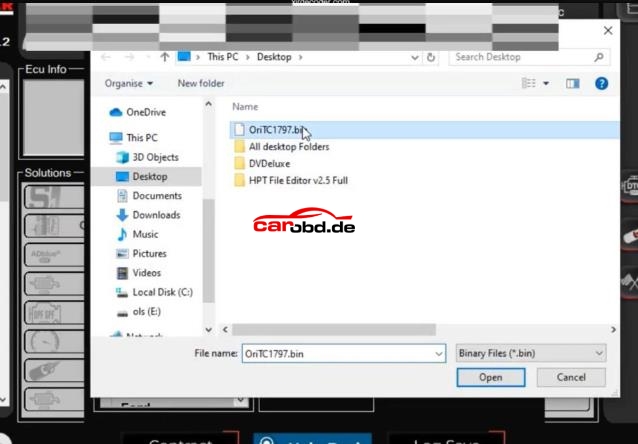
3. Upload the original file read in Step1
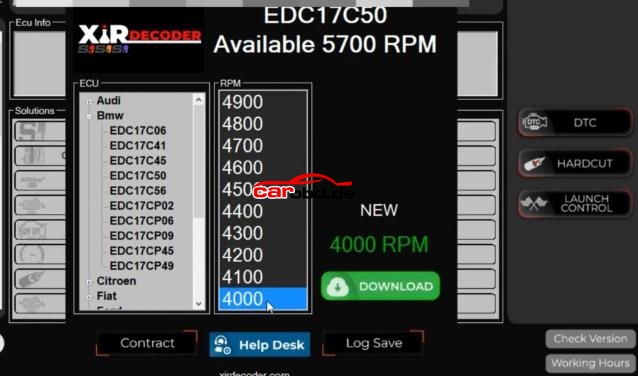
4. Set the desired RPM limit (e.g, 4000RPM for a bouncing limiter effect)
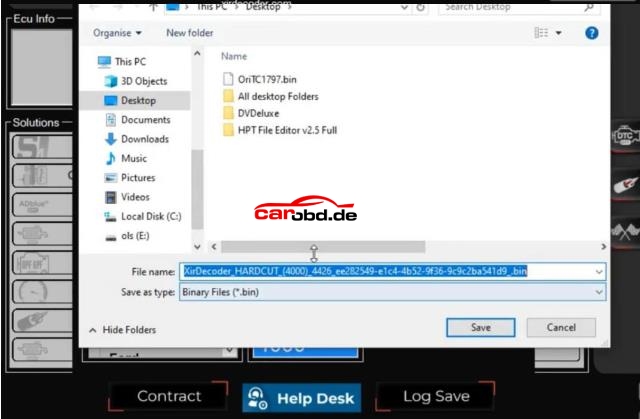
5. Download and save the modified file.

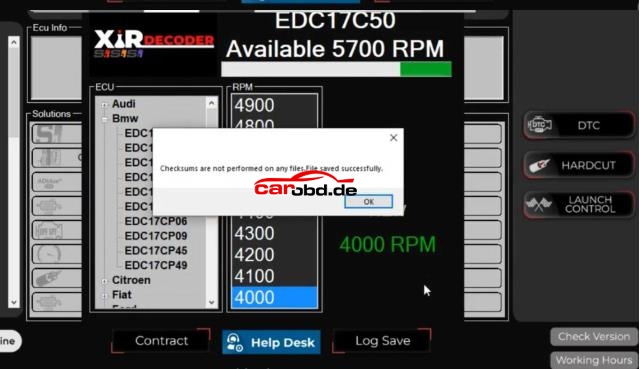
Note: Xirdecoder does not perform checksum correction – this must be handled by your hardware tool.

Step3: Perform other modification( EGR/DPF Off, Stage 1, etc.)

In XirDecoder, select the EDC17C50 ECU again.

Upload the original or Hardcut-modified file.

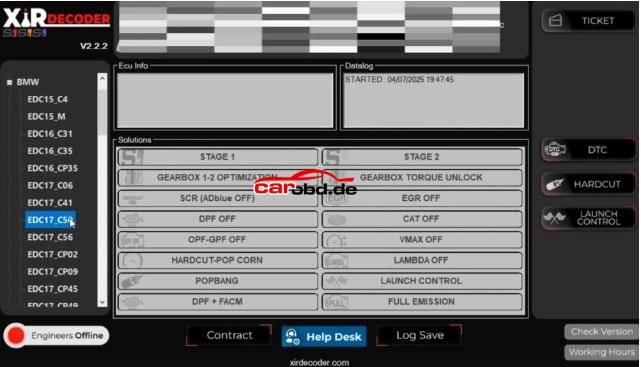
Choose desired functions:

EGR OFF( disable exhaust gas recirculation)
DPF OFF (remove diesel particulate filter restrictions)
VMAX OFF( eliminate speed limiter)
Stage 1( optimize fuel and boost maps for increased power)

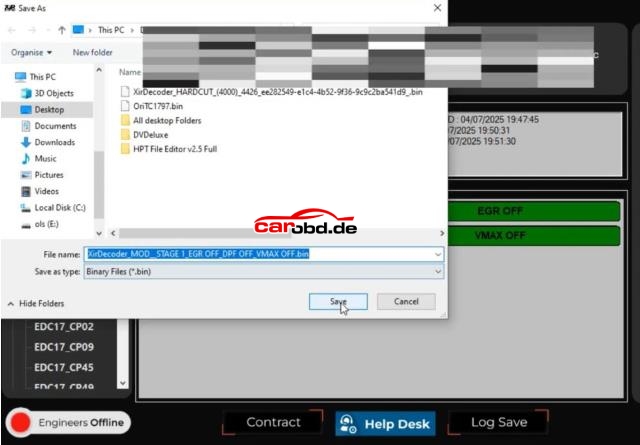
Click Download and save the final modified file.

Step 4: Write file

Write the modified file back to the ECU.

Verify that all changes are applied correctly

For more technical support,please contact

Jenny

Whatsapp: +86 19947637411
Email: Sales@Carobd.de

Service Mode Key Matching Pitfall: Why KTP Failed & The Correct Procedure

Technicians who work on car immobilizer systems and key coding are familiar with vehicle service mode operations. Although EEPROM writing, immobilizer data reading, and key adding seem straightforward, a simple wrong operation sequence will cause key matching failure. In this post, I will share my real service mode key programming experience, explain why the KTP tool failed, and conclude the standard zero-fault workflow to help you avoid the same mistake.

  • My Actual Operation & Failure Process

This was my first time performing key programming via service mode on this vehicle model. The basic steps went smoothly without device errors or communication failures.
I successfully entered service mode, wrote the service EEPROM file, restored the cluster data, and read the IMMO data via OBD. Everything worked fine at this stage.
Then I faced a critical question: Should I generate and add the key in service mode, or restore the original EEPROM first before key generation?
I chose the second method. I wrote back the original EEPROM via OBD to exit service mode, then tried to generate and add a new key with the KTP tool. However, the vehicle refused to accept the new key, and the matching process failed completely after multiple attempts.
For emergency recovery, I used the CS code and PIN code I had previously saved. I switched to the KM100 tool to generate a dealer key, and the key learning was finished in just one minute perfectly.
After the repair, I analyzed the core problem: why does the standard routine fail on KTP? What is the real purpose of service mode?

  • The Core Misunderstanding of Service Mode

The root cause of the failure is misunderstanding the functional limits of service mode — a very common mistake for many technicians.
Many people think service mode allows full operations including data reading, writing, and key matching. But the actual rule is clear:
Service Mode is ONLY for reading IMMO data.
Service mode is a temporary vehicle unlock state. It only authorizes IMMO data reading, while key learning and key adding functions are completely locked under service mode. No matter which tool you use, you cannot enter the key learning channel in service mode, which means key matching will never succeed.
My operation had two logical errors: I restored the original EEPROM and exited service mode too early, which made the KTP tool unable to capture valid and authenticated immobilizer data, resulting in matching failure.

  • Official Correct Step-by-Step Procedure (Zero Failure)

The service mode key programming sequence is fixed and non-reversible. Follow this standard workflow strictly:
Step 1: Read and backup the original 24C32 EEPROM
First, read the factory original 24C32 EEPROM data and save a full backup. This step prevents data loss, immobilizer lock, and other secondary faults.
Step 2: Generate and write service EEPROM file
Based on the original EEPROM file, generate the dedicated service EEPROM file and write it to the vehicle to enter service mode.
Step 3: Restore original EEPROM via OBD, then read IMMO data
Keep the device connected, write the backed-up original EEPROM back to the vehicle through OBD to restore the factory immobilizer state, then read complete valid IMMO data including PIN, CS code and authentication information.
Step 4: Generate dealer key
Use the valid IMMO data to generate an official dealer key file with your programming tool.
Step 5: Reset instrument and complete key learning
Perform an instrument reset to clear temporary service mode cache. After resetting, you can either learn the new key online directly or add the key without extra learning procedures.

  • Why KTP Failed But KM100 Worked

Many technicians wonder about the difference between the two tools in this case:
1. KTP requires strict operation sequence
KTP highly relies on standard operation timing and valid real-time vehicle data. It only works under the correct sequence: enter service mode → read IMMO data → restore original EEPROM → generate key. My reversed timing caused data verification failure.
2. KM100 supports offline dealer key generation
KM100 can generate valid dealer keys offline using saved PIN and CS codes. It does not depend on the vehicle’s real-time service mode state, so it works perfectly for emergency recovery.

  • Key Takeaways & Field Tips

1. Service mode is only for IMMO data reading. Never attempt key learning or key adding in service mode. Key matching must be done after restoring the original EEPROM.
2. The operation sequence is irreversible. Any wrong step will lead to matching failure.
3. Tool selection strategy: KTP is strict with standard procedures for formal programming; KM100 is more flexible for offline emergency recovery.
4. Always backup the original EEPROM before any operation to avoid immobilizer lockout.
Car immobilizer programming has no universal shortcut. Every model has its own service mode rules. Following the official procedure is the most efficient way to avoid trial and error. Hope this real-case summary helps you achieve one-shot key matching success!

OBDSTAR ECU Master Software Download, Register and Update Guide

OBDSTAR ECU Master Software Download, Register and Update Guide

1. Download Software

Visit OBDSTAR.com offcial site, go to Download Center. Download ECU Master PC software.
Operating System: Windows 10 or above
Language: English,Chinese

2. User Registration

Procedure:
Clicking the “Personal Center ”icon displays the login screen.

Click” Register” button in the lower right corner and proceed the user registration interface.

Fill in the required registration information. Once completed, you’ll see a success message. Click”Login Now” to continue

3. User Login

If you are already registered, enter your account and password, then click”Login”

If you forget your password, click”Forget Password” on the login screen to go to the password recovery page. Enter the required information to reset your password.

After Login , the user’s basic information is displayed and contact details or password can be updated.
Click”Edit” at the bottom of “My Info” screen to update your personal contact details.
Click” Change Password” at the bottom of “My Info” screen to modify your password.

4.Software Update

Users can download the basic data required for diagnosis, vehicle diagnostic software, data
package, etc. in this function module.

Follow the steps below to use it.
1) Log in to your account before using the Upgrade feature. After logging in, go to the Upgrade main screen, where all available updates are displayed.
By default, all upgradable software items are selected. To deselect an optional item, click the box next to the software name. Grayed-out checkboxes indicate mandatory software that must be upgraded and cannot be deselected. After selecting the software to upgrade, click the upgrade
button in the upper-right corner to begin the upgrade process. When the list contains many items, use the search bar in the upper-right corner to quickly find specific software by entering keywords or letters.


2) On the Upgrade main screen, the last column displays the upgrade content for each
software item. Click the icon button corresponding to a specific software entry to view
details about its version update

3) If you click the Upgrade button in the upper-right corner again while an upgrade is in
progress, a pop-up message will appear: “Downloading. Please try again after the download finishes.” Once a software item has finished downloading, a checkmark icon will appear in column 5 of that row to indicate completion

5. Log Upload

After clicking the [Log Upload] on the Support main page, the user can see the screen shown
in the figure below. Click [Upload] to upload your log.

CG FC200 V1.3.6.0 Update Benz FBS4 VGS4 TCU Cloning Function

CG FC200 released a new big update on 26th May. FC200 now supports Mercedes-Benz transmission FBS4 VGS4 gearbox TCU virgin/reset/ clone directly-no need to open cover !

FC200 V1.3.6.0

New Functions

1. Added new BENZ TCU Types:
VGS4-0-NGS2/VGS-500-NGS2(Supports Read/Write/Erase/Clone/Modify VIN Functions)

2. Added New ECU Types:
KAMA: EDC17CV54(Read/Write/Checksum)
Foton: EDC17C55(Read/Write/Checksum)
Honda/Acura: KEIHIN 37820-R5G-H61 MPC5566(Read/Write/Checksum)
Honda/Acura: KEIHIN 37820-R5G-H62 MPC5566 (Read/Write/Checksum)
Skoda: SIMOS15.10(Read Only)

3. Added New DFlash Checksum Function:
BOSH ME17/EDC17/MED17/MEG17/MEV17/MEVD17/MEDG17 Series

4.Added CALID modification support: EDC17C53

5.Added VIN modification support:
EDC17C53(domestic)/MED17.9.8(Hyundai)

2021 DUCATI MULTISTRADA V4 S 8A TRANSPONDER KEY PROGRAMMING PROCEDURE By Using MOTOMASTER

2021 DUCATI MULTISTRADA V4 S 8A TRANSPONDER KEY PROGRAMMING PROCEDURE By Using MOTOMASTER

  • Prerequisites for Key Programming

1. The vehicle’s original immobilizer system must be free of faults. No immobilizer warning light should be solid or flashing on the dashboard, and communication to the ECU and immobilizer module must be
normal.
2. At least 1 valid original key capable of starting the vehicle normally is required for scanner communication verification and immobilizer security validation.
3. The key to be programmed must be an original, brand-new blank 8A immobilizer key. The transponder must be unprogrammed and notpreviously bound to any vehicle’s immobilizer data. (See key diagram below:)


  • Detail Steps:

①Select【MOTO Diag】>【DUCATI】> Latest Version >【Diagnosis】

②Choose【By model】

③Sequentially select 【M】 >【Multistrada V4 S E5】 > 【1262】 >【MY 421】 ;

④Click【Manual selection】;

⑤Click【Hands Free (Smart Key)】and tap【Enter】;

⑥Click【Special Function】, follow the prompts, enter the password 123, Click【OK】;


⑦Click【Store Keys】function ;

⑧Click【OK】;

⑨Place the key to be programmed more than 3 meters away from the  vehicle. Place the original working key at the vehicle’s antenna location  and wait for the system to identify it ;

(Antenna Location: Front section of the fuel tank / central area below  the instrument cluster, near the steering lock)


⑩Position the original key just used on the antenna and Click【OK】;

⑪The original key (Key 1) has been successfully identified and programmed and Click【OK】;

⑫Place the new key to be programmed at the antenna location and wait  for the programming process ;

⑬The new key has been successfully programmed. Select【Cancel】to exit  (or tap【OK】to continue programming a second new key) ;

⑭Click【OK】;

⑮Key programming is complete.

Summary

Pls strictly follow your device tips in your operation process.

OBDSTAR ECU Master vs OBDSTAR DC706

what’s the difference between the 2026 new OBDSTAR ECU Master and the DC706 ECU TCU Programming tool ?

Here is the details

1. Operation:

  • OBDSTAR DC706: Standlond operation
  • ECU Master : PC-based, requires PC operation, Supports Windows 10 and above operating system.

2. Configuration:

  • DC706: 3 configurations-ECM, BCM, TCM
  • ECU Master: 4 configurations-

-A: Car ECM/BCM/TCM+ EV
-B: Motorcyle ECM
-C: HD ECM/BCM/TCM (diesel trucks/tractors)
-D: Airbag/BMS/SAS Reset

Key Differences:

  • Accessories:

=DC706 requires optional accessories such as P003+, MP001 and CAN FD.

=ECU Master has all of these built in. ECU Master does not require P003+ or MP001 adapters.

  • Motorcyle Support

Motorcyle ECM is offered as a seperate configuration (Config B) because OBDSTAR plans to expand and develop more competitive motorcyle coveragae in future time.

  • Diesel/ HD Vehicle Support

ECU Master supports ECM, BCM, and TCM for diesel trucks/tractors.

  • Competitors

Auto VEI (13000+) -strong in BCM but very expensive
The Genius (8000 – wide ECM/TCM support
ECU Master is more competitively priced.
DC706 does not support ECM, BCM or TCM for trucks or tractors.

  • Airbag Reset

DC706 can not add the Airbag Reset( OBDSTAR P50) function.
ECU Master supports Airbag Reset as an optional function (Config D).

  • CAN FD Protocol

ECU Master has built-in CAN FD protocol-no extra adapter needed for certain aribag resets.
DC706 requires a seperate CAN FD adapter.

  • Marine ECM Support

DC706 supports some marine ECMs.
>ECU Master does not support Marine ECMs.

For more informations,please contact

Jenny

Whatsapp: +86 19947637411
Email: Sales@Carobd.de

Lonsdor K518 MQB49 5C 5D Data Reading Failed Error 25 Solution

Problem:

Trying to make a key for a 2019 VW Polo, Normal key not proximity. 5C chip. Tried using both adapters that are in the shape of the key. Lonsdor K518 failed to read original key data with MQB49 5C adapter

It reported an error” Data reading failed. Error code Unlock failed ret=25″ Any solution ?


Solution:

Check the connection diagram carefully. You need to solder one wire from the key circuit board to the 5C interface board, as shown in the diagram. They try again, and it should work.

Not for all key types. For this type of key, solder 1 wire to the board.

If reading the original key data for BMW BDC2 or BDC3 fails(error code 25), check if need to solder 1 wire to the board as well.

For more technical support,please contact

Jenny

Whatsapp: +86 19947637411
Email: Sales@Carobd.de

How to Replace Keydiy KD-X4 Key Programmer Small Screen?

How to replace the keydiy kd-x4 key programmer’s small screen which is damaged

Instruction

First, remove the 4 screws on the back of the unit.

Pry open the housing from the gap

After prying it open, set the back cover aside

Remove the screws on the circuit board.

Lift the inductor and take out the coil

Disconnect the gold ribbon cable from the screen

Gently lift the board.

Peel off the protective film on the screen.

Replace with the new screen

Reapply the protective film onto the screen.

Reinstall the inducator and coil

  • Slide the screen’s locking latch backward, then insert the ribbon cable into the latch.
  • Push the latch forward until no solder pads are visible, then snap it securely into place.
  • Reinstall the power button.

After reinstalling the screws, check whether the screen lights up.
If the screen lights up, the installatino is successful.
Assemble the other side. Be sure to power off the device before reasembling.
Ensure proper aligment

Once aligned, press down firmly.
Finally, verify whether the device powers on properly.

Keydiy KD-X4 screen replacement is done.

For more technical support,  please contact

Jenny

Whatsapp: +86 19947637411
Email: Sales@Carobd.de

Mercedes SIM4LE & SIM4SE: The Kompressors live via 100% OBD!

The iconic Youngtimers from Mercedes-Benz have arrived on your AutoTuner Tool! Tune the legendary 180, 200k, and 230k engines directly through the diagnostic port.
Coverage:
✅ Mercedes C-Class
✅ Mercedes E-Class
✅ Mercedes CLK
✅ Mercedes SLK
Method: 100% OBD (Normal Read). A fast and perfect solution to boost these bulletproof blocks or perform E85 conversions! 🔌
The AT Team
Key Features:
⚙️ Type: Engine Control Unit (ECU)
🔌 Mode: OBD NR
🧩 Readout: Calibration
🖥️ MCU: C167 (29F400)
⏱️ Read time: 1min 45sec
⏱️ Write time: 1min 30sec
✅ Checksums correction
Compatibility List*:
🚗 Mercedes Models: C (2000) / CLK (1998) / E (1995) / SLK (2000)
🔧 Mercedes Engines: 180 / 200 Kompressor (2.0k) / 230 Kompressor (2.3k)

For more technical support,please contact

Jenny

Whatsapp: +86 19947637411
Email: Sales@Carobd.de

2026 VNCI 6154B vs VNCI 6154A

What’s the difference between 2026 new VNCI 6154B and VNCI 6154A diagnostic interface ?
Here we show details about two interace.

VNCI 6154B vs VNCI 6154A

In sum:

VNCI 6154A=6154A
VNCI 6154B=6154B+V-CDS Gen4 VCI 2 in 1

VNCI 6154A is compatible with O-DIS S and O-DIS E software.

VNCI 6154B is compatible with O-DIS S and O-DIS E and V-CDS software. Plug and play, it will auto detect software type.

The 6154B connects faster in DOIP and USB mode