Bosch ESI Tronic Installation Step by Step

Here we start:
1: Mount ESI Tronic Iso image “Recommend Magicdisc”.
2: Open the bosch ESI DVD and then run Setup.exe.
3: Few sec’s then this window will appear, select your language -> Continue.

BOSCH-ESI-Setup-1

4: New window will appear, Select user defined installation and leave I-key blanked -> Continue.

BOSCH-ESI-Setup-2

5: Chose your Installation Directory -> Continue.

BOSCH-ESI-Setup-3

6: New window will appear, just tick what u want (4ex: screen saver or Fuel injection pump section…).

BOSCH-ESI-Setup-4

7: U will get this window.

BOSCH-ESI-Setup-5

8: Drag and Drop the bases you want to install.

BOSCH-ESI-Setup-6

9: New window will appear, click Continue.

BOSCH-ESI-Setup-7

10: Installation will Start

BOSCH-ESI-Setup-8

11: Take a cup of coffee till the installation is finished.
OBD2 enginner Note: During the installation it will ask you to import DVD 2 so just mount Image 2 and then Continue.
Now this window will appear, Click Close.

BOSCH-ESI-Setup-9

12: New window will appear, U can click Yes “If u want to enter the license now” OR Click No ” If u want to install the license after installation is finished.
In this case, I’ll click NO.

BOSCH-ESI-Setup-10

13: Restart windows by clicking finish.

BOSCH-ESI-Setup-11

14: Now here you see how to activate ur ESI.

BOSCH-ESI-Setup-12

15: New window will appear, Customer code could be any number, to get ur Release code, copy ID no. to keygen, generate, then paste the Release code back to the window.

BOSCH-ESI-Setup-13

16: after you paste your Activation key , then click Ok.

BOSCH-ESI-Setup-14

17: Click close. Job is done en the bosch ESI DVD and then run Setup.exe.

Engine Control Module Recovery by GM MDI or Tech 2

This is step-by-step instruction on how to do engine control module recovery on Cadillac cars.

modules tested successfully with the tools and guide below:
2009 Buick Enclave
2007-2009 Cadillac CTS, SRX, STS
2009 Chevrolet Traverse
2007 GMC Acadia
2009 GMC Acadia
2007 Saturn OUTLOOK
2009 Saturn OUTLOOK

Diagnostic tool:
GM MDI module/
GM GM Tech2 GM with 32MB Card and TIS2000

gm-tech2-gm-diagnostic-scanner-blog-1
Engine control module recovery procedure:
1. Disconnect the programming device.
2. Power down the control modules connected to the GMLAN bus by disconnecting the positive battery cable for 2 minutes.
3. Reconnect the positive battery cable.
4. Determine which programming device will be used to perform the recovery steps.
If using MDI, connect to the programming station or Notebook using a cable (LAN). Proceed to Step 5 and then Steps 6-8.
If using a Tech 2 proceed to Steps 6-8.
5. Reboot the programming station or Notebook. This is to make sure nothing is in memory.
Kindly Note: Selecting Replace and Reprogram from the Select Diagnostic Tool and Process Screen is REQUIRED because some of the calibrations may be erased from the initial attempt to reprogram the module.
6. Reprogram the engine control module. Select Replace and Reprogram from the Select Diagnostic Tooland Process Screen.
7. Follow the on-screen instructions to complete the programming event.
8. Clear all DTCs using the GM Tech2 GM with 32MB Card and TIS2000 or GDS.

Xtool X100 PAD Tablet Active Procedure

About Xtool X100 Pad Tablet

The first tablet key programmer in the word. Xtool X100 PAD performs key programming, mileage adjustment, oil service light reset, timing belt service light reset, tire pressure warning light reset , EPB reset, throttle body reset, DPF reset, battery reset, steering angle calibration and OBD-II engine diagnosis.

Xtool X-100 PAD Activation

Note: please activate X-100 PAD before you use it to test vehicles.

Read Xtool X100 Pad Tablet Active Procedure as follows.

Procedure:

Connect X100 Pad Tablet to the internet connection.
Boot X100 Pad Tablet, go to X100 pad user interface. Fill in personal information
Including activation code, product serial number (each device will have a serial number and activation code), nickname (workshop’s name or user’s nickname), login account (can be your email address pr cell phone number) and password, the system will then save it. Activation is a onetime process. The diagnostic application will start after activation.

x100-pad-active-01
Note:

1.The required “Activation Code” is printed in the user manual shown as following red -circled number.

x100-pad-active-03

2.Take down your password, not lost it, otherwise it will take you some trouble.

Xtool X100 PAD Main Interface

Tap on X-100 PAD application icon, the main interface and sub-menus will be shown as below.

xtool-x-100-pad-tablet-key-programmer-4

Diagnostics: open the X-100 PAD diagnostic application. It can read diagnostic information, view live data, perform actuation tests and special functions etc.

Diagnostic Report: Users can view all the diagnostic reports and diagnostic data generated in the diagnostic process.

Setting: Users can access the language setting and other system related settings.

Xtool Cloud: online communication Platform for X-100 PAD users.

Update: after connected to the internet, you can download the latest diagnostic software directly to the X-100 PAD.

Remote Diagnosis: Users get remote assistance from Xtool Technical Assistance Center.

Instruction on LAUNCH X431 V Client uninstall and reinstall


launch-x431-v-new-1

How to uninstall and reinstall LAUNCH X431 V Client

Step 1: Uninstall X431 V client

Step 2: Delete “cnlaunch “ from these 2 files: “ES File Explorer” and “File Manager” as following picture shows:

x431v-2
Step3: Browse www.dbscar.com to download the newest version for X431 V client, and then install it. Important Note: you need to find X431 V under “Product Introduction”, and install X431 V Android version.

Step4: Open X431 V Client that has been installed, log into your CC account

Step5: Update software by following the below picture instruction.

x431v-3

Important Note: the X431 V you downloaded will be saved in “downloads” shown as follows.

x431v-4

Christmas sales in autodiagtool.de

Dear Friends

Merry Christmas!

In year of 2015,

We share the happiness,
We solve problems together,
We discuss to improve the performance of the product,
We make the website better and better
Here ,We thanks to our customer who aways support www.carobd.de!
All of products with 6% discount!!!
Enjoy your shopping~

Bset Regards

carobd.de Team

Cheap working VXDIAG VCX NANO, the replacement of VCM / VCM2

vxdiag-vcx-nano


Why VCX NANO for Ford Mazda is so popular?

According to these customers feedback, it is not only cheaper than VCM/ VCM2 which price range from $268-$99, but also working well as long as you can install the driver, usually the users are recommended to install driver on VMware machine. Besides, VXDIAG VCX NANO is compatible with original IDS.

Why buy from carobd.de?

Customer feedback, the carobd.de is 8 years-old trustful site, besides engineer make the video demo which show how to step-by-step install Ford IDS and Mazda IDS, and keep make video after the newest software release.


VXDIAG VCX NANO diagnostic scanner, the cheap working replacement of VCM / VCM2 to work with Ford, Mazda, Jaguar and Land Rover, and it is available with both wired and wireless specification.

MB Star Series

MB Star Diagnostic Tool series are the Mercedes-Benz approved dealer diagnostic systems for troubleshooting and programming.

MB Star diagnostic hardware:

MB STAR series now includes: WIFI MB SD Connect Compact 4 system, Super MB STAR C3 diagnostic system, MB Star C3 multiplexers (best quality, best price and C3 pro with 7 cables) and MB STAR Compact 4 system.

mb-star-series


All Star diagnostic system will do Mercedes Benz 1989~up to now Car, Bus, Trucks, Sprint, Smart (expect SP45-C best price MB STAR C3)

MB SD Connect C4 is the newer Star system for newer models and support Mercedes with UDS protocol. SD Connect supports offline/online programming and Vediamo engineering software as well. Super MB STAR is the only Star tool that can be updated online.

Star diagnosis software:

All MB STAR Diagnostic systems come with multi-language basic software applications.

D-A-S / Xentry: the automatically Diagnosis Assistance System, Concise interface and straightforward operation with IB M high-quality computer can realize the quick and accurate code reading and the whole car system testing
W-I-S net: Workshop Information System Supply the whole view of the wiring diagram in a car, component location diagram and maintenance method. What you do is to enter the chassis number, and then you will get the manufacture data, engine configuration and the car model -all in detail.
EPC.net: Electronic Parts Catalog
ST Finder: Part location finder
STARUTILITIES: the movement management system and self-test
SDMEDIA
PL69

mb-star-diagnostic-system-1

mb-star-diagnostic-system-2

Super MB STAR C3 comes with more software programs, including Smart Tan Code, Developer model and Benz Disassembly system etc comparing with other Star systems.

There are basic 3 formats Star diagnosis software HDD: IBM T30 HDD, Dell D630 HDD, and moveable external HDD. Internal HDD runs faster and stable then external HDD. While external HDD can be easily replaced and has no computer limitation (any laptop has COM-PORT)

FGTECH success and fail list (SE61-G & SE61-GB)

We have do same test with SE61-G and SE61-GB,and we have come to the conclusion of success and fail list.

If you have any ideas,please feel free to contact me.

You can send us email:sales@CarOBD.de or add our skype: AutoDiagShop.de

FGTECH success and fail list:

EDC16u34 (VAG) Read/Write ok (OBD)
EDC16U1 (VAG) Read/Write ok (OBD)
MED9.1 (VAG) Read/Write ok (ODB)
Trionic8 (saab 9-3) READ/WRITE OK (OBD)
EDC16P (VAG) Read/Write ok (OBD)
EDC15V (VAG) Read/Write ok (OBD)
EDC17CP14 03L906022G Read/Write ok (OBD and boot mode)
Ford
EECV 1.8tddi read/write ok

VAG
AUDI ME 7.1.1 3.0 v6 read ok – awaiting flash

fiat multijet
mjd 6f3 diesel read/write all ok

renualt megane
siemens s3000 read hitachi mcu/write ok

EDC15C13 (Renault) Read/Write ok (K-line on bench and boot mode)

DDCR (Nissan Almera 1.5DCI) OBD read/write OK

Mercedes w211 2.2 cdi edc16c3 obd, ecu data ok read/write fail! Bdm read ok

opel
edc16c39 obd r/w ok
edc16c39 bdm r/w ok
edc16c9 bdm r/w ok
astra J 2009 denso galletto jtag NOT ok (but ktag r/w same ecu ok with jtag)

mitsubishi grandis
edc16u31 obd r/w ok

renault megane /laguna
sagem3000 obd r/w ok

bmw 3/5/7 series
edc16c31/35 obd r/w ok
edc17 in boot mode ok

psa
edc16c34 obd r/w ok
dcm 3.4 obd r/w ok

ford
edc16c34 and delphi ECUs obd r/w ok

vag
edc15 / my galletto can not read program shout down (I use kess)
edc16 obd r/w generally ok
edc17 in boot mode ok

volvo
edc17 boot mode ok

Audi S3 Med9.1 r/w (OBD) ok
Mercedes GLK Delphi CRD2 r/w (OBD) ok
Peugeot 207 EDC16C34 r/w (OBD) ok

Merc w212 crd 3.7 obd. OK
BMW E87 116D 2.0 EDC17C06 Bootmode r/w ok
BMW E83 3.0d ODB r/w ok
ME 7.5 (VW 1.8T AWT) Read ok / Write ok (OBD)
Merc Viano EDC16 C2. OBD. Ok
VW Golf5 1.4 TSi
ecu MED17.5.1 Boot mode r/w ok
I test clone work ok
sirius32N,EMS3132,EMS3134 in boot-mode read/write OK.
Mazda 5 2.0D 2005 Denso RF7K read/write OBD ok
Mazda 6 2.0D 2006 Denso RF8J read/write OBD ok

Peugeot 308 1.6 HDI 2013 Siemens SID807 EVO read/write BOOT ok

BMW X6 3.0D 2012 and 2013 (306 and 245hp)BOSCH EDC17CP45 read/write BOOT ok

Mistubichi Pajero 3.2DID 2013 Denso 4M41 and 4D56 read/write JTAG RENESAS ok
Mercedes W203 320CDI EDC16cp31 r/w ok (OBD)

Audi q7 3.0TDI – ok
BMW e46 2.0D 150km EDC16c31- ok
BMW E90 2.0D 163km EDC16c35- ok
Chevrolet Captiva 2.0D 150km – ok
Renault Trafic 2.5D EDC15 – ok
Mercedes B180CDI EDC15c32 – ok
Mercedes B200CDI – ok
VW Golf4 102km – edc15 – ok
Skoda Octavia 1,9TDI 105km EDC16 – ok
Citroen Jumpy 2.0D Simens 802A – ok
Ford Focus 2.0D 136 PSA Simens 802 – ok
Mini One 1.6 90km – ok

BDM
Mercedes B180&B200 CDI – ok
Q7 3.0tdi – ok
BMW one – ok
Landrover /jaguar EDC17CP11 read out in boot mode ok

BMW 330d EDC15C4 read ok/write ok via OBD
Mercedes vito 111 EDC16C31 read ok/write ok via OBD
Mercedes vito 120 EDC16C31 read ok/write ok via OBD
bmw e90 edc 17cp reading ok write fail. boot mode ok!
vag edc17cp14 read/write in boot mode ok, read in OBD ok
vag pcr2.1 read/write OBD ok, PCR2.1 unlock via bootmode ok
vag edc16cp34 obd read/write ok
fiat/iveco edc16c39 obd read/write ok
edc16u31/34 obd read/write ok, BDM read/write ok
Mercedes Vito 2.2CDI 2012 Delphi CRD2.x (OBD) read / write ok

Siemens BMW MSS54 BDM R/W OK OBD not tested (will probably work)
Siemens BMW MSS54HP BDM R/W OK only with AMD Chip/Not ST EEPROM, WILL NOT READ PROPERLY/WRITE
If you change ST chips to another EEPROM works fine wit HP unit

OBD
ALFA ROMEO
· edc15c7
· ME 7.3.1
· edc16c39
· edc16c39 read time 40 MINUT!
· id Alfa 147 immo off (k line /boot mode)

BMW
· edc16c31 obd
· BMW X5 2007 3.0TDI
· EDC16 OBD
· BMW 525 (E39)
· BMW 320D E46
· bmw e90

FIAT
· Grande Punto read 1_3 MJT 75 hp

MERCEDES
· EDC15C5
· edc5c2
· delphi CRD2

OPEL
· EDC16c9
· Opel Corsa-D CAN

PSA
· edc15c7 boot mode (ID problems)
· EDC 16C34
· EDC16c3 K line
· edc16c34

RENAULT
· Renault Delphi 2007 k-line

VAG
· edc15v
· EDC15-P
· edc15
· Golf Plus 2006 2.0TDI
· EDC16U34
· A4 2.0 tdi 2008
· Skoda octavia vrs 2005
· EDC15P K lINE
· VW crafter READ
· VW Golf5 1.9TDI
· Audi A6 V8 4.2l Petrol (over OBD fuse for dash fuse 11 or 15 , but it worked after pulling the fuse for dash and it went 100%)
· med9.1
· edc17cp14
· EDC17
· But edc17cp20, edc17cp44, etc, etc same year, have tricore protected active, and if you write in obd, ecu bloqued.

BMW E70 3.0D EDC16 (BDM)
bmw. edc16c35 (BDM)
Opel EDC16c9 (BDM)
iveco edc16 BDM (BDM)

Audi A6 (TRICORE BOOT)

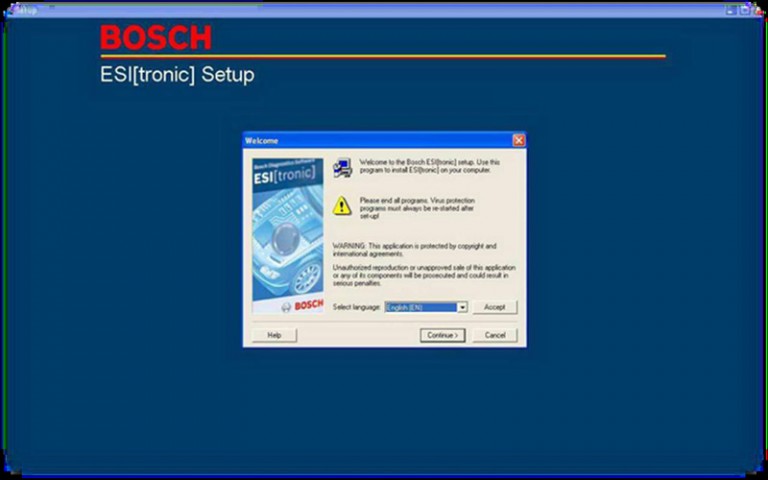
Fgtech Galletto V54 What not work:
i have FG Tech v54, with one cannot read Subaru Impreza 2.0d, with another one read/write ok, Denso ECU.

Plug and Drive NitroOBD2 Performance Chip Tuning Box for Diesel Cars

NitroOBD2 chip tuning box is specially made for Diesel cars and it has two year warranty. NitroOBD2 is a Plug & Drive Ready device to function the increasing the performance of engine. NitroOBD2 is easy to install. Just plug it into the OBD2 connector of cars. NitroOBD2 fits all car from the year of 1996.

Plug and Drive NitroOBD2 Performance Chip Tuning Box for Diesel Cars
It works based OBD2 protocols as remaping the Car’s computer ECU. After driving 200 km road total, NitroOBD2 adjusts itself to the car, according to the drivers’ habits and always keeps remaping the ECU to increase the performance of engine.
What does NitroOBD2 make?
According to your driving habits,  NitroOBD2 makes new map in the car’s computer ECU to increase the performance of your car. As you driving much more KM/Mile, it renews the map. Thus it keeps the vehicle’s power and torque increasing.
What is NitroOBD2 Chip Tuning Box?
NitroOBD2 is a Chip Tuning Box which can be plugged into OBD2 connector of your car to increase the performance of your car.
When it plugged into OBD2 connector, NitroOBD2 receives the information from the car computer ECU. With the received data from ECU, NitroOBD2 adjusts the boost pressure, quantity of fuel, injection timing and pressure to increase the performance of your car.
NitroOBD2 Chip Tuning Box does not exceed the manufacturer requirements. It works only within the tolerance of the engine.
NitroOBD2 finds out the hidden power of your car. NitroOBD2 does not damage the engine and the car computer ECU or not cause any negative effects to the car factory setting.
NitroOBD2 does not change any of the settings permanently. To turn back to the car’s original settings, just unplug NitroOBD2 from OBD2 connector.
NitroOBD2 Chip Tuning Box finds out the hidden power of your car.
– Up to 35% more power
– Up to 25 % more torque
plug-and-drive-nitroobd2