Archives

How to Program Peugeot 408 New Key with Launch X431 V

Hereby the carobd.de engineer share how to do key programming for Peugeot 408 2013 with original Launch X431 V (X431 pro) and program immobilizer key to Peugeot requesting for pin code.

launch-x431-v-hksp183-blog-1

Model:

Peugeot 408 2013, VIN= *****3X48C13*****

Note:

– Prepare security code/pin code (usually under the spare key card, the last 4 letters after C9000000; if lost, ask the 4S store for help)

– No need a diagnostic tool when the high-frequency remote control synchronizes (key emission frequency is not the same), just press the scan tool and follow the screen instruction.

Step by step to add new keys with Launch X431 V Pro:

1 select Peugeot v42.92 or newer versions

2 select car-> 408-> 408(2010.01-2014.09)

3 select Diagnosis

4 select a system

5 select Embedded Systems Interface (BSI), then communicate with ECU for about 15s

6 the system prompt the menu will be different on different models

7 select Special Function

8 select Repair Kit

9 select Learning

10 Select Key Programming

11 enter the security codes to continue

(wrong security codes will stop the process)

Note: all keys should be programmed together

12 click OK and enter the pin code twice

13 Confirm pin code. Ready to program keys.

14 enter keys number (maxi:5)

Here, keys number: 2

15 turn ignition off

16 turn ignition on within 15 seconds

17 key programming success, and prompt that key programming complete, turn ignition off and take out the key

18 quickly insert the second key to program

19 turn ignition on within 15 seconds

20 key programming success, and prompt that key programming complete, turn ignition off and take out the key

21 click OK, and now programmed keys number: 2

22 Check handbarke Is applied and gear shift in position “P” (automotive transmission)/

gear shift in neutral position (manual transmission) before start the engine

23 remote control programming, follow menu instruction step by step strictly

24 remote control matching complete

25 test the remote control and use the key to start the engine

remote control and new keys are verified working…Done!

How to find the Lan-ID for MB SD C4?

V2016.05 MB SD Connect Compact 4 Star Diagnosis

MB SD Connect Compact 4 support reading out & erasing trouble code,reading the real-time data of sensor and actuator, coding and programming.
Also support wireless diagnose, support K line,CAN BUS and UDS protocol, with multi-language.

All of us know that when you receive the C4 device,it need provide the information to activate,so you need provide the ID to the sales,so they can activate for you.

the ID of information is below”

Hardware ID:

Lan-ID:

HW-ID:

APP-ID:

and the version of the software.

But so many customers send the Lan-ID is wrong,now i will show you the right way to find the Lan-ID:

Step one:

step-1

Step two:

step-2

Then you will find the right one Lan-ID.

If you don’t want activate by yourself,you can check this one,that we have already install the software for you,and you can used it immediately after receive the device.

pp03

Renault Can Clip V159 Newest Update and Installation

Renault CAN Clip V159 is designed to diagnose Renault car models including automatically test all Renault models’ computers, reporgramming, airbag test and other functions.Renault CAN Clip V153 Diagnostic Interface works on Renault cars 1996 to 2013, Engine automatic gear shifting, Air conditioning system, SRS, ABS, ASR, MPL, GM, IMMO, Keyzess GO system, OBD-I I and so on.


Renault CAN Clip V158 Update Features:

1 Software version: V159

2 Multi-language:English,German,Brazil,Danish,Spanish,Finnish,French,Italian,Norwegian,Dutch,Portuguese,Romania,Swedish

3 Best tool for renault
Renault can clip is best tool for Renault car from 1998-2015.It mainly do scan and diagnose.
It can do ENGINE, automatic gear shifting, Air conditioning system, SRS, ABS, ASR, MPL, GM, IMMO, KEYZESS GO system, OBD-I I and so on.

4 Free update in one year by link.

5 V146 software only can install on XP system,with no anti-virus software in.
If you don’t have XP system,please tell us,we can send you system cd with your order.


How to Install Renault Can Clip Newest Software V159?

Step 1 – install DAEMON Tools Lite

Insert CAN CLIP V159 disk E: and open it
Run DTLite application to instal
Accept the agreement
Select Free License
Then follow the screen instruction
DAEMON Tools Lite installtion success and runs automatically
Minimize it for later use

Step 2 – run Crack Renault Clip

Copy clip 159_0_2_0 in Clip 158 disk E: to local disk D:
Open folder Activation (Patch V3) in Clip 158 disk
Open Crack Renault Clip
Register Editor: click Yes
Click OK
Click OK
Open DAEMON Tools Lite
Add image: clip 159_0_2_0 in local disk D:
Click it for Mount
Minimize DAEMON Tools Lite
Close folder Activation (Patch V3)

Step 3 – install Clip 159

Open computer clip 159 disk F:
Run setup application
Click the lapto icon (First installation) in Clip V158 interface
Click “I accept … agreement” and click Next
Select country (if no, select OTHER COUNTRY) and click Next
Select language and click Next

Manufacturer: Renault. Click Next
Click Next to begin copying files
Then computer will rebot automatically
Finish Clip installation

Step 4 – Clip properties setup

Open clip properties on Desktop
Open file location
Cut RSRWin appliation in local disk C:/CLIP_X97/Lib/Application
Paste RSRWin appliation on Desktop
Replace RSRWin appliation in local disk C:/CLIP_X97/Lib/Application with RSRWin on CLIP 159 disk E:/Activation (Patch V3)

Close CLIP properties

Step 5 – register CLIP

Run RSRWin application in disk C:/
Accept the license and register Clip

Are you part of Renault Network? Select No
Enter the unlocking code with the picture guide Renault Clip Registeration Step 4 in the folder Activation (Patch V3)
then click Confirm
Registration successful: Click OK
Replace “RSRWin” in C:\CLIP_X91\Lib\Application with “RSRWin” on Desktop

Step 6 – Computer management

Automatically install driver software
Open computer management
Select Device manager->Bosch automotive service solution device-> 18-alliance vehicle communication interface
Close Computer management

Step 7 – open Renault can clip v159 software to start diagnosis

Disclaimer:
The new clip v159 only works with the following one pcb we sells.

renault-can-clip-pcb-1renault-can-clip-pcb-2

How to renew Benz EIS and replace Benz ESL with VVDI MB BGA Tool ?

In general, Benz electric steering locks (ESL) are used with EIS W204/ W207/ W212. ESL is damaged in high frequency. In this case, there are two possible reasons and solutions:

If the ESL motor is damaged, replace a new motor.
If the NEC chip of ESL is locked, renew EIS then replace ESL.
How to tell if the ESL motor is damaged or NEC chip is locked?

Open VVDI MB tool software. Click “Check ESL damage status”.

If it shows ESL works normally, generally it means the EIS motor is damaged and you need a new one.
Replace a new motor, what need to buy?

—OEM MB ESL motor+ MB ESL dowel pin+ MB EIS removal tool

This full kit of MB ESL motor is available at:

esl-elv-and-oem-motor-steering-lock-plus-removal-tool-1
If it shows that ESL is damaged, then replace ESL.
This new ESL/ ELV emulator is recommended for your replacement:
How to replace ESL with VVDI MB Tool?

Step1.

To replace ESL, you need renew EIS at first, then re-write EIS and personalize ESL, in this way ESL is synchronized. To renew EIS, both key password and erase password are required.

Note: if you do not renew ESL first, but only personalize ESL, the ESL won’t be synchronized.

Get key password. You can increase key to get it.
Use VVDI MB NEC Key Adaptor to work with VVDI MB Tool to get key password.

Get erase password. In general, we can get the password directly with VVDI MB tool online calculation from server.
After input the two passwords choose “Infrared” as EIS communication way, then click “save EIS data”, Click “Renew EIS”.

Step2.

Now the EIS is full new, click “load EIS data”, click “Infrared” as communication way to enter new EIS data.
Click “OBD” as communication way to enter VIN.
VVDI-enter-new-EIS-data-3

Step3. Click “Personalize W204 ESL”

Step4.

After above steps, all EIS and ESL status checkboxes will be tick except the “Activated” checkbox. Insert the original car key hen EIS and ESL is activated. Now you use VVDI MB Tool to renew ESL successfully.

Note:

It’s hard to buy Mercedes W204/207 EIS and they are expensive.

If you have W204/ 207 all key lost, you can use W212 EIS for replacement.

VXDIAG JLR SDD V145 Offline Engineering Software Free Download

Jaguar and Land Rover 2 in 1 diagnose programming newest software has been updated to V145, which supports offline engineer programming. JLR SDD V145 can work with Vxdiag vcx nano for Jaguar and Land Rover diagnostic interface.

vxdiag-vcx-nano-for-landrover-blog-1

JLR SDD Multi-languages:

English, French,Finnish,German,Swedish,Dutch,Polish,Turkish,Portuguese,Spanish,Italian,Croatian,Danish,Slovenian,Czech,Russian,Greek, Romanian,Korean,Japanese.

JLR SDD Supported Car Models: Diesel and gasoline cars
JLR SDD Update: via CD, without firmware locked

JLR SDD Software Install Computer Requirements:

OS WIN7 32bit,
CPU I3 I5 and above,
RAM 1G and more,
HDD 200G and more
You’d better use the SSD disk

Free Download JLR SDD V145 Offline Version
https://mega.nz/#F!IVEjkJIJ!GVtIQMcqKFpqQHFkt_lLEA

Jaguar Land Rover SDD Interface Features:

1. Data Lists
2. Active Tests
3. Monitor
4. Utility tests
5. Reprogramming
6. Diagnostics Trouble Codes

Vxdiag JLR SDD Vcx Nano for Jaguar Land Rover Vehicles List:

Support 2005 to 2014 year vehicles of Jaguar and Land Rover
Support L316, L319, L320, L322, L359, L405,L494, L550, L538 Land Rover Vehicle Lines
Support X100, X150, X152, X202, X250, X350, X351, X400 Jaguar Vehicle Lines

Original OBDSTAR X300 PRO3 Key Master Powerful Garage Tool

Hot selling X300 PRO3 Key Master full package is a original OBDSTAR newest key programmer cover more powerful functions than OBDSTAR F100 Ford/Mazda key pro, OBDSTAR X300M and OBDSTAR F108 PSA key pro does. In fact, OBDSTAR F100 Ford/Mazda key pro and OBDSTAR X300M are divided programmer out from X300 PRO3 Key Master. If you are a master working at workshop/ garage, you are advised to own one OBDSTAR X300 PRO3 Key Master.

obdstar-x300-pro3-blog-1

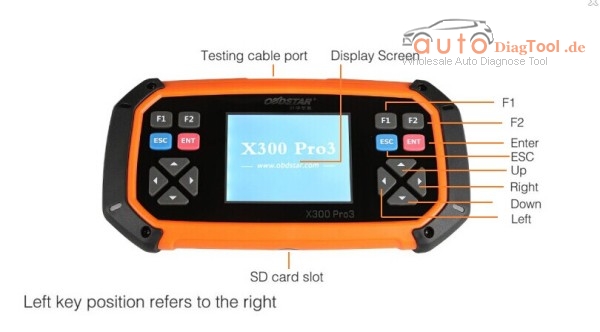
OBDSTAR X300 PRO3 hardware features:

Modern design with high definition screen.
Crack proof, shock proof and it can work stably under tough environment, such as at high or low temperature.
OBDSTAR X-300 PRO 3 software features:

The main system adopts ARM high speed chip to keep it stable and anti-jamming while running fast.

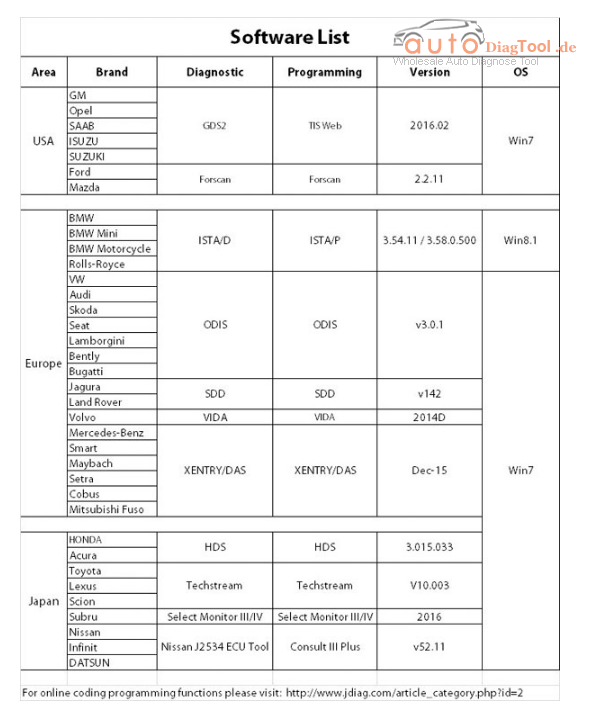
X300 PRO3 full package supports most vehicle models, and including functions:

New keys programming ( except VW 4th IMMO and VW 5th IMMO.)
Reads keys from immobilizer’s memory
New immobilizer programming
New ECU programming
New mechanical key number programming
Vehicle Identification number programming
ECU reset & immobilizer reset
Easy to operate by the programming guide menu
New remote programming
PIN code reading
Odometer adjustment (Via OBD)
EEPROM/PIC chip reading and immobilizer initialization
(read write CPU data on a part of car computer, read out password from EEPROM chip and restore data)
EPB
Oil service reset
Battery matching etc
Full and strong database for the most famous vehicles makes

Volvo Vida Dice 2014D Install Error tskill.exe not recognized Fixed

As customers feedback, during installed Super Volvo Vida Dice Pro+ 2014D patch, it pops out error message “tskill.exe is not recognized as an internal or external command or operable program or batch file”.  When click “Vida all” icon the interface will turn to a blank page.  Soon there is another new prompt “The comment below contains SFX script commands” vida error.


vida-error-1-blog-1

Reasons and Solution: Before install Vida 2014d patch you can check whether you finish all pre-install steps or not.

Vida 2014 patch software must be installed at [C disk], so you can do two things:

1. Check if this software is match to your laptop OS;

2. Check if the software is installed at [C disk].

Your computer might be not compatible with this software. So if you could not install it successfully, we suggest you to download our Win 7 to install: http://www.chinaautodiag.com/html/win7-32bit-free-download-19514.html
Vida DICE 2014D OS: Windows 7 32Bit

Vida dice install computer configuration requirements:

1). Internet Explorer 8

2). Over 2GRAM

3). C:// must have 40GB space

4). Software must install on C://

5). Must be NTFS format

How to set up XTOOL PS201?

The PS201 heavy duty CAN OBDII code reader has been designed and built to Construction, Marine and Agriculture applications vehicles, specifically for diagnose Truck, Bus and Coach OBDII/ EOBD/ CANBUS compliant vehicles from 1996 onwards. It may be small in size but it is powerful enough to perform the same tasks as premium level workshop scanners while being faster and more user friendly.

xtool-ps201-code-reader-1

1. Connect the scanner to your vehicle: PS201 communicates with the computer in your vehicle through a special connection. One end of the cable plug into the connector on the top of PS201 and the other end to the adaptor, which plug into the diagnostic socket on your vehicle.

1.Each vehicle manufacturer has its own specific diagnostic socket location.

2. Make sure that all pins are straight and the connecting surfaces are free from oils, grease and moisture.

3. Push the PS201 diagnostic adaptor into the vehicle diagnostic socket firmly.

4. Connect the PS201 cable to the socket on the top of the tool.

2. Set up: Turn the vehicle ignition key to ON or start the engine, then the PS201 will automatically start.

set-up-blog-1

[Diagnose]: State diagnosis

[Language]: Select language

[Contrast]: Contrast level modification

[Display Test]: LCD display test

[Keypad Test]: Key test

[Information]: Show firmware information

[EN/Metric]: Select English or Metric units

[Font]: Adjust font size

[Data Logging]: Switch on/off the Data Logging function

[Self Test]: Use the Self Test Connector to test this tool is OK or not

3. Operation: Use

[Up]/[Down] button and [ENTER] button to select setting tool or diagnosing vehicles.

4. After use: Use [ESC] button to back the main menu, and disconnect from the vehicle.

Select Menu: Select [Diagnose] and press [ENTER] button, PS201 includes two categories of software:

xtool-ps201-code-reader-blog-1

1. OBD II: ISO 14230, ISO15765, SAE J1850

2. HD OBD II: SAE J1939 CAN, SAE J1708/J587

Keep Notice:

a.Make sure the vehicle is connected. Make sure the connectors are firmly connected.

b.Keep the vehicle ignition key ON or the engine running.