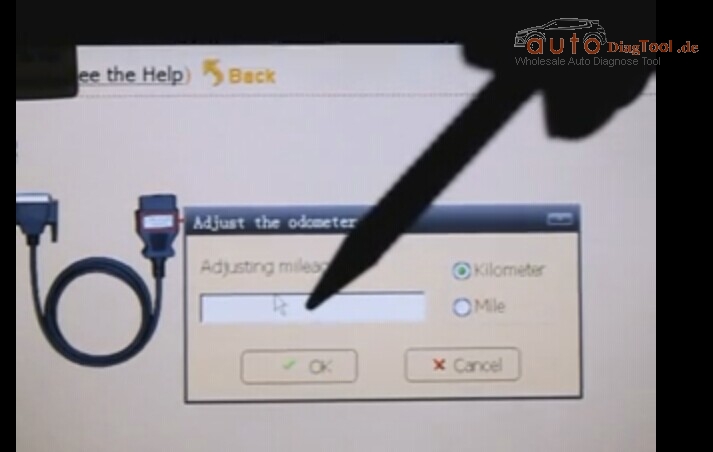
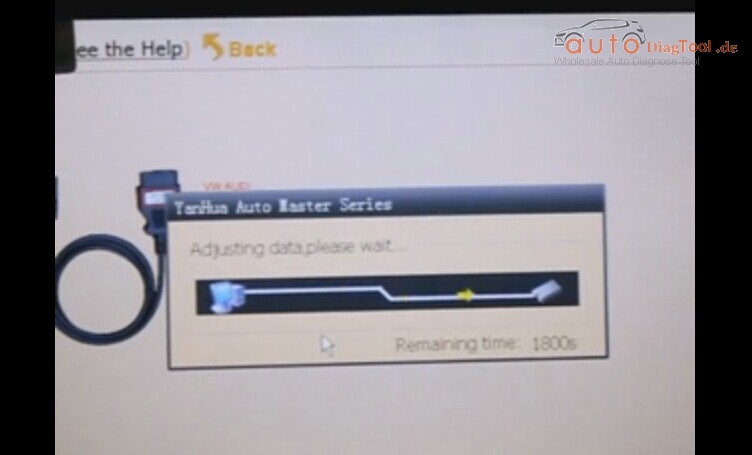
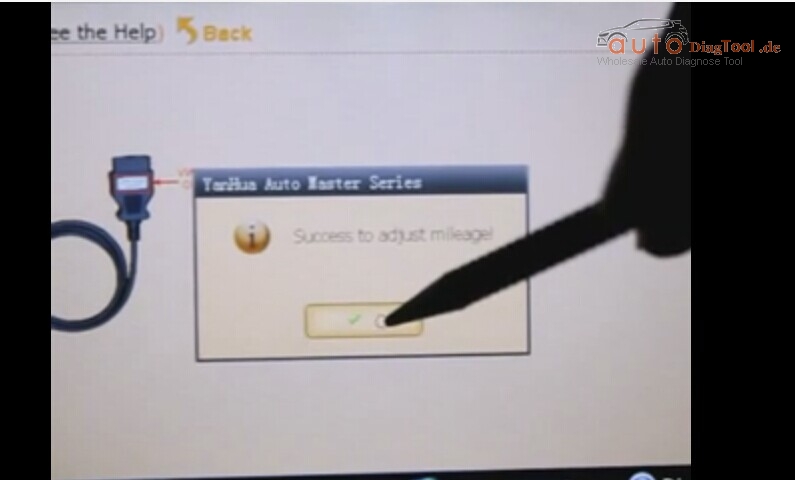
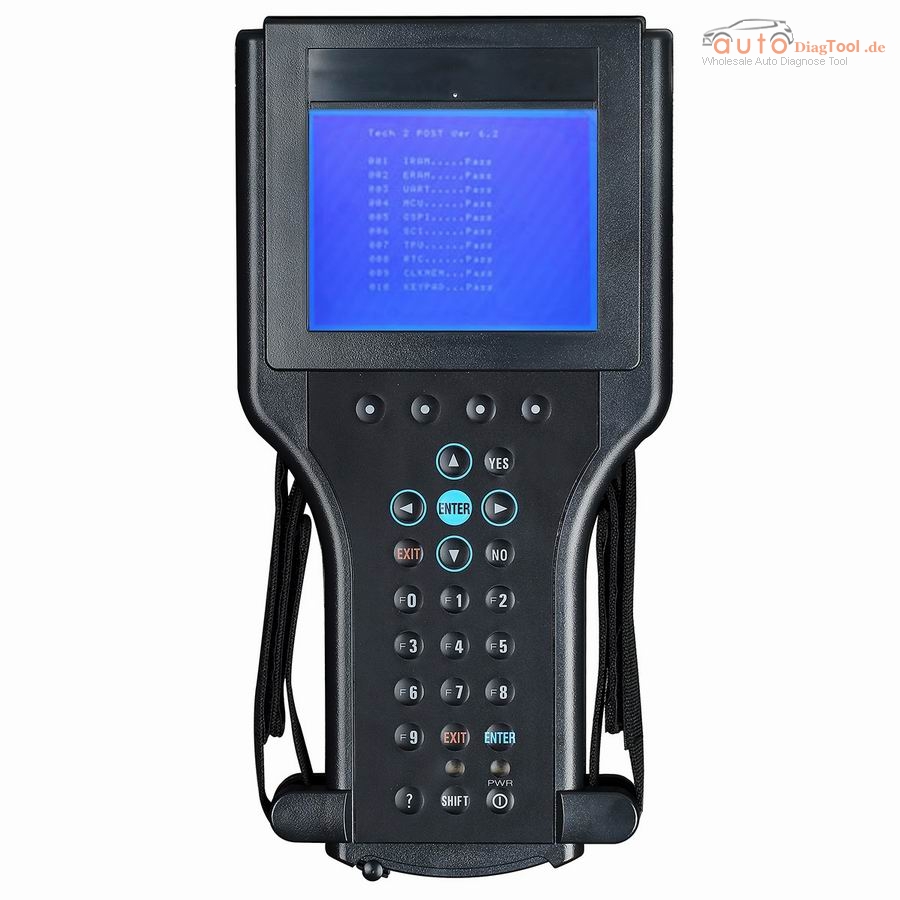
Archives

Vpecker Easydiag Scanner Bluetooth vs. WiFi

Wi-Fi version VS Bluetooth version

Bluetooth and WiFi are different standards for wireless communication.

Bluetooth technology is useful when transferring information between two or more devices that are near each other when
speed is not an issue,such as telephones,printers,modems and headsets.It is best suited to low-bandwidth applications
like transferring sound data with telephones(i.e. with a Bluetooth headset)or byte data with hand-held computers(transferring files)
or keyboard and mice.

WiFi is better suited for operating full-scale networks because it enables a faster connection,better range from the base station,
and better wireless security(if configured properly)than Bluetooth.

Vpecker Easydiag V8.1,which version better for diagnosis? Please refer the chart below for more specification to make a decision.

vpecker-easydiag-scanner-bluetooth-blog-1

autodiagtool.de has kinds of Autel Maxidiag

Original Autel MaxiDiag Elite MD802 All system+DS Model:

3 Reasons to Get Maxidiag Elite MD802

1.MD802 Language: English
2.Update: Via EMAIL, after one year you will pay 75.00EUR
3.Vehicle Coverage:MD701, MD702, MD703, MD704
What is DS model?

Autel Maxidiag Elite MD802 for all System+data stream function.

Autel’ new MaxiDiag Elite Series, the most advanced and multifunctional scan tools powered by its exclusive technology, are designed for technicians to troubleshoot either the basic four systems or all the systems for most of major vehicles on the road today. This new diagnostic platform delivers fast and easy diagnostics at the right price.

autel-maxidiag-md802-abs-airbag-code-scanner-blog-1

Autel Maxidiag Comparison Table: 

table-blog-1

Which ecu programmer is better

Some users asked what’s the best eeprom programmer in the market.In the following parts,Carobd.de senior engineer

list some best-selling and good quality eeprom programmers.

Notes:the following products listed by sales volume.
Carprog Full V9.31

Carprog Full V9.31 is 2 years younger than X-pro m,started sold from 2012 year at

carobd.de,However its sales volume is higher than XPROG programmer because of its additional function-support airbag
reset,and it only sales about 53 EUR,not mean Xprog end of this time,if you simply want to read &write chip,
X-pro M is the best choice.

carprog-full-ecu-chiptuning-tool-blog-1

Xprog-m ECU Programmer

As the oldest eeprom programmer in the market,x-pro m gave birth in 2010,during the past 4 years,it keeps updating software
and good quality at cheap price,therefore x-pro m win lasting good reputation among many users around the world.it has been
proven by many VIP members and veterans from the famous forum.

x-prog-box-ecu-programmer-xprog-m-blog-2
X-pro m ECU Programmer brief introduction:

Xprog works with more than 450 units(serial EEPROM’s,Microcontrollers(MCU),Electronics Control Units,DashBoards,Immobilizers,
Calculators and others.

Now,Xprog newest version is V5.50,more details about Xprog autorizations,adapters,notice and OS requirement;you can directly
search at carobd.de site.

JDiag Elite J2534 Diagnostic and Coding Programming Tool with JDiag Tablet and Software Preinstalled Free Update Online Life Time

JDiag Elite J2534 Diagnostic and Coding Programming Tool is the new generation J2534 tool from JDiag Inc.
JDiag is the most validated and accepted J2534 device in the world. It has been on the market longer than any other J2534 device, it has been approved by more automakers than any other product, and has been called the “golden standard” by customers and competitors alike.
This device is powerful,set a lots of product’s advantage,can do the function of MB SD C4、Porsche、Nissan and so on,it is more then 8000 EUR,but this one ,only need 1999 EUR,that is very cost-effective.
jdiag-elite-j2534-diagnostic-and-coding-programming-tool-1
JDiag Elite J2534 Diagnostic and Coding Programming Tool Free Update Online Life Time
The JDiag offers a wide range of capabilities to help you grow your business and retain customers including:
Module Programming
Diagnostic Functions
Key programming
Data monitoring
The software list:
jdiag-elite-j2534-blog-2

New I-2015 Multi-Diag Access J2534 Pass-Thru OBD2 Device Support Win7 System

New I-2015 Multi-Diag Access J2534 Pass-Thru OBD2 Device
Top 4 Reasons to Get I-2015 J2534:
1. Latest Version: V2015.01
2. Support Multi-languages: French/ Spanish/ German/English/ Italian/ Portuguese/ Bulgarian/ Croatian/ Czech/ Danish/ Dutch/ Finnish/ Hebrew/ Hungarian/ Polish/ Romanian/ Russian/ Serbian/ Slovenian/ Swedish/ Turkish
3. Support 23 Brands Updated, 5300 New Systems
4. Operating System: Windows XP; Windows 7 32bit
Software activation Notice:
1. Must disconnect network when install the software.
2. Must watch our installation video when install the software and drivers. (Please contact customer service to get the installation video)
3. I-2015V Multi-Diag Access J2534 needs activation, after installing the software pls send ID (format is only 31-xxxxxxxxxxx) to us, we will send the activation code.

multi-diag-j2534-obd2-device-blog-1

How to update DS708?

How to update DS708

autel-maxidas-ds708-update-online-german-hksc39-f-1

Frist,you need register the tool:

Log in our website to register an autel ID.Then log in our website with your autel ID and password to register your DS708.
http://pro.auteltech.com/

ds708-blog-1
After registering DS708 on our website,please make sure that the serial number and register password that you input are correct.

On DS708,you can press on Setup-Help-About to double check the serial number and register password.

Method: Updating via DS708

After registering DS708 on the website succussfully,please connect
DS708 to internet via Ethernet connection or Wifi,and then choose

Update on the main screen of DS708.

When the Update screen loads successfully,you can download all the
software updates directly on DS708.

PS:To ensure high internet speed,Ethernet connection is recommended.

ICOM A2 Firmware Update Steps and Note

new-bmw-icom-a2-b-c-diagnostic-and-programming-tool-without-software-blog-1

9 Steps to update ICOM A2 :
1. Use Network cable to connect ICOM (ICOM A1 or Common version ICOM A2) with a computer, charge ICOM (ICOM A1 or Common version ICOM A2) with 12V power adapter or connect ICOM with the BMW vehicle.
2. Open IE Internet Exploer, browse http://169.254.92.38:60080/, log in with username/password: root/NZY11502.
3. Click “Update Firmware”, you will see ICOM firmware version information.
4. Choose file “ICOM-BootImage-01-13-00.bin”, set image type to SYSTEM, click “Send the file”.
5. When it pops up “Write the image file to the flash?”, click “Yes”, then ICOM indicator light will turn red.
6. When it pops up “The SYSTEM IMAGE update was successfull”, click “Update Firmware”.
7. Choose “ICOM-ApplicationImage-01-18-00.bin”, set image type to APPLICATION, click “Send the file”, it will take several minutes since the file is a little bit large.
8. When it pops up “Write the image file to the flash?”, click “Yes”, then the ICOM indicator light will turn red for the second times.
9. When it finish upgrading, click “reboot” to reboot the computer.


Important Note For ICOM A2:

1. Setting up your computer to obtain an IP address automatically;
2. Firstly choose the smaller file “ICOM-BootImage-01-13-00.bin” , then set image type to SYSTEM;
Secondly choose the bigger file “ICOM-ApplicationImage-01-18-00.bin”, then set image type to APPLICATION.


How to Install the Digiprog 3 V4.94 Software

When you receive the software, the next is to install it:

Step 1 – Download the V4.94 update software from your email, open it and and find two zipped files inside.
Copy and paste the two files to desktop and unzip them. You will then get two document file folders in the same name.

digiprog-3-blog-1
Step 2 – Open “Digiprog3 V4.94 Update Video” folder, find a zipped file “COM 2.08.30 x86WHQL Certified” and unzip it.

update-Digiprog-3-to-v4.94-blog-2

Step 3 – Plug Digiprog3 hardware to the USB port of your computer and a “Found New Hardware Wizard” window will pop up.

update-Digiprog-3-to-v4.94-blog-3
Step 4 – Next select “Install from a list or specific location (Advanced)”.

update-Digiprog-3-to-v4.94-blog-4
Step 5 – Select “Include this location in the search”, click “Browse”, select “COM 2.08.30 x86WHQL Certified” and click “Ok”.

update-Digiprog-3-to-v4.94-blog-5

Step 6 – The “Found New Hardware Wizard” window will pop up again. Click “OK” – “Next” – “Finish”.

update-Digiprog-3-to-v4.94-blog-6


Step 7 – Now check if there is “USB Serial Port (COM4)” under “Computer Manager”. This is to make sure the driver is installed successfully.
If you do not find the option, repeat Step 3 to 7.

update-Digiprog-3-to-v4.94-blog-7

Step 8 – Open the other file on the desktop, you will get 8 things in the file. Double click on “Digiloader1” to open it.

update-Digiprog-3-to-v4.94-blog-8
Step 9 – Select “COM4 – USB Serial”, “Digi1.bin” and click “Select the port and click me”.

update-Digiprog-3-to-v4.94-blog-9

Step 10 – When you get a “Process end” prompt, it means the V4.94 Digiprog 3 software is installed successfully The upgrade process takes a few minutes.

Customer feedback for Scania VCI-3 Scanner

V2.24 Scania VCI3 VCI3 Scanner Wifi is a brand new tool designed by Scania to provide full maintenance for all Scania trucks, buses and other heavy vehicles or heavy duty engines made by Scania.

vci-3-vci3-scanner-wifi-diagnostic-tool-for-scania-1


One of my customer said the VCI3 is very good to use,here is the function he has tested which all is ok:

wifi-scania-vci-3-1

wifi-scania-vci-3-2

wifi-scania-vci-3-3

If you have the test same funtion,we will really appreciate if you share with us.


How to Operate Digimaster 3 ?

How to Operate Digimaster 3 ?

Here only needs 8 step to make it:

Step 1. Digimaster 3 Function Menu

digimaster-3-digimaster-iii-original-odometer-1 (1)
Step 2. Digimaster 3 Function

digimaster-3-blog-1
Step 3. Digimaster 3 Basic Info

digimaster-3-blog-2
Step 4. Digimaster 3 Select Car Series

digimaster-3-blog-3
Step 5. Digimaster 3 Adjust Odometer

digimaster-3-blog-4
Step 6. Digimaster 3 Adjust Odometer

digimaster-3-blog-5
Step 7. Digimaster 3 Adjust GTS

digimaster-3-blog-6
Step 8. Digimaster 3 Success Adjust GTS

digimaster-3-blog-7