Archive | September 2026

KD-X6 Key Adding Procedure for 2016 Porsche Cayenne

KD-X6 — 2016 Porsche Cayenne KD Key Adding Procedure

Note: Exact BCM board locations, component identification, and vehicle-specific conditions should be verified against the applicable service information before performing the procedure.

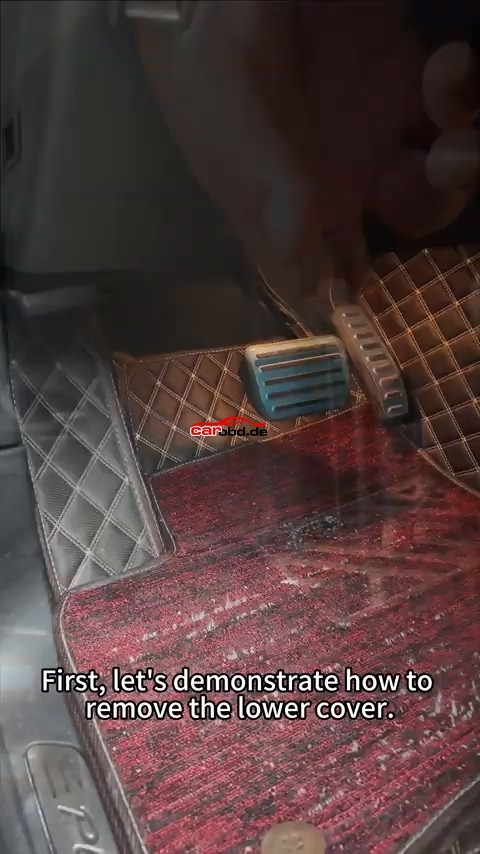
1. Remove the BCM lower cover
Remove the lower cover under the steering wheel. Locate the clip/retaining points and release them carefully.
2. Remove the BCM
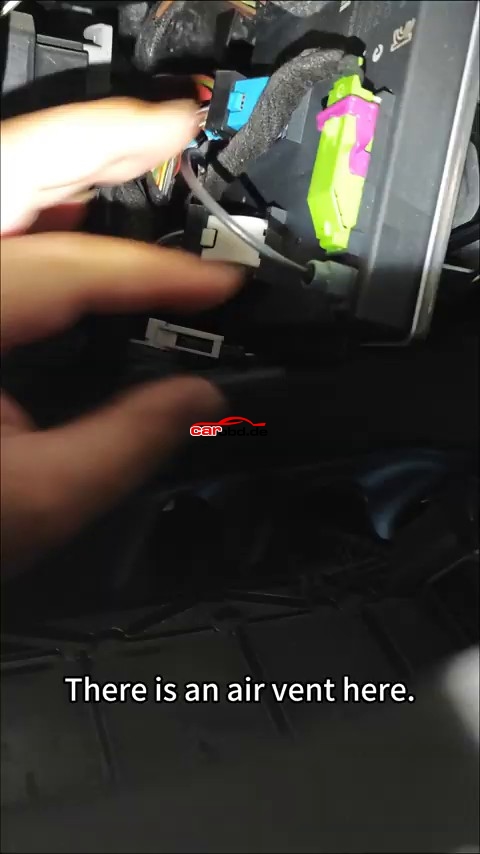
Look under the steering wheel and locate the BCM/module. Release the retaining clip(s) and remove the module
3. Enter IMMO Programming
On the KD-X6, enter the IMMO programming function and select Porsche.
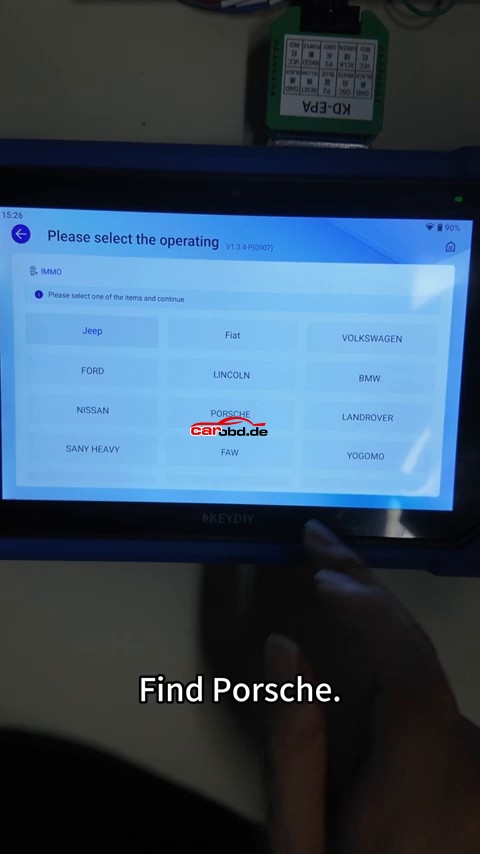
4. Connect the adapter
Connect the required adapter to the KD-X6. Follow the on-screen instructions for the Porsche BCM connection.

5. Select the chip version
Select the chip/oscillator type : the 1N35H ceramic crystal oscillator version.

6. Prepare the BCM board
There two components that need to be removed. Perform the board modification exactly as demonstrated.

7. Check the modification
After cutting/removing the specified components, use a multimeter to verify the result. It notes that the relevant points should not be connected if the cut is successful.

8. Start the BCM data read
Confirm the adapter is connected correctly, start the operation, and click Read to read the module data.

9. Generate the dealer key
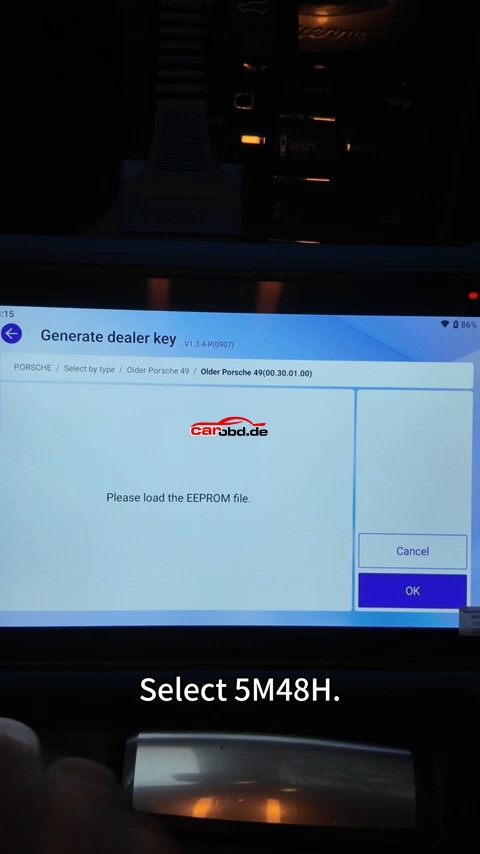
Open Generate Dealer Key. Insert the universal key into the sensing coil of the device, select 5M48H, load the locally saved file, and click Generate Key.
10. Prepare the vehicle for key learning
Return to the vehicle. Turning the key/handle back and forth about three times before proceeding with key learning.

11. Enter key learning
Enter Key Learning and turn on the hazard lights

12. Learn the first key
Insert the first key to be programmed and turn on the ignition. It indicates that successful learning is shown on the dashboard.

13. Learn the next key
Within 30 seconds, remove the previous key, insert the next key to be programmed, and turn the ignition off/on as instructed.

14. Confirm the key count
It shows the dashboard displaying 02-02 after the second key is learned, indicating the demonstrated two-key learning sequence has completed.

15. Verify key operation
Turn off the hazard lights and test the learned key functions. Then locking/unlocking and the trunk button.

Quick Workflow

Remove BCM → Porsche IMMO Programming → Connect adapter → Select chip version → Modify/check BCM board → Read module data → Generate dealer key → Vehicle key learning → Learn additional key(s) → Verify lock/unlock/trunk operation.
How to Unlock the FCA SGW by TOPDON Diagnostic Tool?

1. Which TOPON products are certificated with AutoAuth Gateway?

FCA US has partnered with TOPDON to certify TOPDON manufactured diagnostic tools to secure SGW vehicles’ access.
Requirements:
✓ Ensure TOPDON tools have the latest software (valid software
subscription required)
✓ Tools need to connect to the Internet
✓ Users will enter AutoAuth Credentials when prompted on the tool to
unlock SGW vehicles
✓ As of August 3, 2022, TOPDON has 7 devices equipped with the
AutoAuth gateway. Among them are: Phoenix Lite 2, Plus, Elite, Pro, Smart, Remote, Max.
We will also continue configuring the AutoAuth gateway to Unlock FCA SGW in more releases.

2. How to access the AutoAuth on Topdon Diagnostic Tool?
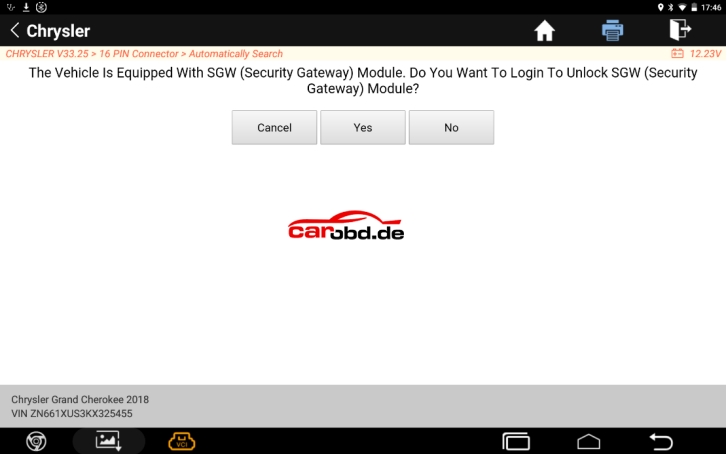
Step 1: When you diagnose FCA models, the following prompt will pop up, please click Yes.

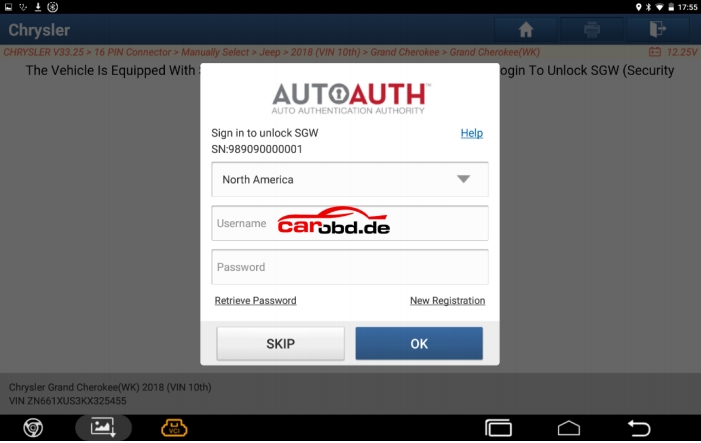
Step 2: Log in to your AutoAuth account to unlock it.

3. How to register AutoAuth acccount?

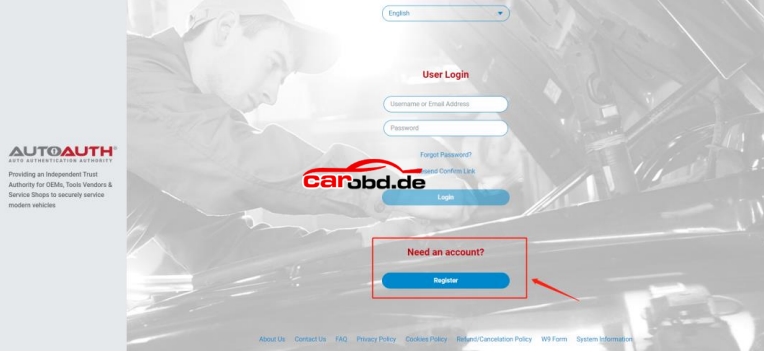
1) Go to https://webapp.autoauth.com/

2) Click REGISTER

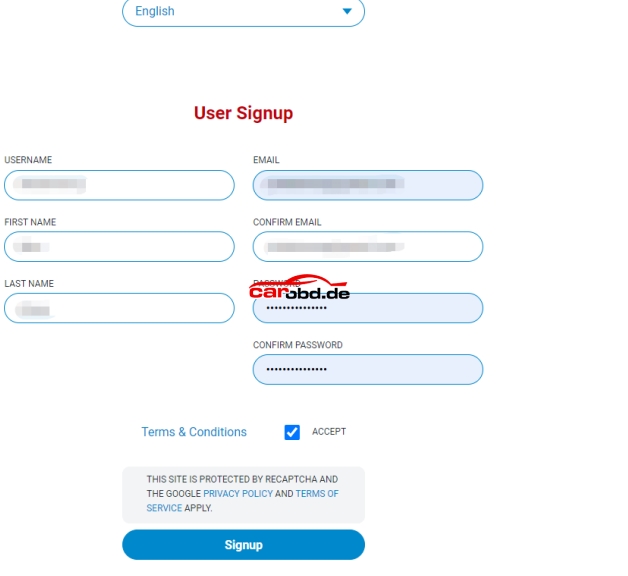
3) Setup AutoAuth User Account – There is no payment until a user registers a service center (shop or technician).
You will need to create a unique username. The username must be at least 8 alphanumeric characters starting with a letter. Usernames are lowercase. Once you decide on a username you will enter the other

fields including:
• First name
• Last name
• Email address
• Password
• Password confirmation

Once you accept the terms and conditions, click the “Signup” button.
This will create your account and AutoAuth will send you an email to confirm your email address. You are required to click the link sent in email to confirm your email address. Once this is done, you can then log in to the AutoAuth portal to manage your account at the AutoAuth home page.
https://webapp.autoauth.com.

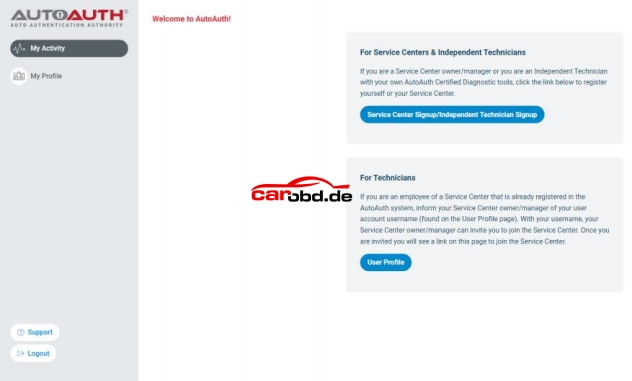
4) To pay for service, first log in to your account. You will see a welcome to AutoAuth message. Click “Service Center Signup/Independent Technician Signup”

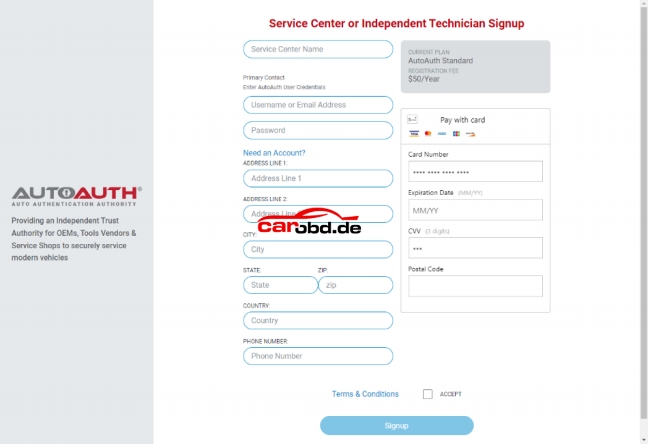
You’ll be taken to the Service Center registration form.

Enter a name for your shop. (This can be changed later.)
Enter your username. (This cannot be changed later.)
Enter your password.
Enter your Address, city, state, postal code, and country.
Enter your phone number.
Enter your credit card number.
Enter your expiration date of your card.
Enter the CVV number of your card.
After reading the terms and conditions, check the box that you agree to them.
Check the box at the bottom to confirm you are not a robot.
Click the “Signup” button at the bottom of the page.
NOTE: The payment charge by AutoAuth directly, TOPDON is not involved in any transaction process.
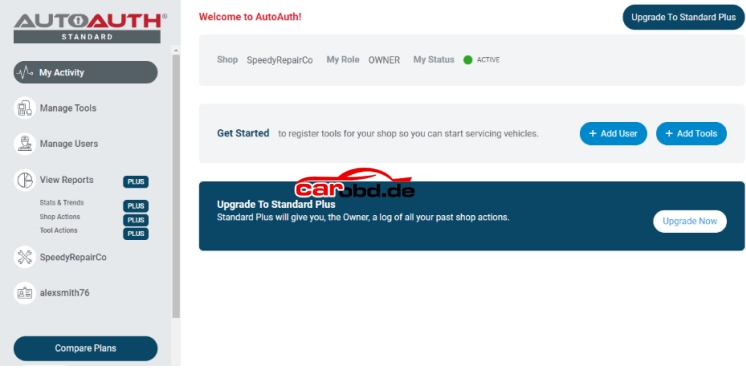
You will now have “Manage Tools” and “Manage Users” available in your menu at the left of the page as shown below:

The next step is to register your tool serial numbers.
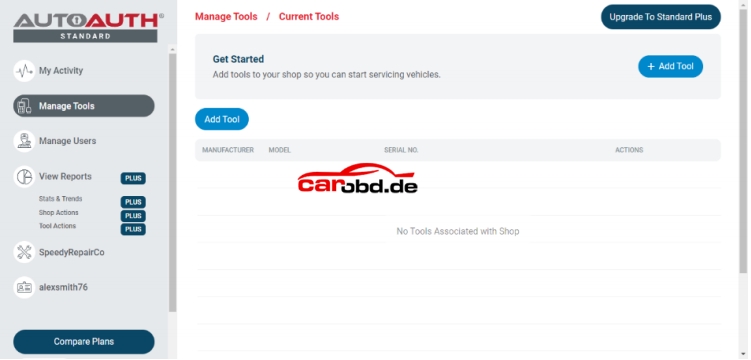
5) After logging in as the shop owner, select “Manage Tools” from the left menu

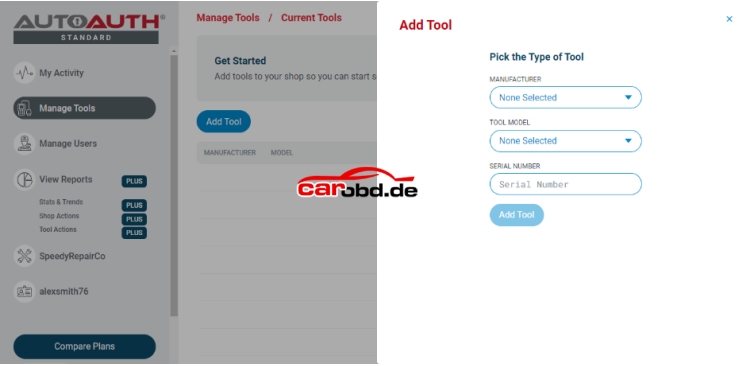
Click the “+ Add Tool” button.

Select the manufacturer of TOPDON.
Select the model of your tool. (Phoenix Lite 2, Plus, Elite, Pro, Smart,Remote, Max)
Enter the serial number for your tool.
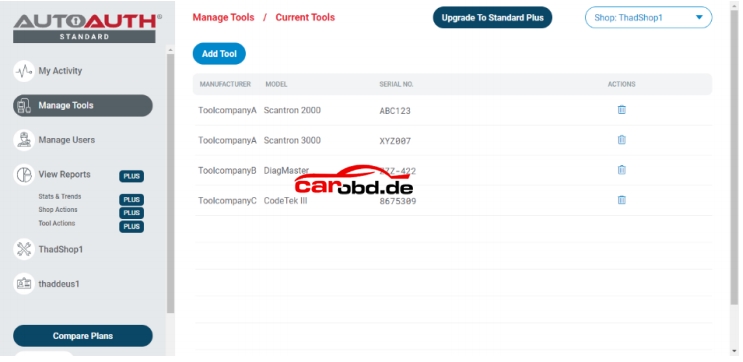
Click the “Add Tool” button. You may now see the TOPDON diagnostic tool in your list.

Note that a TOPDON tool serial registered to a shop can be used by all registered shop users. However, a tool serial cannot be used by more than one shop.
After your TOPDON tools are added to your shop account, they are authorized by AutoAuth to unlock the secure gateway on vehicles. There is no delay after registering your serial numbers.

For more technical and product support, please contact Jenny

Whatsapp: +86 19947637411
Email: Sales@Carobd.de

2M2 TANK CNC Key Cutting — Schlage by Code

2M2 TANK CNC Key Cutting — Schlage by Code

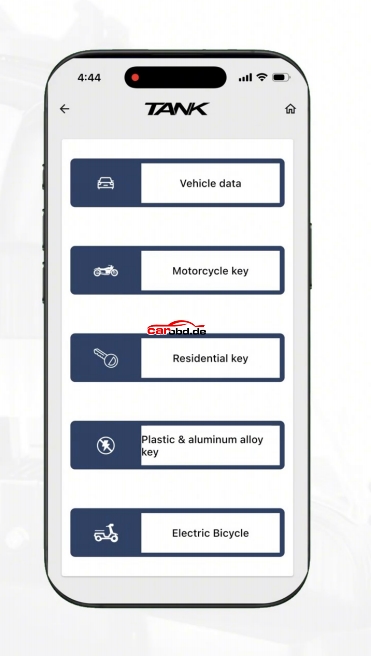
Workflow: TANK App → Residential Key → Schlage profile → Fixture setup → Key blank clamping → Code/Cut
Depths → Automatic cutting → Finished-key check

1. Open the TANK app
Launch the TANK application and enter the key-cutting section. Select Residential key from the available key categories.

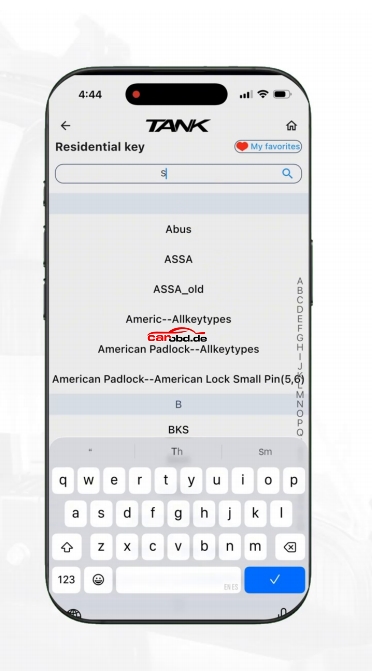
2. Search for the Schlage key profile
Use the search field to locate Schlage, then select the required Schlage key family/profile shown in the video


3. Select the correct key type
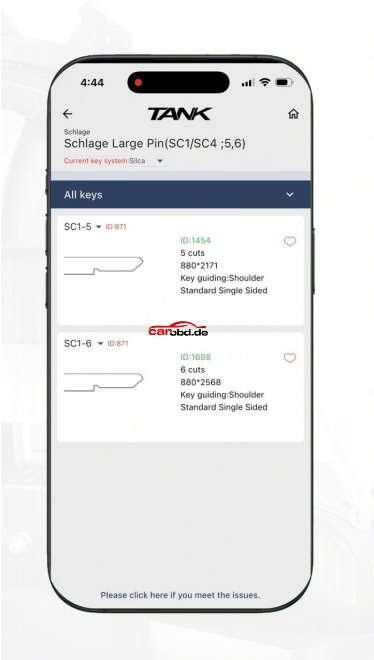
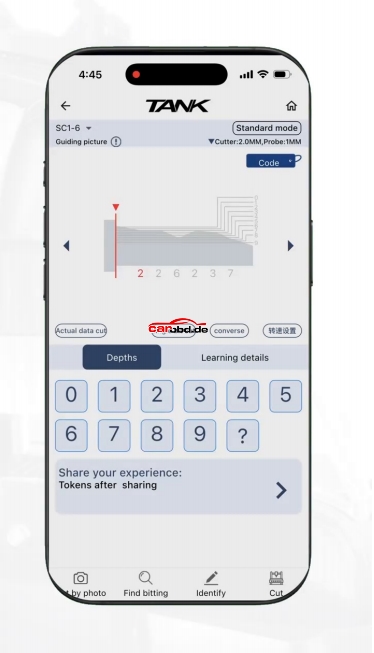
Choose Schlage Large Pin (SC1/SC4) and select the matching key specification. The video shows a 6-cut SC1-6 profile being selected.


4. Follow the clamping guide
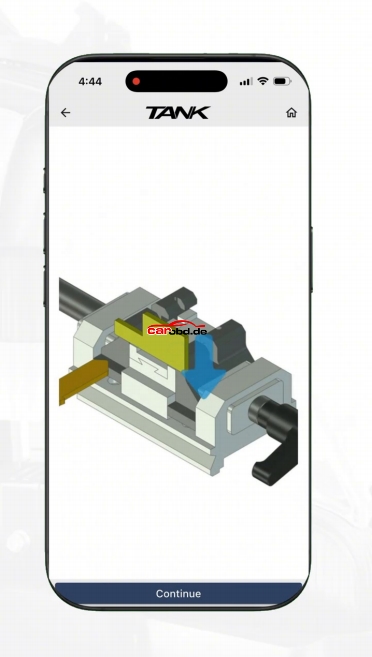
Tap Continue. The app displays a fixture/clamping diagram. Follow the indicated orientation before installing the key blank.


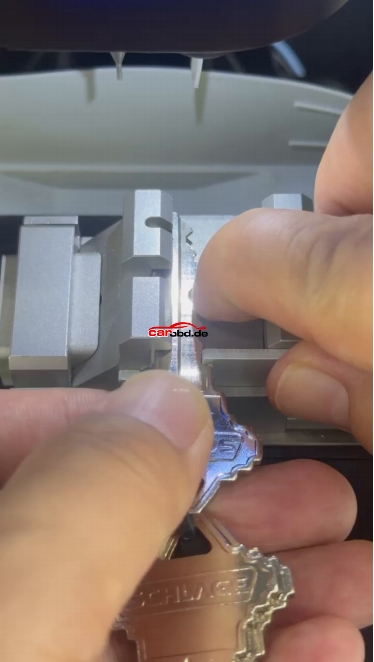
5. Clamp the key blank
Install the appropriate key blank in the machine vise/fixture and secure it firmly. Make sure the blank is seated in the correct position and orientation.


6. Enter the key code / cut depths
On the cutting screen, select Code and enter the required cut-depth information for the authorized key. The app displays the cut positions graphically.

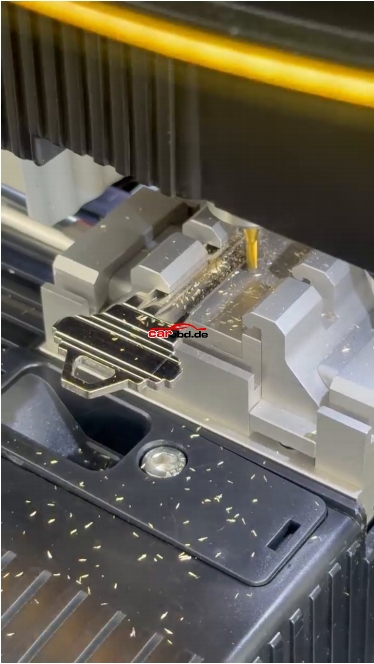
7. Start the automatic cutting process
After confirming the settings, start the machine. The cutter automatically follows the programmed positions and depths to mill the key blank


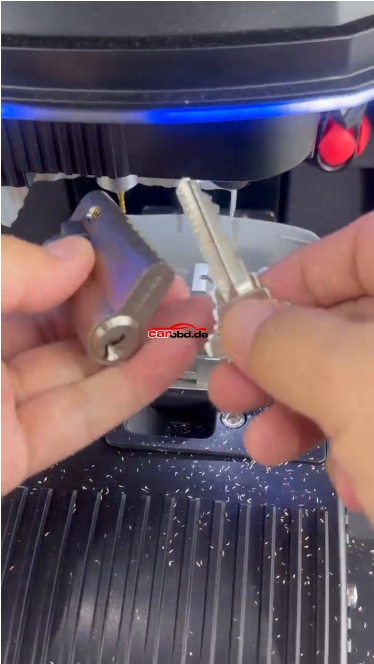
8. Finish and verify the new key
When cutting is complete, remove the finished key carefully, clean away metal chips, and compare the cut profile with the selected specification. Test it only on the lock you are authorized to service.

For more product and technical support,please contact Jenny

Whatsapp: +86 19947637411
Email: Sales@Carobd.de

How does ALIENTECH KESS3 Unlock Module Complete Kit work ?

The ALIENTECH KESS3 Unlock Module Complete Kit is designed to unlock selected protected Bosch MD1/MG1 (MDG1) ECUs so that KESS3 can access their internal memories and perform ECU programming in BOOT mode. It was introduced with KESS3 Upgrade 3.50 in September 2026.

How it works ?

1. Remove and open the ECU
The supported ECU is removed from the vehicle and opened so the technician can access the ECU circuit board. BOOT mode requires direct access to the ECU’s internal electronics.

2. Connect the Unlock Module
The KESS3 Unlock Module is connected between the KESS3 and the ECU using the supplied adapter board, ribbon cable, jumpers and VFL3 connection cables. The complete kit includes the 14AS00T11S hardware module and 14AS00T12S adapter.

3. Perform the BOOT Unlock procedure
Using the appropriate KESS3 protocol, KESS3 communicates with the protected ECU through the Unlock Module and performs the required unlock/patch procedure. This allows the previously protected ECU memories to become accessible.

4. Read / write / backup the ECU
After successful unlocking, KESS3 can access the ECU in BOOT mode for supported operations, including:

  • ECU identification
  • Full read
  • Write/programming
  • Complete backup
  • Access to supported memory areas

5. BENCH operation may be available afterward
For supported ECU versions, Alientech has also released BENCH protocols. After the initial BOOT unlock, the ECU can subsequently be accessed directly through its connector in BENCH mode, meaning the ECU does not necessarily need to be opened again for every subsequent programming operation.
Simple workflow

Vehicle → Remove ECU → Open ECU → KESS3 Unlock Module → BOOT Unlock → ECU Memory Access → Read/Backup → Modify File → Write → Reinstall ECU

Supported ECUs

The current Alientech release includes models such as MD1CS003, MD1CS069, MD1CP007, MD1CS012, MG1CS042, MD1CS004 (HW80), MG1CS031, MD1CP006, MD1CS005 and MG1CS002. Coverage is protocol-dependent and mainly concerns protected Bosch ECUs used in vehicles from around 2021 onward.
Important: the Unlock Module is an accessory for KESS3, not a standalone ECU programmer. The relevant KESS3 CAR BENCH/BOOT activation and active subscription are required for the new unlock protocols.

For a product page, a concise description could be:

Unlock Protected Bosch MD1 & MG1 ECUs with KESS3
The ALIENTECH KESS3 Unlock Module Complete Kit enables professional BOOT-mode unlocking of supported Bosch MD1/MG1 ECUs. After unlocking, KESS3 provides access to ECU memory for reading, writing and full backup, helping workshops complete ECU programming in-house.

For more product informations and technical support, please contact Jenny

Whatsapp: +86 19947637411
Email: Sales@Carobd.de

What’s the difference between Launch X431 PAD V Elite and PAD V Elite V2

LAUNCH X431 PAD5 ELITE V2 is a new-generation PAD series product built on the Android 15.0 operating system. It features an octa-core high-performance processor, 8GB RAM and 128GB ROM for ample storage, and a high-capacity battery, delivering faster, more stable, and longer-lasting performance.

It covers over 98% of vehicles on the market and supports full-system fault diagnosis, including functions such as reading/clearing trouble codes, reading data streams, special functions, actuation tests, coding, matching, and programming.

It is equipped with the latest Smartlink V4 WiFi diagnostic connector, which supports J2534, RP1210, CANFD, and DOIP protocols.

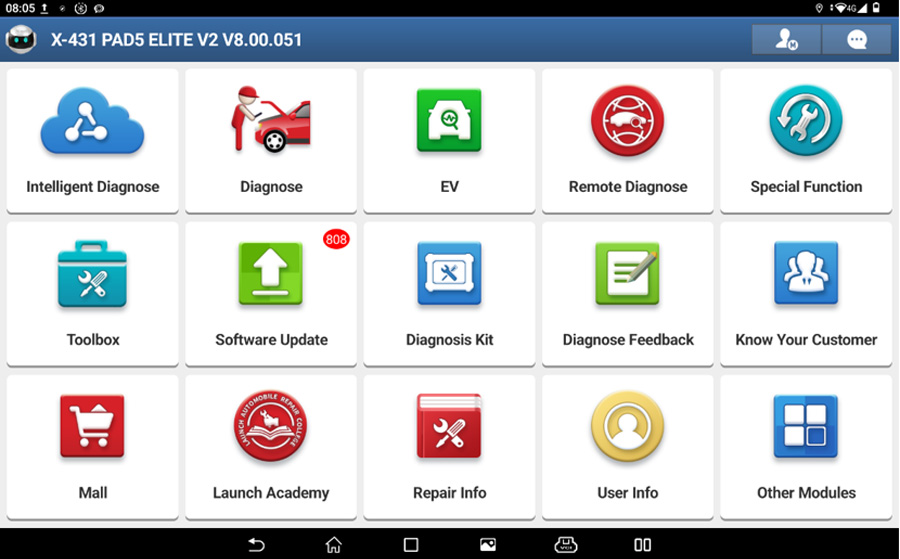
The homepage features the following functions: Intelligent Diagnose, Diagnose(traditional ), EV (Electric Vehicle Diagnosis), Remote Diagnose, Special Functions, Toolbox (with expansion modules), Software Update, Diagnosis Kit, Diagnose Feedback, Know Your Customer, Mall, LAUNCH Academy Repair Info, User Info, and Other Modules.

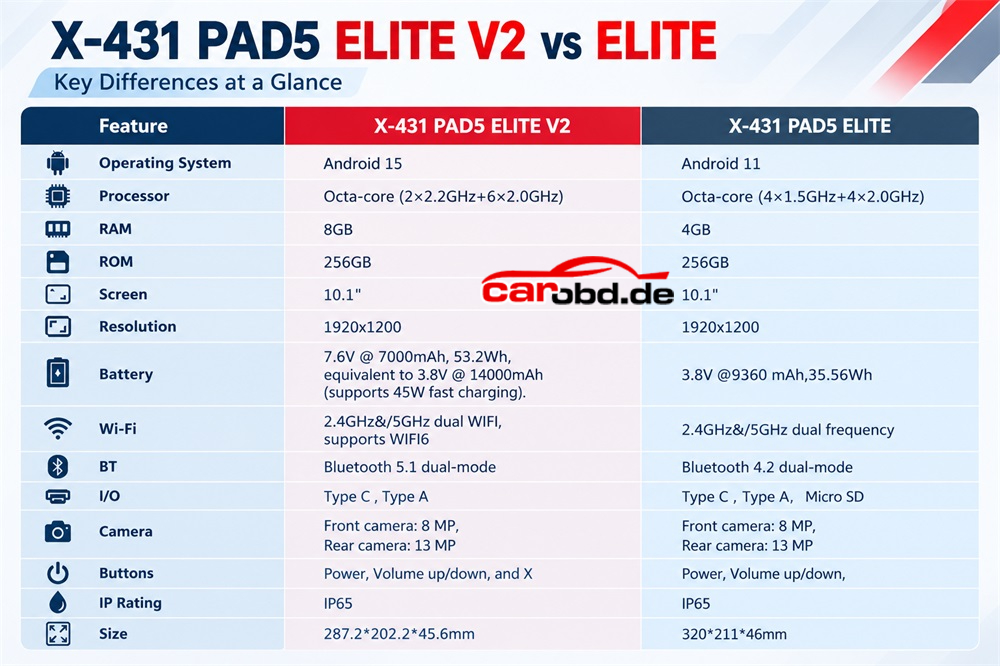
Compared to the LAUNCH X431 PAD 5 ELITE, the new configuration changes are as follows

1. Android 10 → Android 15: OS upgrade for a more advanced system experience.

2. CPU 4×1.5GHz + 4×2.0GHz → 2×2.2GHz + 6×2.0GHz: Enhanced processing power with a stronger chipset, delivering significantly improved computing performance.

3. RAM 4GB → 8GB: Doubled memory capacity, delivering a generational leap in multitasking performance.

4. 3.8V @ 9360 mAh, 35.56Wh → 7.6V @ 7000 mAh, 53.2Wh (equivalent to 3.8V @ 14000 mAh): Provides approximately 13 hours of battery life (tested under maximum screen brightness; for reference only, actual performance may vary depending on usage).

5. 45W fast charging support: Shortened charging time with nearly 40% faster charging speed; a full charge takes about 2 hours (internal test data; for reference only, actual results may vary).

6. Added LAUNCH-branded charging breathing light: Charging status is now clearly visible at a glance.

7. Added “X” shortcut key: Customizable for one-touch access to Voice Diagnosis, Smart Diagnosis, X-431 FIX, and other functions.

8. Supports USB-to-HDMI cable for screen mirroring, providing more stable projection performance (USB-to-HDMI cable sold separately).

9. Equipped with 4 linear microphones and a 3-watt speaker, delivering professional-grade voice diagnosis capabilities.

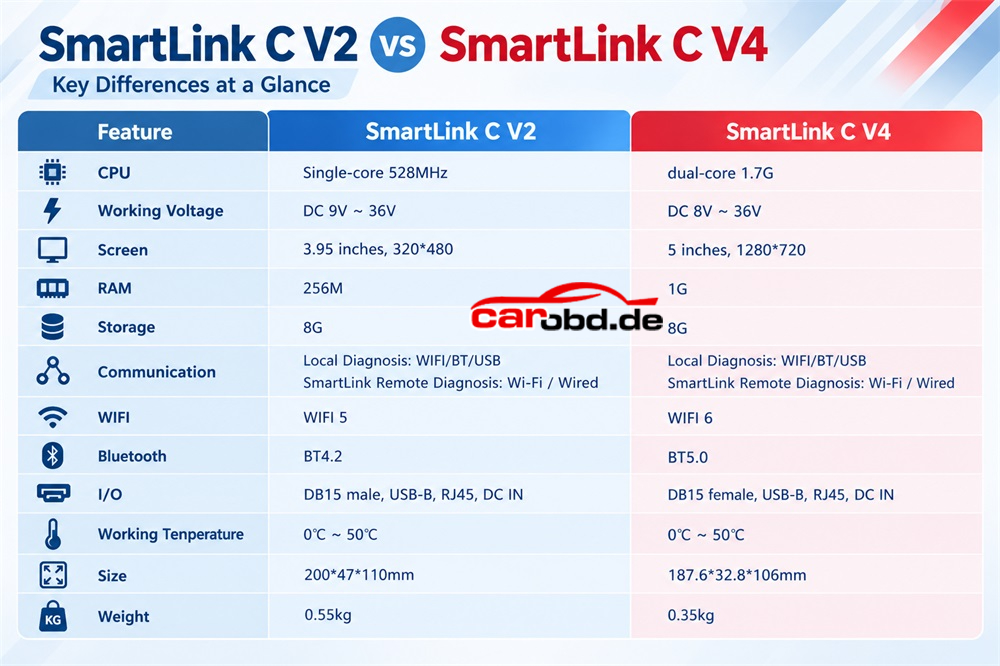
Smartlink V2 connector upgraded to Smartlink V4

Performance leap: CPU upgraded from single-core to dual-core, with clock speed increased to 1.7 GHz, and RAM expanded from 256 MB to 1 GB for faster processing and response. CAN bus upgraded to 4-channel CAN FD for enhanced communication capabilities.

Refreshed interactive experience: Features a 5-inch 1280×720 touchscreen with a brand-new UI design, significantly improved screen-to-body ratio, and a slimmer, more compact form factor for a better visual and operational experience.

Better connectivity and signal strength: Wi-Fi module upgraded to Wi-Fi 6 protocol, with dual antennas for enhanced signal strength. Diagnostic communication speed tested to improve by 20% (data for reference only).

Practical functional upgrades: Added auto-VIN-read function upon connector power-on; added cooling fan that automatically activates based on core temperature; supports USB power supply, allowing the host to connect to the VCI via USB cable for upgrades.

For more product informations,please contact Technical Support Jenny

Whatsapp: +86 19947637411
Email: Sales@Carobd.de

KeyDiy KD-X6 Built-in MQB48 Key Reading-Standalone Operation

A significatn upgrade of the KEYDIY KD-X6 key programming tablet is the intergration or MQB48 and MLB functions. Our customers have tested the built-in features and provides us with positive feedback, and we are pleased to share with you.

Model example: 2019 Audi Q3
Transponder: MQB/ID48 Chip

Disassembel original MQB48 key.

Turn on KD-X6 tablet.

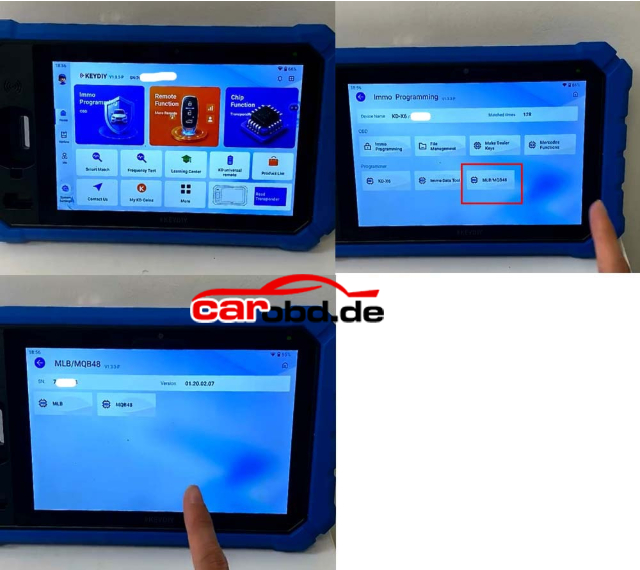
Go to IMMO Programming-MLB/MQB48 function-MQB48

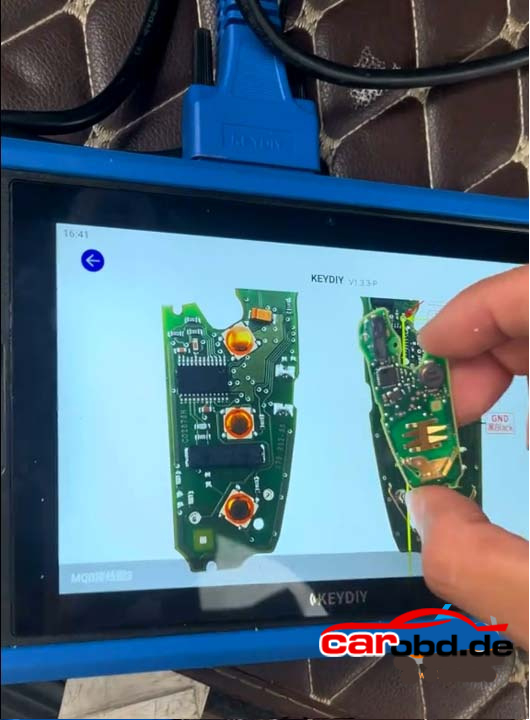
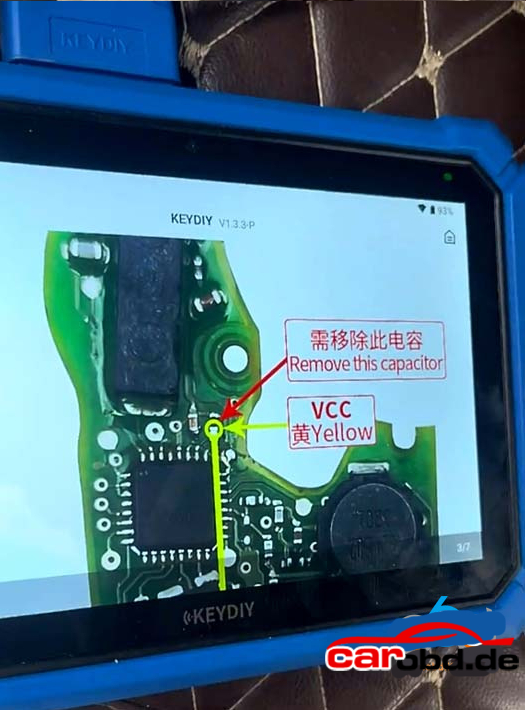
Check key wiring diagrams and find the correct one that matches your original key circuit board

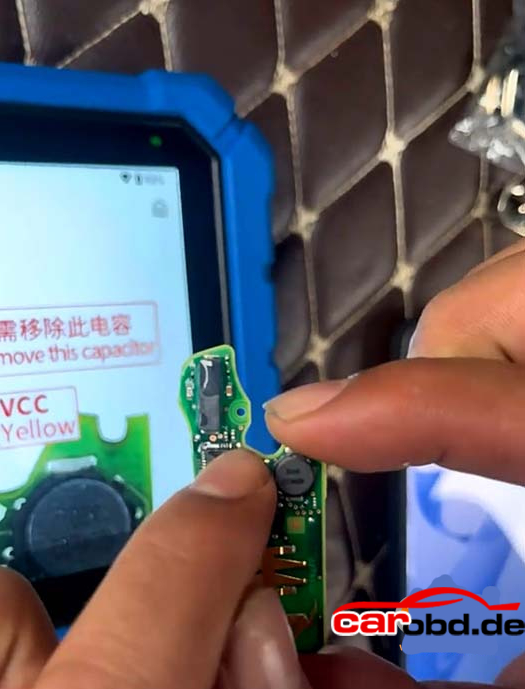
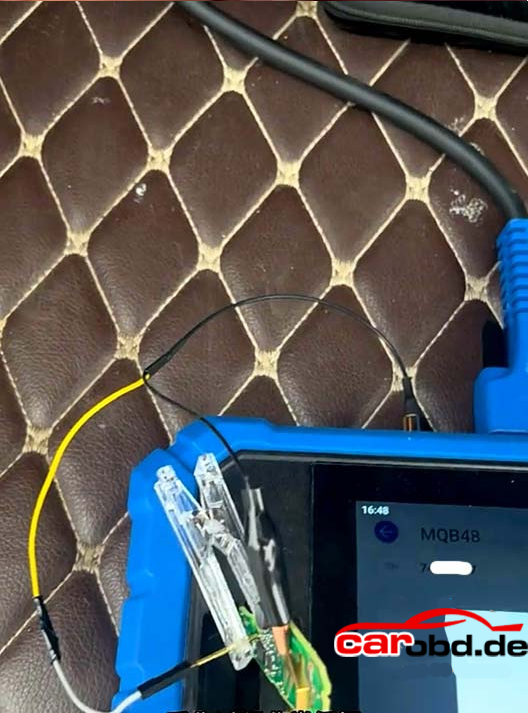
Follow diagram to solder wires to the key circuit board. Need to remove a capacitor carefully.

Then read MQB48 key data

Calculate key data in 5 minutes; not very fast but very stable

Restor the capacitor on the key circuit board after the data reading is finished

The generate dealer key and learn key following the KD-X6 prompts. The key learning procesure is the same as KD-X4