Archives

How to Clear Land Rover Evoque Fault Codes via Foxwell GT80

I have successfully used Foxwell GT80 professional diagnostic tool to read and clear fault codes of Rover Evoque 2012, here I will share the process with more guys.

After many weeks of reading and finding sparse bits of information here and there, I finally ordered Foxwell GT80 as my Rover Evoque 2012 fault codes scan tool, it cost me €1070 with free shipping, the price is a little high, but I have used it to diagnostic my car and my friends’, no major problems have been found yet. My friends said that this product could make a lot of unemployed mechanic. Hummm…I think it is right.

All right, let’s go to the detailed procedures:

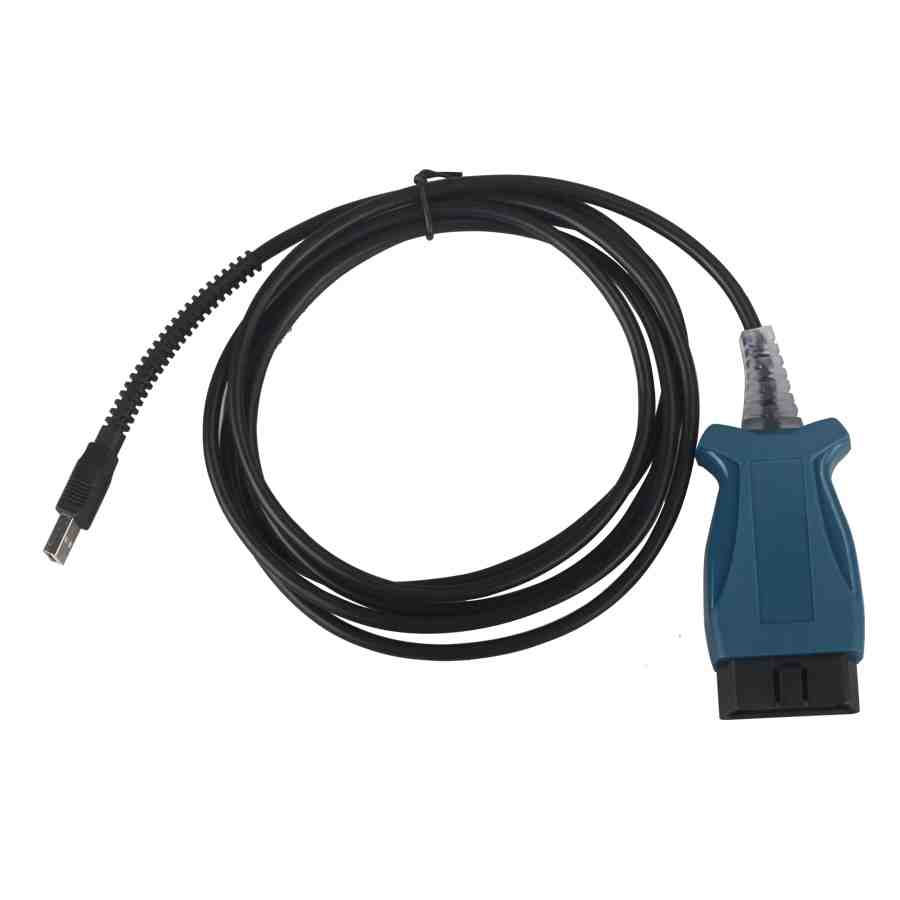
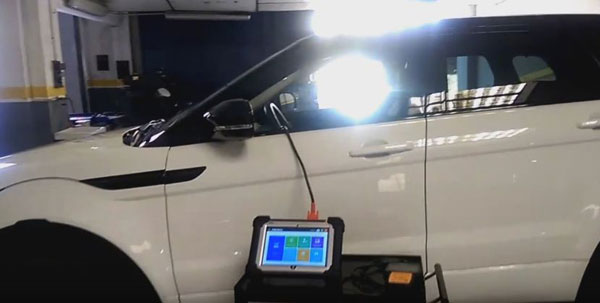
First of all, I connect Foxwell GT80 with my Evoque via diagnostic cable which comes with the GT80.

foxwell-gt80-blog-1
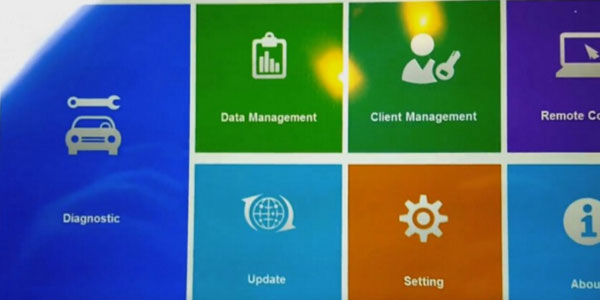
NEXT start the scanner, this is main menu

foxwell-gt80-blog-2

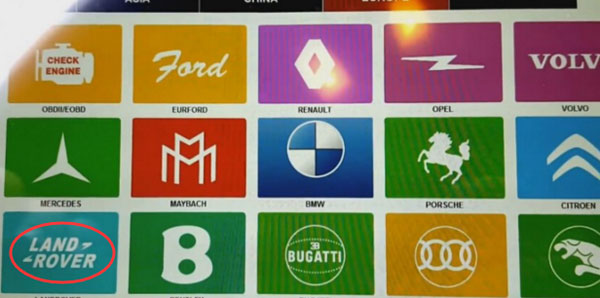
Then Go to Diagnostic -> Vehicle Selection ->EUROPE-> Land Rover

foxwell-gt80-blog-3

foxwell-gt80-blog-4
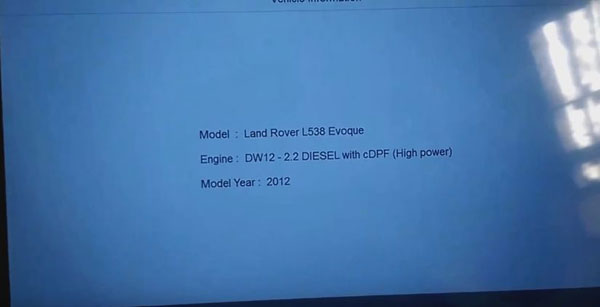
It is establishing vehicle communications. Waiting…

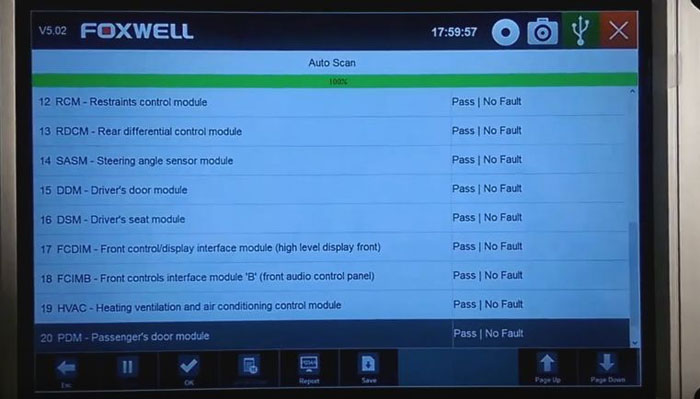
Well, Select Main Groups->Auto Scan

foxwell-gt80-blog-5

Next I Select ABS-ABS control module

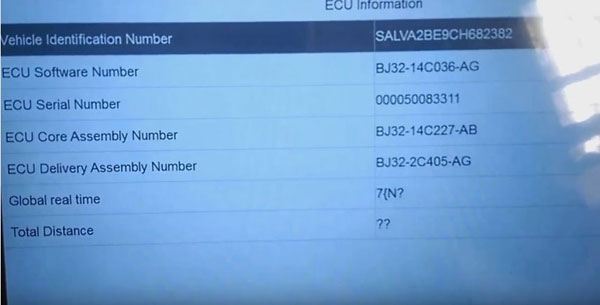
Select diagnostic function->ECU information

foxwell-gt80-blog-6

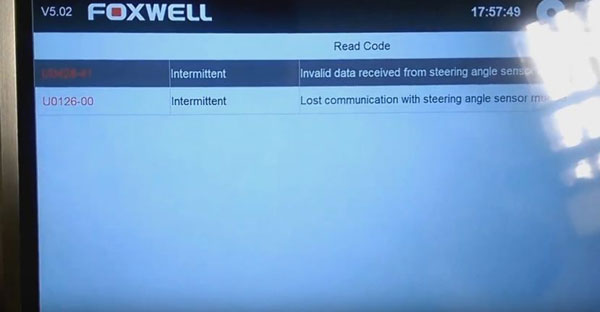
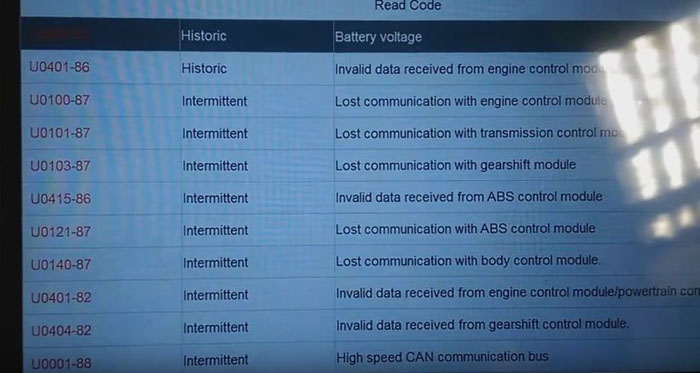
Select diagnostic function->Read Codes

foxwell-gt80-blog-7
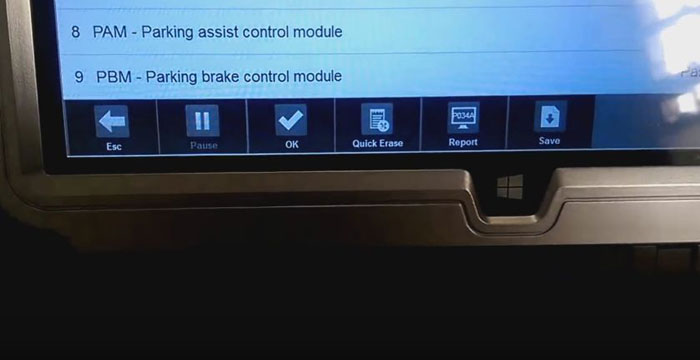
And Back to Erase Codes

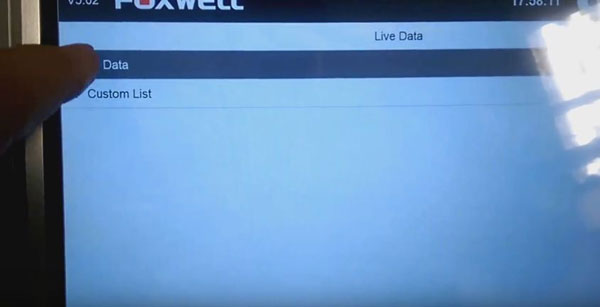
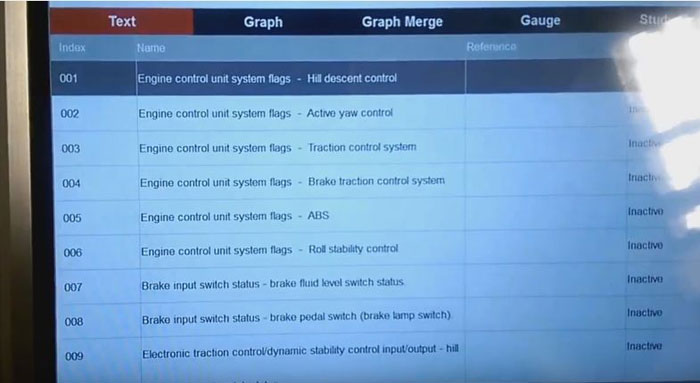
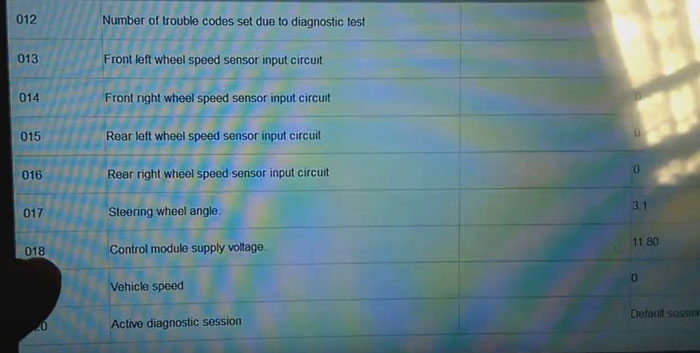
Then I select diagnostic function-> Live Data->All Data to know my car status

foxwell-gt80-blog-8

foxwell-gt80-blog-9

foxwell-gt80-blog-10


Next I Select GSMB-Gearshift module B

And select diagnostic function->Read Codes

foxwell-gt80-blog-11


After reading completely, back to Erase Codes
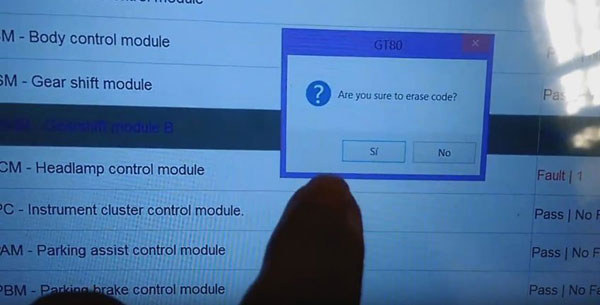
Select Quick Erase

foxwell-gt80-blog-12
Are you sure to erase code? Yes

foxwell-gt80-blog-13


Finally, I select Main Groups->Auto Scan again to confirm the fault codes are erased.

foxwell-gt80-blog-14

Done! It is simple to operate.

How to solve JLR Mangoose SDD Problem “cannot read VIN”

jlr-mangoose-for-jaguar-and-land-rover-blog-1

Problem description:

When install JLR Mangoose SDD diagnostic software for Jaguar and Land rover on windows XP laptop, the program runs well, but unable to read Jaguar or Land rover vehicle VIN. SDD “Manual VIN read” failed either.

The Mangoose cable can be detected by computer because the green indicator light flashes. But when loaded SDD both green and red indicator flashed. Try to install on different clean (none-anti-virus software) XP laptop, all fail to read VIN.

Solution (offered by one of the JLR SDD users):

1.Uninstall the previous JLR SDD drivers on the computer.
2.Download the new drivers from the Drewtech website (only fits for 32bit system) and update the firmware on the Mangoose.
3.Install the new downloaded driver and connect the Mangoose cable with vehicle.
4.SDD will be able to recognize vehicle VIN
5.If the method fails, perhaps your vehicle model is not supported by JLR SDD diagnostic software.

ALLSCANNER CLOUD DIAGNOSTICS INSTALLATION STEP

ALLSCANNER Cloud diagnostics Installation Step

Note:Recommended using Microsoft WIN7 or more of the system. Computers are required to install the Microsoft IE11 browser or Google.
Android and IOS systems are not supported
for the time being。

1.Installation of ALLSCANNER device driver
management“VX MANAGER”;

1

2

Here nothing to choose, directly point “NEXT”
go down

3

4

5
2.Connected to the diagnostic equipment, the
computer automatically install the driver

6

3.The driver installed after open the “VX MANAGER”,
select the top menu VX CLOUD”;

7
Point open “start cloud diagnostics” will automatically
open the default browser, enter the cloud diagnostics

page, enter the dealer to the account and password;

8

9

4.Select the required models in the main interface
Icon

10

Select “Open Cloud diagnostics” and enter the cloud
server(Note: to enter the cloud server must be
connected to the device);

11

12

13

14

15
5.Open diagnostic software for vehicle diagnosis

16

17

18

CN900 Mini & ND900 Mini which is clone?

Both CN900 Mini and ND900 Mini key copy machines are available in carkeydeals.com. Which one is original?

Answer:

Both CN900 Mini and ND900 Mini are original products from TJECU company.

It’s true!

They are made by the same manufacturer but distributed to different dealers. Tat’s why there looks slightly different each other.

Similarities:

1. Mini CN900 and ND900 support same function: 11/12/13/33/T5/4C/4D/42/46/48/72G chip copy

2. USB2.0, GSM/GPRS SIM, support same frequency, RF data, RFID identify etc

3. They comes with same firmware version, latest goes to V1.13. Build with same PCB.

mini-cn900-pcb-blog-1

4. Update online. Share the same update procedure

Differences:

1. MINI ND900 looks almost the same as CN900 mini (difference is it has TJECU logo on the plastic)

cn900-mini-a1-blog-2

nd900-mini-key-programmer-a1-blog-3
2. Update on different websites

Although they share the same update procedure, they have different update file from their own websites.

CN900 Mini official website: www.cn900.net

ND900 Mini official website: www.mini900.cn

Update procedure goes here:

How to update MINI CN900/ND900 key programmer?

1. Browse to ND900/CN900 Mini official website, register and download Updater file respectively.
2. Delete previous updater file (updater v1.8 etc)
3. Open newest updater v1.9 setup.exe
4. Click on Update button
5. The main module of firmware is updating. Wait upgarde procedure complete.

difference-cn900-mini-and-nd900-mini-4

XTOOL X100 PRO Key Programmer Newest Positive Feedback

This blog is newest reviews and feedbacks on XTOOL X100 PRO Auto Key Programmer key programming function. Cardiag.co.uk collects XTOOL X100 PRO latest successful experiences for your reference.

original-x100-pro-plus-auto-key-programmer-new-1

XTOOL X100 PRO Successful Feedbacks:

Suzuki Alto 2003 lost key, programmed a 4D65 chip in seconds. (under 02-04 Swift menu)

Suzuki Ignis 2005 all keys lost OK

Maruti Suzuki Alto 2011 erase all key ok, program new key ok

Chevrolet S-10 2014 all key lost, Program key OK with remote 10 min, need pin (client had info card) by – USA – Chevrolet – track.

Chevrolet Cruze 2012 read pin code ok in 2mins, add key ok in 10mins

VW Polo 2005 read pin code OK

Chevrolet Kalos 2007 lost key, program key OK (you must min 2 keys programmed. There is no Kalos option so choose Aveo)

Toyota HiLux 2012 G chip add key OK

Toyota Prado 2014 add key -ok

Toyota Land Cruiser add key -ok

Honda CRV 2007 add key OK

Honda add G chip key ok

VW Caddy diesel 2006 read pin and program key OK

VW CADDY 2007 lost all key – read pin code ok, program key ok

Audi a3 2004 program remote OK

Skoda Octavia 2007 read pin code OK

Hyundai i10 2012 read pin and program ID46 chip quick and easy

Kia Rio 2014 program key OK (already have pin)

KIA Carens 2006 program key – ok

Kia Ceed 2007 convert VIN to pin OK, program key ok

Kia Ceed 2009 read pin code with key ok, program remote ok (choose Hyundai option)

Peugeot boxer 2008 add ID48 key OK (already have pin)

Peugeot 408 2014 program key OK (already have pin code)

USA Ford Mustang 2014 add key – OK

Ford Focus 2014 all keys lost, add smart key success (Use option smart key all keys lost, it’s under “add smart key”! Follow the instructions)

Nissan Juke 2015 all key lost, read pin ok, program smart key and remote ok

Nissan Murano 2007 read BCM programming key and remote ok

NISSAN Leaf 2012 all key lost, add smart key perfectly (but not calculated pin, read BCM code – OK)

Other car makes:

Dodge charger 2005-2015read pin code and program key ok

Citroen C4 2006 program key ok (already have pin)

Chrysler PT Cruiser 2008 read security code ok, erase keys ok, program new key ok in 2mins

Mitsubishi Space Star reset IMMO box OK

SsangYong Rexton 2005 program ID8E chip key OK in 2min

Chevy Cruze all keys lost ok in10 mins

Jeep Cherokee 2012 read pin (but failed to program)

XTOOL X100 PRO Key Programmer reviews from forum:

X100 pro works really well but depends on what cars, for Honda it is great to edit VIN etc, on Toyota not so great, for Nissan smart keys it is awesome! For ford it’s terrible..

I have the tool XTOOL X100 pro, very good for immobilizer Kia, Hyundai and Nissan.

I have most Kia / Hyundai presence key, and the pin code at hand. IX35, New Santa Fe, Kia Picanto, Hyundai HB20, Sportage and New Sportage, Hyundai Veracruz, Kia Sorento, all I tested. But not tested Mileage with the X-100 yet.

How Renault Can Clip reprogram a fuel injection ECU?

Renault can clip is not only a scanner and diagnostic tool, but it also has some special functions like reprogram Renault ECU. This blog will show you how Renault Can Clip reprograms a fuel injection ECU step by step.

How Renault CAN Clip diagnostic interface re-flash/code Renault injector ECU?

Step1. Install Renault CAN Clip diagnostic software. CAN Clip V160 is the newest version now. This blog is a detailed how-to guide:

Renault Can Clip V160 Free Download and Installation Steps

Carobd.de Renault Can Clip Update to V160 Free Download

Step2-1. Connect CAN CLIP interface with vehicle via OBD socket. Select the reprogramming page. Obtain the VIN of the vehicle automatically. Select the reprogramming button.

renault-can-clip-reprogram-ecu-blog-1

Step2-2. Click “SELECT THE COMPUTER TO BE PROGRAMMED” then “SELECTION” then click validate.

renault-can-clip-reprogram-ecu-blog-2
Step3. Input the Repair Order and the vehicle Technical Specification code then click validate. After that make sure two things done: 1. Connect battery charger to the car. 2. Plug Can Clip Renault into the mains.

renault-can-clip-reprogram-ecu-blog-3
Step4. There will be a tip “Select programming mode”, choose “CD-ROM”.

renault-can-clip-reprogram-ecu-blog-4

Step5. Select the number for the software to download depending on the recorded operation commons, then confirm, then click “Software reference” and press Validate

renault-can-clip-reprogram-ecu-blog-5
Step6. Input vehicle AFTER SALES REPROGRAMMING CODE then press Validate.

renault-can-clip-reprogram-ecu-blog-6
Here you need use Renault Pin Extractor to calculate AFTER SALES REPROGRAMMING CODE by request code. Here is the Renault Pin Extractor Zip file for you:

http://cartechnology.co.uk/attachment.php?aid=3557

renault-can-clip-reprogram-ecu-blog-7

Now it is programming. Please remember no operation on the vehicle or on the tool. This procedure will last for 5 minutes. Wait until the procedure is complete

renault-can-clip-reprogram-ecu-blog-8

Then reprogramming is done! Return to the home page and save result. Next exit the CAN Clip software.

Autel MaxiDAS® DS708 On Sales

Autel Maxidas DS708 ,is the universal car diagnostic tool for 1998-2015,it support 12V petrol & diesel vehicle.We are authorized autel dealer,purchasing from us,you can get 100% original Autel DS708 tool.

autel-maxidas-ds708-scanner-english-version-2

Ds708 can update online,and have one year free update.

How to update Autel MaxiDAS® DS708?

DS708 has one CD, firstly install the software in the CD;
Secondly run the update software, login with username and password.
Importand note: inser the SD card into computer when updating DS708

Autel DS708 Specifications

Operating System: Windows CE
CPU: ARM9+ARM7 dual processor
Memory: Max. 4 Gigabyte SD card
Communication Interface: OBD,USB Ethernet
Input Voltage: 8.0-32.0V power provided via vehicle battery
Power Consumption: 8W
Operating Current: 500mA
Display: Backlit, 7″ TFT (800*480 dpi) color display with touchscreen
Operating Temperature: 0 to 60°C
Storage Temperature: -10 to 70°C
Operation: Touchscreen and one rubber key (ON/OFF)
Printer Interface: Wi-Fi, USB, Ethernet
Housing: Strong plastic housing with protective rubber boot
Protocols: ISO 9141-2, K/L lins, flashing code, SAE-J1850 VPW, SAE-J1850 PWM, CAN ISO 11898
ISO15765-4, High-speed, Middle-speed, Low-speed and Single-wire CAN

FAQ

Q: Are you Autel authorized dealer?
A: Yes, we are Autel authorized dealer; please check the Autel Certificate on our DS708 description page.

Q: I tried to register DS708, but not successfully, I got error message “found no service or DNS error”, the WIFI indicator light keep flashing.
A: There are mainly two ways to register.
The first way: use computer to register on www.maxidas.com, (NOTE: Please use the System/Help > about function to find out the Product Serial No. and Register Password. )

Now the price of DS708 is fall,only need 729 EUR ,It is a good chance to get it,coming soon!

Quality AAA Clone Xhorse Mini VCI cable support VPW

How to tell good clone Xhorse mini VCI cable techstream from a bad clone, this is what I verified and think it may be helpful if I share here.
Good clone Xhorse Mini VCI cable firmware >2.0.1 support VPW protocol. I got from cardiag.co.uk, they always offer such clone and will not have problems.
Bad clone Mini VCI cable with FW 1.4.1 and lack VPW protocol.

If you would like to reset immo, or make customization to cars, you need at least 2.0.1 FW with 2.0.1 FW there is change in PCB, as it supports VPW, and has extra security chip. On the other hand, all these simple clones with 1.4.1 FW support only CAN and K line, VPW protocol is unsupported in 1.4.1 FW, and there is no parts for it on PCB.

As you can see, this is the PCB for the good clone Mini VCI cable with FW 2.0.1 and VPW:

good-clone-with-fw-2-0-1-and-vpw-protocol-blog-1
And the outlook

mini-vci-for-toyota-tis-techstream-v500028-single-cable-blog-2

Here the PCB for the bad clone Mini VCI cables with FW 1.4.1 and lack VPW:

bad-clone-with-fw-1-4-blog-3

bad-clone-with-fw-1-4-1-and-lack-vpw-protocol-blog-4

bad-clone-with-fw-1-4-1-and-lack-vpw-protocol-blog-5

Wireless VPECKER Easydiag V8.3 MSS update – DPF reset function is tested OK

(8th September, 2016 update) Wireless VPECKER Easydiag V8.3 MSS system update – DPF RESET special function is tested working fine on following car makes: CITROEN, DAEWOO, JAGUAR, LANDROVER, OPEL, PEUGEOT, SUBARU and VAUXHALL, it covers up to 2014 year. At present, Easydiag V8.3 MSS system can perform a total of 6 functions, they are: DPF (V18.0), ABS bleeding (V19.), Battery (V18.0), EPB (V20.1), Oil reset (V21.0), TPMS (V19.0).

As you can see in the following pictures:

vpecker-dpf-function-blog-1

vpecker-dpf-function-blog-2
(2nd september, 2016 update) VPECKER Easydiag is tested ok to perform ABS bleeding function on CITROEN and PEUGEOT vehicles up to 2014 yeaR

CITROEN: C3, C3 R, C3 PLURIEL, C3 PICASSO, C3 (A51), C4, C4 PICASSO, C4 SEDAN, C5, C5 R, C5(X7), C-Elysee 4, C-Elysee 5
PEUGEOT: 207, 307, 308, 407, 408

At present, VPECKER Easydiag can perform ABS bleeding function on the car makes up to 2014 year including Citroen, Peugeot, Daewoo, Jaguar, Landrover, Opel, Renault, SsangyongFord, etc.

abs-bleeding-blog-3

Historical update during the past one month:
1. Add 1 version ID for ENGINE of MITSUBISHI PRO 2005 model year.

abs-bleeding-blog-4

2. Kia update from V13.0 to V18.0 at DSS system and ESS system -Covered up to 2015!
Add following special functions on Kia:
1. [N] Position The Adaptive
2. A/F Learning
3. A/F Value imposing
4. Auto Detected Configuration Reset
5. BSD Radar Calibration
6. Calibration
7. CLEAR CAN Learnable Status
8. Clutch Learning Reset
9. Current FOB Key Check
10. DCT Manual Input Function(Transmission Exchange)
11. ECM Neutralization
12. ECU Initialization
13. EMS Neutral Mode
14. Engine Test Off
15. EPS Type Recognition
16. ESCL ENABLE OUTPUT CHECK
17. ESCL OPEN STATUS CHECK
18. Get All S/W Version
19. IFU Neutralization
20. ISG TEST(Option)
21. LATERAL G SENSOR CALIBRATION
22. Limp Home Mode
23. LONG G SENSOR CALIBRATION(ONLY EPB)
24. Longitudinal G Sensor Calibration(HAC/DBC Only)
25. Neutral Mode
26. PAD Change Mode(After Change)
27. PAD Change Mode(Before Change)
28. Password Teaching/Changing
29. PRESSURE SENSOR CALIBRATION
30. Read VIN
31. Resetting Adaptive Values
32. Resetting Auto T/A Values
33. Resetting E – CVVT Values
34. Ring Break
35. Sensor Initialization
36. Smatra Neutral Mode
37. Update from CD
etc.

abs-bleeding-blog-5

kia-pro-at-ess-blog-6

3. Hyundai and Hyundai pro update from V13.0 to V18.0 at DSS system and ESS system
Add following special functions on Hyundai:
1. [N] Position The Adaptive
2. A/F Learning
3. A/F Value imposing
4. Auto Detected Configuration Reset
5. BSD Radar Calibration
6. Calibration
7. CLEAR CAN Learnable Status
8. Clutch Learning Reset
9. Current FOB Key Check
10. DCT Manual Input Function(Transmission Exchange)
11. ECM Neutralization
12. ECU Initialization
13. EMS Neutral Mode
14. Engine Test Off
15. EPS Type Recognition
16. ESCL ENABLE OUTPUT CHECK
17. ESCL OPEN STATUS CHECK
18. Get All S/W Version
19. IFU Neutralization
20. ISG TEST(Option)
21. LATERAL G SENSOR CALIBRATION
22. Limp Home Mode
23. LONG G SENSOR CALIBRATION(ONLY EPB)
24. Longitudinal G Sensor Calibration(HAC/DBC Only)
25. Neutral Mode
26. PAD Change Mode(After Change)
27. PAD Change Mode(Before Change)
28. Password Teaching/Changing
29. PRESSURE SENSOR CALIBRATION
30. Read VIN
31. Resetting Adaptive Values
32. Resetting Auto T/A Values
33. Resetting E – CVVT Values
34. Ring Break
35. Sensor Initialization
36. Smatra Neutral Mode
37. Update from CD
etc.

hyundai-pro-at-ess-blog-7