Program 2020-2022 Hyundai i10 ID4A All Keys Lost By Autel IM508

Program 2020-2022 Hyundai i10 ID4A All Keys Lost By Autel IM508

Autel-IM508-Program-2020-2022-Hyundai-i10-ID4A-All-Keys-Lost-1-2-678x381

Autel MaxiIM IM508 Key Programmer (In 2022 we recommend Autel IM508 + XP400 Pro) is able to program 2020-2022 Hyundai i10 ID4A all keys lost by OBD with free pin code. Follow the steps below to learn how to do.

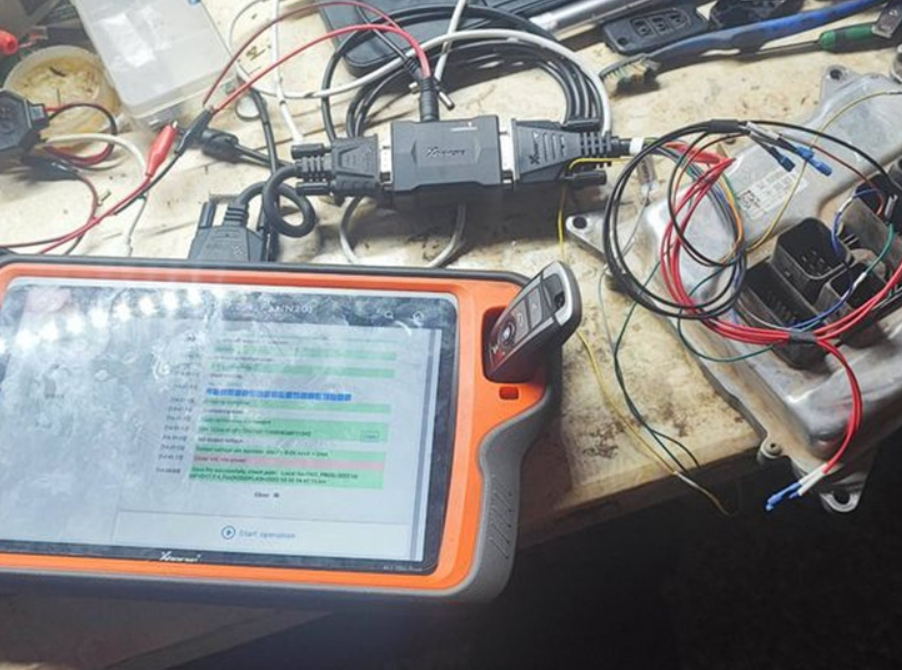
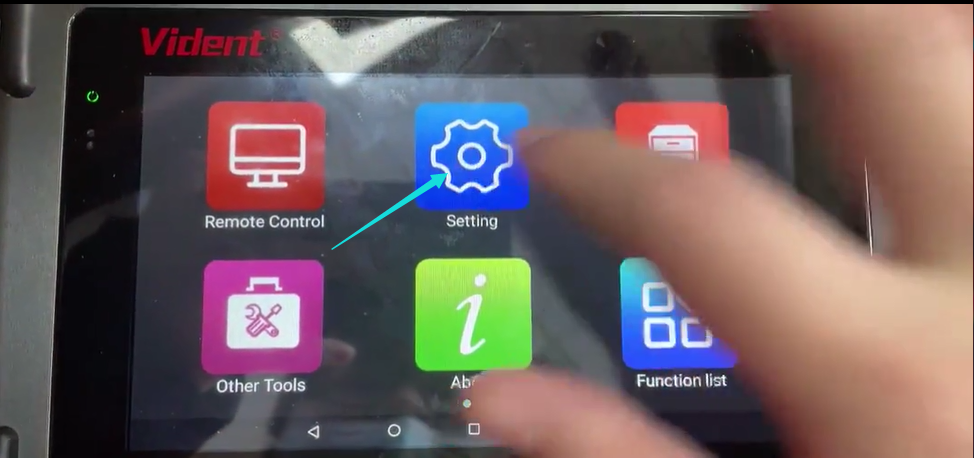
Connect Autel IM508 to OBD,
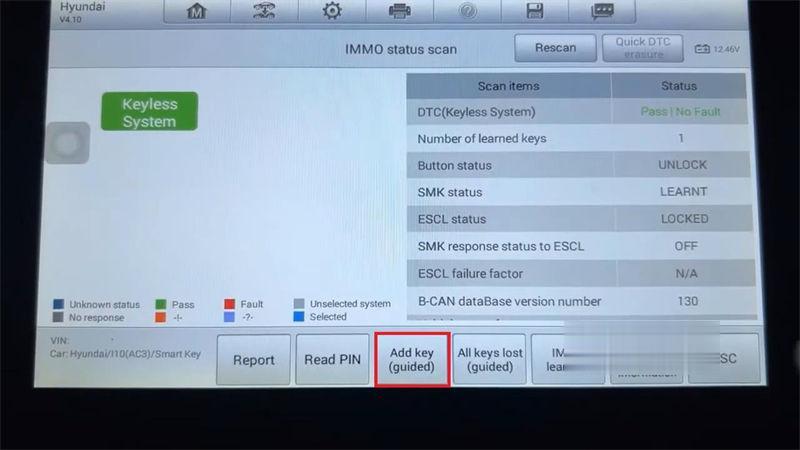
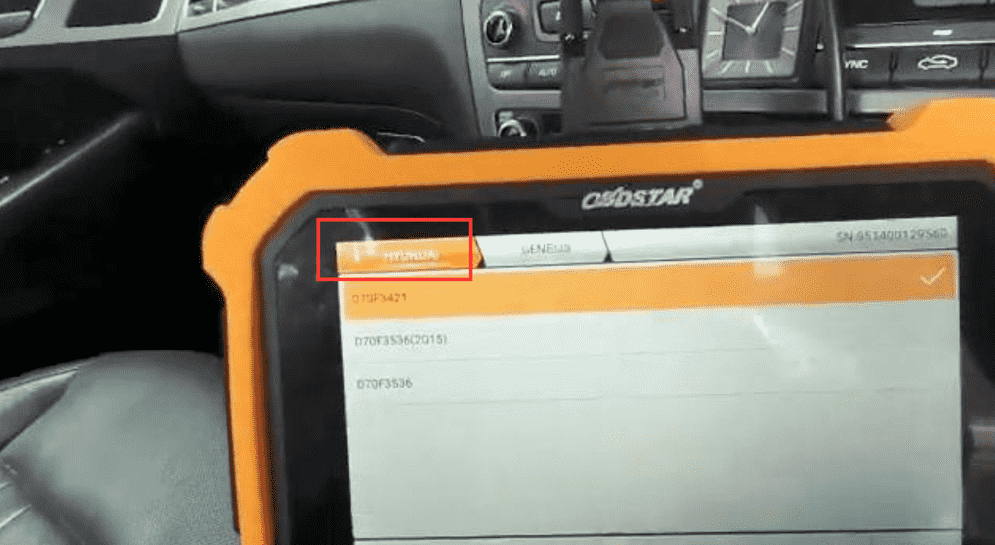
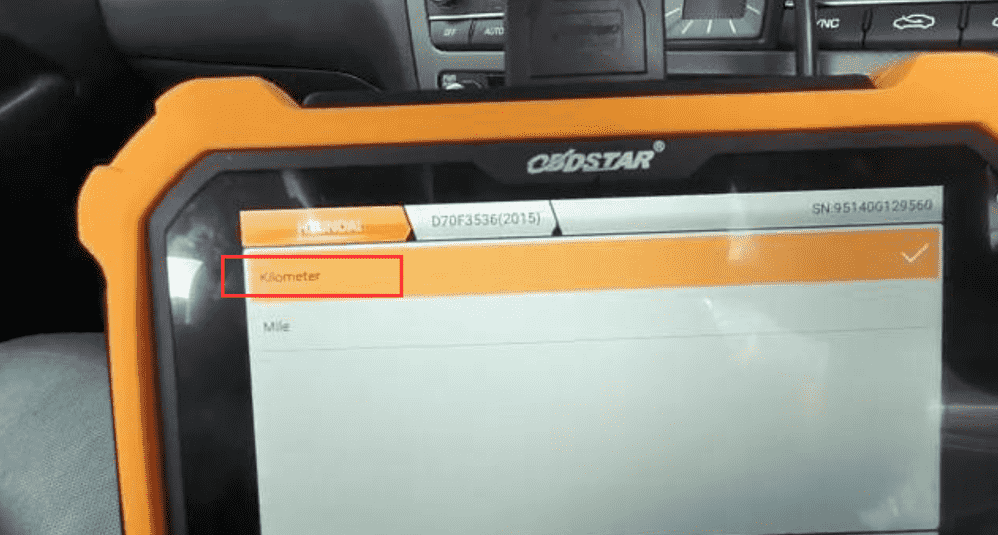
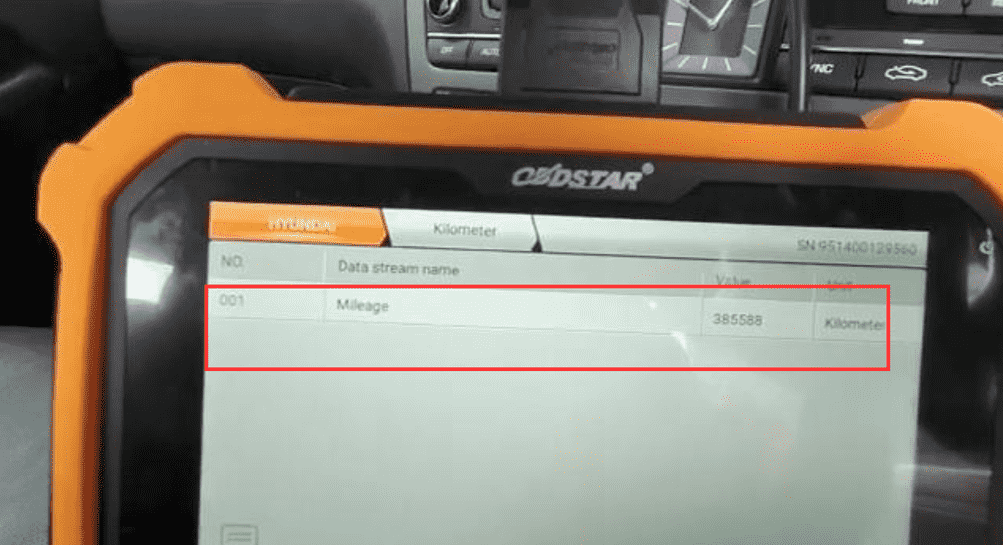
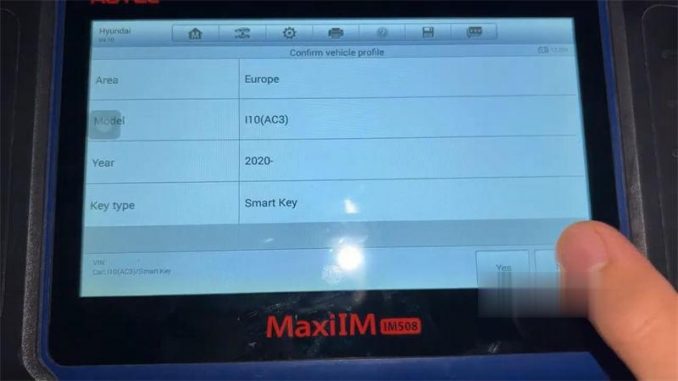
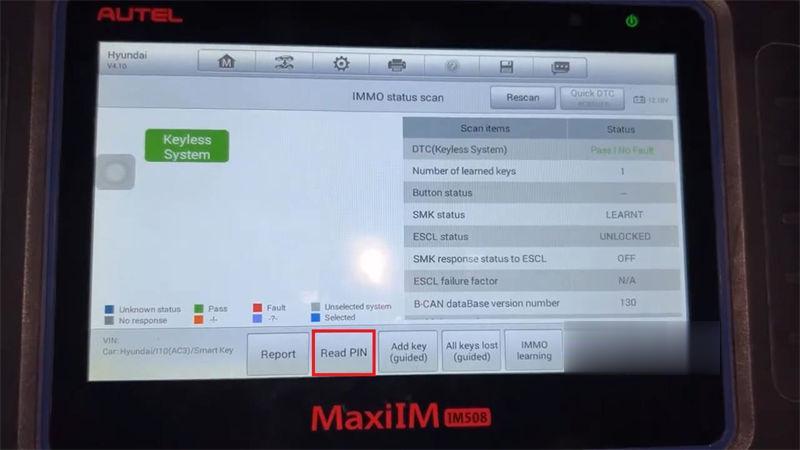
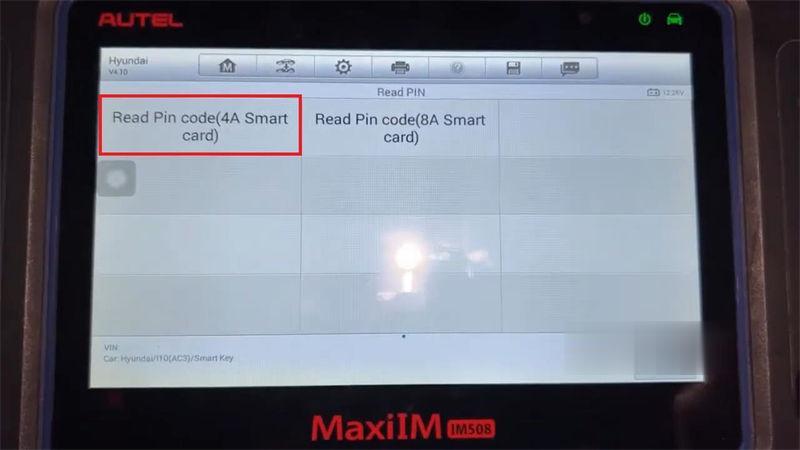
IMMO >> Hyundai >> Manual selection >> Europe >> I10(AC3) >> 2020- >> Smart key >> Yes >> Immo status scan >> Read PIN >> Read pin code(4A smart card)
This function only supports models with 4A chip type smart card. Please ensure the key type is correct!
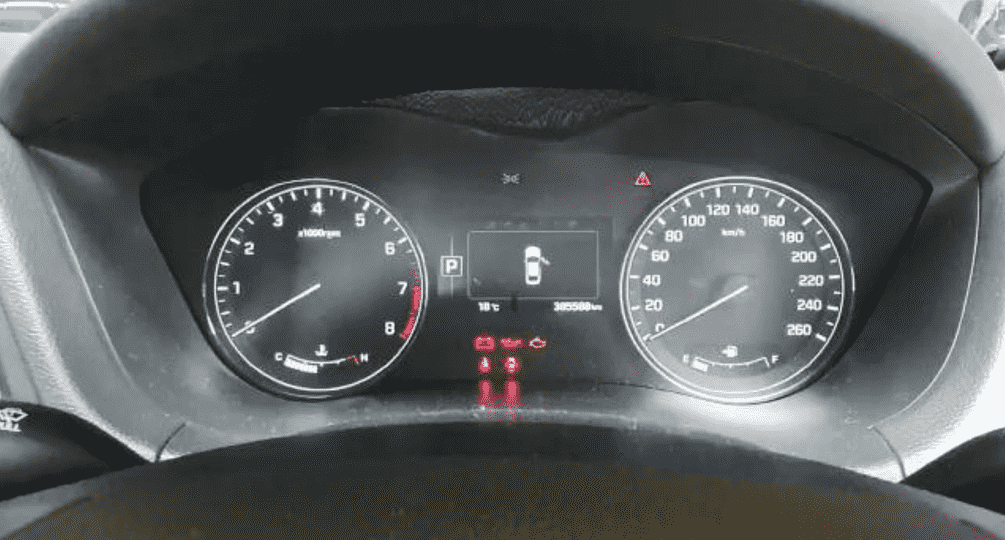
Press the START button, turn the Hazard warning light on.
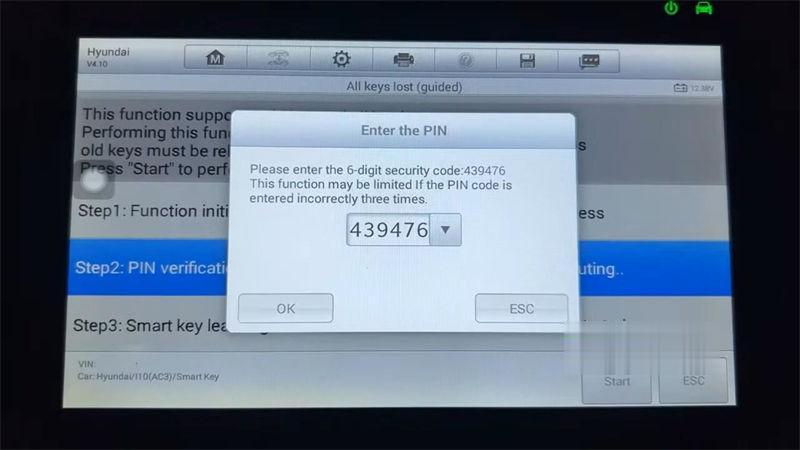
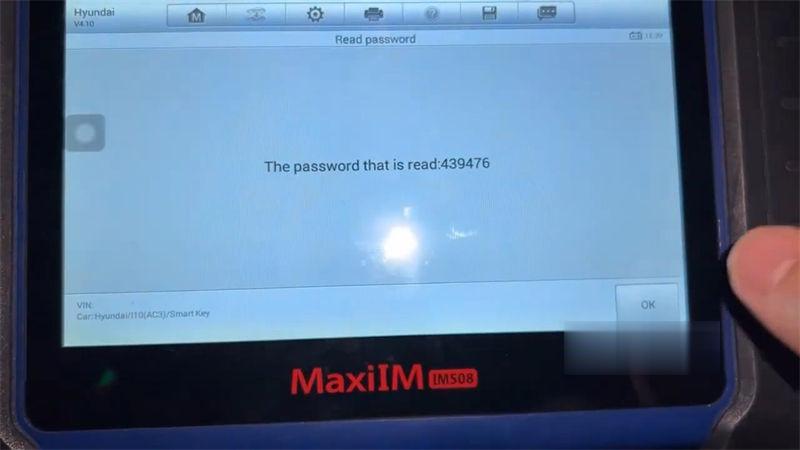
Password was read out: 439476.

Autel-IM508-Program-2020-2022-Hyundai-i10-ID4A-All-Keys-Lost-1-2

Autel-IM508-Program-2020-2022-Hyundai-i10-ID4A-All-Keys-Lost-2-2

Autel-IM508-Program-2020-2022-Hyundai-i10-ID4A-All-Keys-Lost-3-2

Autel-IM508-Program-2020-2022-Hyundai-i10-ID4A-All-Keys-Lost-4-2

All keys lost(guided) >> Start
This function supports add key and all key lost;
Performing this function will erase all existing keys, all the old keys must be relearned again to be able to use normally. Press “Yes” to continue.

Turn the ignition off
(note: the instrument screen is black)
Open and then close the driver door once!
Please enter the 6-digit security code: 439476
Click “OK” to complete the following steps:
Within 5s after “OK” is pressed. Use the back or top of the Universal Smart Key to hold down the START button for 5s until the anti-theft lamps flash.
(If the operation failed with the prompts, please remove the key case and re-execute the above steps so that the key chip can be successfully.)
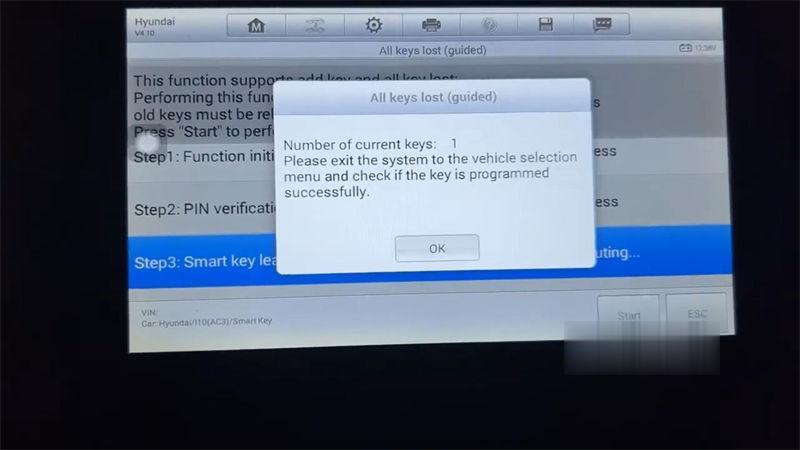
Programming succeeded.
Number of current keys: 1
This is how to program 2022 Hyundai i10 ID4A all keys lost with Autel IM508.

Autel-IM508-Program-2020-2022-Hyundai-i10-ID4A-All-Keys-Lost-5-2

Autel-IM508-Program-2020-2022-Hyundai-i10-ID4A-All-Keys-Lost-6-2

Autel-IM508-Program-2020-2022-Hyundai-i10-ID4A-All-Keys-Lost-7-2


How to do Mileage Adjustment for Hyundai Gensis 2015 With OBDSTAR X300 DP PLUS ?

How to do Mileage Adjustment for Hyundai Gensis 2015 With OBDSTAR X300 DP PLUS ?

How-to-do-Mileage-Adjustment-for-Hyundai-Gensis-2015-With-OBDSTAR-X300-DP-PLUS-7-678x381

This article will show you How to do Mileage Adjustment for Hyundai Gensis 2015 With OBDSTAR X300 DP PLUS ?

Steps :
1.Find Hyundai to D7OF3536(2015)

How-to-do-Mileage-Adjustment-for-Hyundai-Gensis-2015-With-OBDSTAR-X300-DP-PLUS-1

How-to-do-Mileage-Adjustment-for-Hyundai-Gensis-2015-With-OBDSTAR-X300-DP-PLUS-2

2.Enter into Kilometer

How-to-do-Mileage-Adjustment-for-Hyundai-Gensis-2015-With-OBDSTAR-X300-DP-PLUS-3

You can see old value 385588 kilometer

How-to-do-Mileage-Adjustment-for-Hyundai-Gensis-2015-With-OBDSTAR-X300-DP-PLUS-4

3.Input a new value 105000

How-to-do-Mileage-Adjustment-for-Hyundai-Gensis-2015-With-OBDSTAR-X300-DP-PLUS-5

4.Finished “Calibration complete”

How-to-do-Mileage-Adjustment-for-Hyundai-Gensis-2015-With-OBDSTAR-X300-DP-PLUS-6

How-to-do-Mileage-Adjustment-for-Hyundai-Gensis-2015-With-OBDSTAR-X300-DP-PLUS-7

OBDSTAR X300 DP Plus is comprehensive Immobilizer+Mileage correction+Diagnosis+Special function (Oil rest +ABS+Battery matching+ECU programming+EPB+Throttle programming+Airbag rest+TPMS+Steering angle rest+OBDII+D-P-F+Injector code+Supension matching+Gear learning+CVT learning+EEPROM+Key renewing+ECU cloning)Adapter(P001 programmer+C001 circuit board+C002 circuit board+W001 data cable+W002 data cable+W003 data cable)+others(Ignition coil+Remote tester)

Powerful scanner for your vehicle, the best choice for you

https://www.carobd.de/wholesale/obdstar-x300-dp-pad2-key-programmer.html

Ford and Mazda IDS Software Update to V129 Free Download

Ford and Mazda diagnostic software IDS was released to V129

ford vcm ii v129 software

Please kindly note:
1. Newest Software Version: IDS Ford V129, Mazda V129
2. Two models available: Ford and Mazda
3. Multi-language: English, Italian, Spanish, Spanish(Mexico), French, French(Canada), German, Dutch, Finish, Danish, Greek, Slovenian, Amer English, Vietnamese language, Turkish, Thai, Swedish, Russian, Portuguese, Portuguese(Brazil), Polish, Norwegian, Korean, Japanese, Indian, Czechic, Chinese(Taiwan), Chinese(China)
4. Update: Via CD
5. Operating System: Windows XP or WINDOWS 7
6. Vehicles Coverage: VCM II provides full dealer diagnostic capabilities for most 16 pin for Fords and Mazda
7. Best Quality, better than J2534 mode interface.
8. VCM II Scan tool can do diagnose, scan, airbag, key programming, ecu programming, PCM programming via OBD2 port

Compatible device:
VXDIAG VCX NANO Ford Mazda USB/WiFi, Ford VCM2 clone with vx manager, other VXDIAG Ford VCI scanners.

NOTE: The free driver and patch are used for vxdiag devices. Free to try it on other devices.

Free Download

Software download link:
Ford IDS V129 Installation package:
https://disk.yandex.com/d/dN2AQzBpQ2zhng

MZD IDS V129 Installation package:
https://disk.yandex.com/d/W13LJjMKxOP9LQ

Ford and Mzd patch:
https://disk.yandex.com/d/721IaUrRmilL9A

How to Install Ford IDS Software?
1. Install Ford IDS-1**
2. Wait for the installation of Ford IDS – 1**, and restart the computer
3. Install the Ford original VCI software_ 1.0.0.10.exe
4. Install VX manager and Ford IDS driver
5. Wait for VX manager and Ford IDS driver installation to complete
6. Connect VCX device and install idspatch
7. Use idspatch to open IDs and start diagnosis.

How to Install Mazda IDS Software?
1. Install mazdaids-1**
2. Wait for mazdaids – 1** installation to complete and restart the computer
3. Install VX manager and Ford IDS driver
4. Wait for VX manager and Ford IDS driver installation to complete
5. Connect VCX device and install idspatch
6. Use idspatch to open IDs and start diagnosis.

NOTE:
For Ford IDS you will need to install VCI driver, Mazda IDS does not.
Don’t install Ford IDS and Mazda IDS software on the same computer.

Solution for Unknow Toolkit COM Server error.(801) of SD C4

Solution for Unknow Toolkit COM Server error.(801) of SD C4

One of my customer who own MB SD C4 and yesterday he got a problem , it shows error as following

mb sd c4 softwar error

But how to solve this issue ?

Here we share solution

Solution: Replace the bin file of C:\Program Files (x86)\Mercedes-Benz\SDconnect Toolkit,

Bin file download link: https://mega.nz/file/udxC0T4I#Cu5bFZ2CaOHiN6x-oVxrrhfnyS2eDXHUGmIl-YC_RO0
Then open “TkAdministration” to upgrade the firmware

solution for sd c4 error

solution for mb sd c4

And then the machine will be in good work


Xhorse VVDI Key Tool Plus can read BMW ISN on bench

Xhorse VVDI Key Tool Plus can read BMW ISN on bench 

Xhorse-VVDI-Key-Tool-Plus-can-read-BMW-ISN-on-bench-3_看图王

Xhorse VVDI Key Tool Plus can read BMW ISN on bench perfectly. Xhorse XDNP30 Bosch ECU Adapter is required.

What is Xhorse XDNP30 Bosch ECU Adapter?
Xhorse XDNP30 Solder-free BOSH ECU Adapter is designed to work with VVDI Key Tool Plus Pad and VVDI Mini Prog to read BMW ECU ISN without opening ECU. The BMW ECU contains MSV80, MSV90, MSD80, MSD81, MSD85, MSD87, N20, N55, B38, B48, B58 and more than 80% F Series type.

Xhorse Bosch ECU Adapter Connection Diagram:
Need 12V Power

Xhorse-VVDI-Key-Tool-Plus-can-read-BMW-ISN-on-bench-2_看图王
Customer feedback:
Read BMW ISN on bench using Key Tool Plus successfully.

Xhorse-VVDI-Key-Tool-Plus-can-read-BMW-ISN-on-bench-3-678x381_看图王

Xhorse-VVDI-Key-Tool-Plus-can-read-BMW-ISN-on-bench-4_看图王

Xhorse-VVDI-Key-Tool-Plus-can-read-BMW-ISN-on-bench-5 (1)_看图王

Xhorse-VVDI-Key-Tool-Plus-can-read-BMW-ISN-on-bench-6_看图王

How to Install KESS V2 V5.017 Manager ECU Tuning Kit Software ?

How to Install KESS V2 V5.017 Manager ECU Tuning Kit Software ?

KESS V2 V5.017 can read and write ECU via OBD2 port directly, no need to disassemble the ECU from the car.
Covering all major brands and protocols including Line, KAN, EDC17 and MED17 and for Ford J1850.
But there have some customers dont know how to install the software , today lets check the instructions as following steps :

Attention : Please remember to disconnect all Internet work before installation
1.Open KSuite 2.23 (E:) and run “ksuite_222_v2” exe

kess v2 2

To complete the setup, click “Next”, “Next” then “Install”

kess v2 software

2.It will pop up a Microsoft Visual C++ 2005 License Terms, click “Yes” to continue

kess v2 software

Select language as “U.S English”

kess v2 software

Click “Next” until “Finish” to complete Ksuite 2.22 setup wizard

kess v2 software

And choose “English”

8

3.Back to KSuite 2.23 (E:) and open “Ksuite 2.23” folder
Right click the “K-Suite” shortcut on desktop to choose “K-Suite Properties”

kess v2 software

Delete all files in “KSuite” folder

kess v2 software

Then copy all files in “Ksuite 2.23” folder to “KSuite” folder
4.Now it will pop up a Found New Hardware Wizard
Click “Next” then “Finish”

kess v2 software

After that the USB Device is exist. (You can right click “My Computer”→ “Manage”→ “Device Manager”)

kess v2 software

Open K-Suite shortcut and now it’s Ksuite 2.23 software

kess v2 software

5.Click “Info” button and check the firmware version is 5.017
Now installation is complete, you can use this new KESS V2 FW 5.017 Ksuite 2.23 for ECU chip tuning

14

How to set Online programming function for Launch X431 Pro5

Launch X431 Pro5 Online Programming Function Setting Steps

First, Connect the computer and the device with a USB cable, and set the USB connection method to “Media device (MTP)” on the device.

launch x431 pro5 online programming settings 1

Secondly,Enter the computer and find the file named “StdCfg.ini.” in the directory (\Lenovo TAB M10 FHD Rel\Internal shared storage\cnlaunch\X431Pro5\assets).

launch x431 pro5 online programming settings 2

launch x431 pro5 online programming settings 3

launch x431 pro5 online programming settings 4

Thirdly,Open and edit “StdCfg.ini” with a text editor, find two fields “OnlineFlash=0” and “Flash=0”, the default value is 0, indicating that the diagnostic software does not support online programming, click the corresponding field, change the value to 1, and save. After the save is successful, the corresponding value will change to 1, as circled in the figure below, indicating that the diagnostic software can support the online programming function.

launch x431 pro5 online programming settings 5

Kindly Note: Except Spain and Portugal do NOT support the online programming, devices in other regions can be setted according to the above method for online programming. The overseas online programming menu will not be displayed on the home page, and you need to enter the corresponding diagnostic software to have the corresponding menu


How to Reset Vident ismart800 Pro Diagnostic Tool

Steps on reset settings for Vident iSmart800 Pro Diagnostic Tool

iSmart800 Pro auto diagnostic scanner is Vident newly launched automotive diagnoistic scanner for 12V passenger vehicles. With user-friendly Android interface and easy navigation, solid-state 72GB hard drive, Cortex-A17 1.3GHz processor, easy communication with cars, 7” 1024×600 HD IPS LCD touch screen, iSmart800 Pro supports all systems ECU diagnosis for 100+ car makes, as well as with 40+ common used service functions.Tablet No Power can check car

Usually, some of our customers delete software or other app in accidently, so they want to reset the machine and use it again.

Here we share steps on this operation

1. Select Settins Firstly on the main screen

vident ismart800 pro

2.Enter settings and find “Reset Settings”

vident ismart800 pro

3.It will appear a message” Press【Reset】button to reset all the settings and then click” Ok” to continue

vident ismart800 pro

4.Back to main screen and click “iSmart”

vident ismart800 pro

5.Click” Update” to finish the process

vident ismart800 pro

How to use foxFlash Manager and foxFlash software

How to use foxFlash Manager and foxFlash software
1.Go to https://www.dfb-technology.com/download.html download foxFlash Manager app

how-to-use-foxflash-software-1

2. install this software on your laptop

how-to-use-foxflash-software-2

3. register this app with your email

how-to-use-foxflash-software-3

how-to-use-foxflash-software-3-1
4. input your code which tie on your device , don’t spead yours sn to internet , or others guy will try to stolen your tools password

how-to-use-foxflash-software-4

how-to-use-foxflash-software-4-1
5. connect your foxflash tool to laptop via usb cable then clicke the download button which in foxFlash app inside

how-to-use-foxflash-software-5

how-to-use-foxflash-software-5-1
After download finish ,pls open the folder C:\Program Files(x86)\FoxFlash Manager\foxflash\DFB Technology\DFBTech_DRIVER
Install the drivers

how-to-use-foxflash-software-5-2

6. disconnect your foxflash tool , then plugin the usb again
7. click the foxflash manager app active button till actived , then run the foxFlash app in your desktop , then input the password at the windows ,click login .

how-to-use-foxflash-software-7

8. Close your software : click the close button on foxFlash Manager app , then click the foxflash exit button , you totally close ours tool and software .

how-to-use-foxflash-software-8

9. notiy , always run foxflash manager app each time when you need use ours tool
Run it then click the active button , it will keep let the tool access ours server .
Download just need do at the frist time you don’t have the software .